Chapter 2. System Configuration with YaST / 2.3. Hardware | ||||
|---|---|---|---|---|
 | 2.2. Software | 2.4. Network Devices |  | |
Chapter 2. System Configuration with YaST / 2.3. Hardware | ||||
|---|---|---|---|---|
| 2.2. Software | 2.4. Network Devices | | |
New hardware must first be installed or connected as specified by the vendor. Turn on external devices, such as the printer or the modem, and start the respective YaST module. Most devices are automatically detected by YaST and the technical data is displayed. If the automatic detection fails, YaST offers a list of devices (model, vendor, etc.) from which to select the suitable device. Consult the documentation enclosed with your hardware for more information.
![[Important]](admon/important.png) | Model Designations |
|---|---|
If your model is not included in the device list, try a model with a similar designation. However, in some cases the model must match exactly, because similar designations do not always indicate compatibility. | |
Within the scope of the installation, all detected CD-ROM drives are
integrated in the installed system by means of entries in the file
/etc/fstab. The respective subdirectories are
created in /media. Use this YaST module to
integrate additional drives in the system.
When the module is started, a list of all detected drives is displayed. Mark your new drive using the check box at the beginning of the line and complete the integration with . The new drive is then integrated in the system.
Detailed information about printing in Linux is available in Chapter 12, Printer Operation, which covers general printing issues. YaST configures the printer automatically or offers configuration dialogs to help set up the printer manually. Then you can print from the command line or configure applications to use the printing system. A detailed description for configuring printers in YaST is provided in Section 12.5.1, “Local Printers”.
Normally YaST configures the hard disk controller of your system during the installation. If you add controllers, integrate these into the system with this YaST module. You can also modify the existing configuration, but this is generally not necessary.
The dialog presents a list of detected hard disk controllers and enables assignment of the suitable kernel module with specific parameters. Use to check if the current settings work before they are saved permanently in the system.
![[Warning]](admon/warning.png) | Configuration of the Hard Disk Controller |
|---|---|
This is an expert tool. Your system may no longer boot if you make incorrect settings. If you make changes, use the test option. | |
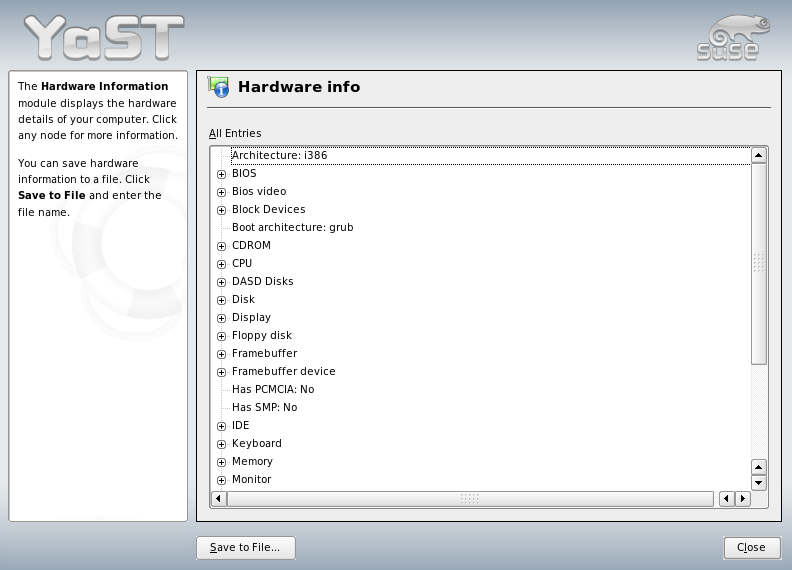
YaST detects hardware for the configuration of hardware components. The detected technical data is displayed in a separate screen. This is especially useful, for example, if you want to submit a support request for which you need information about your hardware.
With this module, activate and deactivate the DMA mode for your IDE hard disks and your IDE CD and DVD drives in the installed system. This module does not have any effect on SCSI devices. DMA modes can substantially increase the performance and data transfer speed in your system.
During the installation, the current SUSE LINUX kernel automatically activates DMA for hard disks but not for CD drives, because default DMA activation for all drives often caused problems with CD drives. Use the DMA module to activate DMA for your drives. If the drive supports the DMA mode without any problems, the data transfer rate of your drive can be increased by activating DMA.
| Important |
|---|---|
DMA (direct memory access) means that your data can be transferred directly to the RAM, bypassing the processor control. | |
If your scanner is connected and switched on, it should be detected automatically when this YaST module is started. In this case, the dialog for the installation of the scanner appears. If no scanner is detected, the manual configuration dialog appears. If you have already installed one or several scanners, a list of existing scanners that can be modified or deleted is displayed. Press to configure a new device.
Next, an installation is performed with default settings. If the installation is successful, a corresponding message appears. Now, test your scanner by inserting a document and clicking .
Only supported scanners can be autodetected. Scanners connected to another network host cannot be detected. The manual configuration distinguishes three types of scanners: USB scanners, SCSI scanners, and network scanners.
Specify the vendor and model. YaST then attempts to load USB modules. If your scanner is very new, the modules may not be loaded automatically. In this case, continue automatically to a dialog in which to load the USB module manually. Refer to the YaST help text for more information.
Specify the device, such as /dev/sg0. SCSI
scanners should not be connected or disconnected when the system
is running. Shut the system down first.
Enter the IP address or the hostname. To configure a network scanner, refer to the Support Database article Scanning in Linux (http://portal.suse.com/sdb/en/index.html, keyword scanner).
If your scanner was not detected, the device probably is not supported. However, sometimes even supported scanners are not detected. If that is the case, proceed with the manual scanner selection. If you can identify your scanner in the list of vendors and models, select it. If not, select . Information about scanners that work with Linux is provided at http://cdb.suse.de/ and http://www.sane-project.org/.
| Assigning a Scanner Manually |
|---|---|
Only assign the scanner manually if you are absolutely sure. Incorrect selection could damage your hardware. | |
Your scanner may not have been detected for one of the following reasons:
The scanner is not supported. Check http://cdb.suse.de/ for a list of Linux-compatible devices.
The SCSI controller was not installed correctly.
There are termination problems with your SCSI port.
The SCSI cable is too long.
The scanner has a SCSI light controller that is not supported by Linux.
The scanner is defective.
| Warning |
|---|---|
SCSI scanners should not be connected or disconnected when the system is running. Shut the system down first. | |
For more information about scanning, refer to the chapter about
kooka in the User Guide.
When the sound configuration tool is started, YaST tries to detect your sound card automatically. Configure one or multiple sound cards. To use multiple sound cards, start by selecting one of the cards to configure. Press to enter the dialog. opens a dialog in which to edit previously configured sound cards. saves the current settings and completes the sound configuration.
If YaST is unable to detect your sound card automatically, press
in to open a dialog in which to select a sound card
and module. Refer to your sound card documentation for the information
required. A reference list of sound cards supported by ALSA with their
corresponding sound modules is available in
/usr/share/doc/packages/alsa/cards.txt and at
http://www.alsa-project.org/~goemon/. After making
your selection, click to return to
.
Choose the configuration level in the first setup screen. With , you are not required to go through any of the further configuration steps and no sound test is performed. The sound card is configured automatically. With , you have the possibility to adjust the output volume and play a test sound. allows you to customize the sound card options manually.
In this dialog, also find a shortcut to the joystick configuration. Click the respective check box. Select the joystick type in the following dialog and click .
Test your sound configuration in this test screen. Use and to adjust the volume. Start at about ten percent to avoid damage to your speakers or hearing. A test sound should be audible when you press . If you cannot hear anything, increase the volume. Press to complete the sound configuration. The volume setting is then saved.
Use to remove a sound card. Existing entries
of configured sound cards are deactivated in the file
/etc/modprobe.d/sound. Click
to open a dialog in which to customize the
sound module options manually. Under , configure additional sound cards. If YaST detects
another sound card, continue to . If YaST does not detect a sound card, automatically
be directed to .
If you use a Creative Soundblaster Live or
AWE sound card, copy SF2 sound fonts to your
hard disk from the original Soundblaster driver CD-ROM with
. The sound fonts are saved in
the directory /usr/share/sfbank/creative/.
For playback of MIDI files, activate . This way, the modules for sequencer support are loaded along with the sound modules.
The volume and configuration of all sound cards installed are saved
when you click . The mixer settings are saved
to the file /etc/asound.conf and the ALSA
configuration data
is appended at the end of the file
/etc/modprobe.conf.
After starting and initializing this YaST module, the dialog appears. If your card was automatically detected, it is displayed at the top of the list. In this case, highlight the line with the mouse and select . If your card was not detected, select . Press to proceed with the manual selection in which to select your card from the list of vendors and models.
If you have already configured TV or radio cards, modify existing configurations with . In this case, a dialog presents a list of all configured cards. Select a card and start the manual configuration with .
During the automatic hardware detection, YaST attempts to assign the correct tuner to your card. If you are not sure, simply keep the setting and check whether it works. If you are not able to set all channels, this might be due to a failure of the automatic detection of the tuner type. In this case, click and highlight the correct tuner type in the list.
If you are familiar with the technical details, you can use the expert dialog to specify settings for a TV or radio card. Select a kernel module and its parameters in this dialog. Also check all parameters of your TV card driver. To do this, select the respective parameters and enter the new value in the parameter line. Confirm the new values with or restore the default values with .
The dialog enables you to connect your TV or radio card with the installed sound card. You must use a cable to connect the output of the TV or radio card with the external audio input of the sound card. This only works if the sound card is already configured and the external input is active. If you have not yet configured your sound card, select to go to the respective dialog, described in Section 2.3.7, “Sound”.
If your TV or radio card has speaker jacks, you can also connect the speakers directly without configuring the sound card. There are also TV cards without any sound function, which do not require an audio configuration, such as those for CCD cameras.