| Chapter 16. Evolution: An E-Mail and Calendar Program |  |
|---|---|---|
| Overview of Evolution | Calendar | |
| | Chapter 16. Evolution: An E-Mail and Calendar Program | |
|---|---|---|
| Overview of Evolution | Calendar | |
To configure the mail settings in Evolution, go to -> . Then activate -> .
Evolution is capable of fetching e-mail from multiple mail accounts. The account from which to send e-mail can be selected when composing a message. To edit a current account, select the account in -> and click . To add a new account, click . The configuration assistant described in Section “Starting Evolution” opens. To delete an account, select it and click .
To make an account the default account for sending e-mail, select the desired account then press . To disable fetching e-mail from an account, select the account then click . A disabled account can still be used as the address for sending, but that account is not checked for incoming e-mail. If necessary, reactivate the account with .
Use to select or disable the quote highlight color or how long after opening a message is marked as read. Also make settings regarding how images in HTML mail messages are handled.
To compose a new message, click -> . Replying to or forwarding a message opens the same message editor. Next to , select from which account to send the message. In the recipient fields, enter an e-mail address or part of a name or address in your address book. If Evolution can match what you enter to something in the address book, a selection list is displayed. Click the desired contact or complete your input if none match. To select directly from the address book, click or .
Evolution can send e-mail as plain text or HTML. To format HTML mail, select in the toolbar. To send attachments, select or -> .
To send your message, click . If not ready to send it immediately, make another selection under . For example, save the message as a draft or send it later.
Evolution supports e-mail encryption with PGP. It can sign e-mail and check signed e-mail messages. To use these features, generate and manage keys with an external application, such as gpg or KGpg.
To sign an e-mail message before sending it, select -> . When you click , a dialog prompts for the password of your secret key. Enter the password and exit the dialog with to send the signed e-mail. To sign other e-mail messages in the course of this session without needing to “unlock” the secret key repeatedly, activate .
When you receive signed e-mail from other users, a small padlock icon appears at the end of the message. If you click this symbol, Evolution starts an external program (gpg) to check the signature. If the signature is valid, a green check mark appears next to the padlock symbol. If the signature is invalid, a broken padlock appears.
The encryption and decryption of e-mail is just as easy. After composing the e-mail message, go to -> and send the e-mail message. When you receive encrypted messages, a dialog opens to ask for the password of your secret key. Enter the passphrase to decrypt the e-mail message.
It is often convenient to sort e-mail messages into a variety of folders. To view your folder tree, select -> . If accessing mail over IMAP, the IMAP folders are also shown in this folder bar. For POP and most other formats, your folders are stored locally, sorted under . Your , , and are also treated as folders in this view, but should not be used for storing e-mail.
Several folders are included by default. is where new messages fetched from a server are initially placed. is used for saving copies of sent e-mail messages. is temporary storage for e-mail that has not yet been sent. It is useful if working offline or if the outgoing mail server is temporarily unreachable. is used for saving unfinished e-mail messages. The folder is intended for temporary storage of deleted items. The folder can be emptied automatically by activating the respective option under -> -> .
New folders can be created under or as subfolders of existing folders. Create as complex a folder hierarchy as desired. To create a new folder while in the view, select -> -> . In the following dialog, enter a name for the new folder. Leave the as for a new mail storage folder. Use the mouse to determine the parent folder under which to place the new folder. Exit the dialog with .
To move a message into a folder, select the message to move. Right-click to open the context menu. Select and, in the dialog that opens, the destination folder. Click to move the message. The message header in the original folder is shown with a line through it, meaning it is marked for deletion in that folder. The message is stored in the new folder. Messages can be copied in a similar manner.
Manually moving a number of messages into different folders can be time-consuming. Filters can be used to automate this procedure.
Evolution offers a number of options for filtering e-mail. Filters can be used to move a message into a specific folder or to delete a message. Messages can also be moved directly to the trash with a filter. There are two options for creating a new filter: creating a filter from scratch or creating a filter based on a message to filter. The latter is extremely useful for filtering messages sent to a mailing list.
Select -> . This dialog lists your existing filters, which can be edited or deleted. Click to create a new filter.
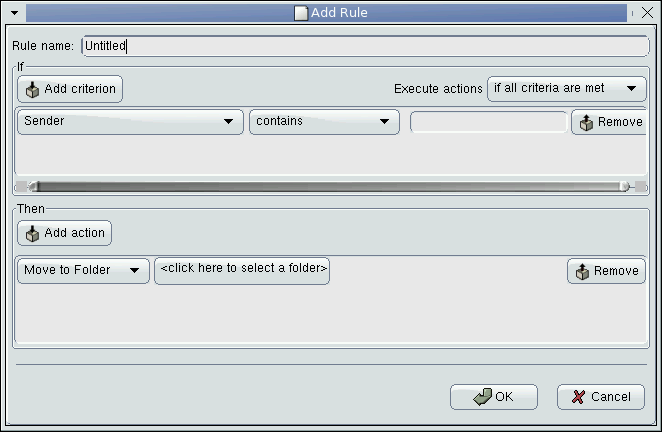
Enter a name for the new filter in . Select the criteria to use for the filter. Options include sender, recipients, source account, subject, date, and status. The drop-box showing provides a variety of options, such as contains, is, and is not. Select the appropriate condition. Enter the text for which to search. Click to add more filter criteria. Use to determine if all or only some of the criteria must be met to apply the filter.
In the lower part of the window, determine the action to take when the filter criteria are met. Messages can, for example, be moved or copied to a folder or assigned a special color. When moving or copying, select the destination folder by clicking. In the folder list that appears, select the folder. Use to create a new folder. Click when the correct folder is selected. When finished creating the filter, click .
Select the message on which to base the filter. Right-click and select . Select the desired filter option. This opens the filter creation dialog with the correct criteria already selected. Add additional criteria if desired. Select the appropriate filter action. Click when finished.
Filters are applied in the order listed in the dialog under -> . Change the order by highlighting a filter and clicking or . Click to close the filter dialog when finished.
Filters are applied to all new mail messages. They are not applied to mail already in your folders. To apply filters to messages already received, select the desired messages then select -> .
VFolders are a unique feature of Evolution. A VFolder is a virtual folder that displays messages based on search or filter criteria. Rather than moving the messages into a folder, messages shown in a virtual folder remain in their original folder. Actions are applied to the message in the original folder.
VFolders are a useful means of reading new mail in one place after it has been sorted into a number of different directories with filters. For example, a VFolder could be created to search all your folders for unread e-mail.
To create a new virtual folder, select -> . In the dialog, click . Like filters, virtual folders can also be created from e-mail messages. Right-click the e-mail message, select , and define the desired criteria.
Enter a . For the new mail example mentioned above, set the criterion to . Set the sources as desired. Other VFolder searches can be set similarly. Click when finished. This returns to the virtual folder list. The order can be changed if desired. Click to close it.
The new VFolder is in the folder list under . You can read, answer, and delete e-mail with the VFolder. However, deleting the message deletes it from the real folder in which it is stored, not just the VFolder.
| |  | |
| Overview of Evolution |  | Calendar |