| SUSE LINUX – User Guide Chapter 4. YaST — Configuration / 4.4. Hardware | ||||
|---|---|---|---|---|
 | 4.3. Software | 4.5. Network Devices |  | |
| SUSE LINUX – User Guide Chapter 4. YaST — Configuration / 4.4. Hardware | ||||
|---|---|---|---|---|
| 4.3. Software | 4.5. Network Devices | | |
New hardware must first be installed or connected as specified by the vendor. Turn on external devices, such as the printer or the modem, and start the respective YaST module. Most devices are automatically detected by YaST and the technical data is displayed. If the automatic detection fails, YaST offers a list of devices (model, vendor, etc.) from which to select the suitable device. Consult the documentation enclosed with your hardware for more information.
![[Important]](admon/important.png) | Important |
|---|---|
If your model is not included in the device list, try a model with a similar designation. However, in some cases the model must match exactly, as similar designations do not always indicate compatibility.
| |
Within the scope of the installation, all detected CD-ROM drives are integrated in the installed system by means of entries in the file /etc/fstab. The respective subdirectories are created in /media. Use this YaST module to integrate additional drives in the system.
When the module is started, a list of all detected drives is displayed. Mark your new drive using the check box at the beginning of the line and complete the integration with . The new drive will be integrated in the system.
A Linux system manages printers through printer queues. Before any data is printed, it is sent to a printer queue for temporary storage. From there, it is retrieved by a print spooler, which sends it to the printer device in the required order.
However, for the most part this data is not available in a form that can be processed by the printer. A graphical image, for instance, first needs to be converted into a format the printer can understand. This conversion into a printer language is achieved with a printer filter, a program called by the print spooler to translate data as needed, so the printer can handle it.
Every normal printer should at least be able to print ASCII text directly. However, there are devices that cannot print ASCII text directly, but are able to handle one of the other standard printer languages mentioned below.
PostScript is the established printer language on Unix and Linux systems. Many programs produce PostScript output that can then be directly printed by a PostScript printer.
If a PostScript printer is not available, the print filter can use the program Ghostscript to convert PostScript data into one of these other standard printer languages. Ghostscript uses different drivers for different printers to make use of specific features, such as color settings, offered by the various models as much as possible.
The user or an application generates a new print job.
The print data is temporarily stored in the print queue. The print spooler sends it from there to the printer filter.
Now the printer filter performs the following steps:
It determines the type of print data.
The print data is converted into PostScript, if not in PostScript already. ASCII text, for example, is normally converted into PostScript by the filter program a2ps.
If necessary, the PostScript data is converted to another printer language.
If the printer is a PostScript model, the PostScript data is sent directly to the printer.
If the printer is not a PostScript model, Ghostscript uses a driver suitable for the respective printer to generate the printer-specific data that is subsequently sent to the printer.
After the entire print job has been sent to the printer, the print spooler removes the print job from the print queue.
SUSE LINUX supports two different printing systems:
This is a traditional printing system that consists of the print spooler LPRng and the printer filter lpdfilter. The entire configuration of this printing system is left to the system administrator. Regular users can only choose between the different print queues that have already been set up. To allow users to choose between different options for a given printer, a number of print queues must be defined, each with a different printer configuration.
In the CUPS printing system, users can determine individual printing settings, as the entire configuration of a queue is not defined by the system administrator. Rather, printer-specific settings are stored in a PPD (PostScript Printer Description) file for each queue and can be offered to users in a print dialog.
Because of conflicts between these two printing systems, you cannot have both installed at the same time. More information about CUPS is available at http://www.cups.org/ and in the Administration Guide.
In most cases, more than one print queue is required. Different printer devices must be addressed through different print queues. The printer filter can be configured differently for each print queue. By having different queues for one printer, it can be operated with a different set of options. However, this is not required when using the CUPS printing system, because CUPS allows users to set options individually for each print job.
One standard configuration is sufficient for plain black-and-white printers, such as most laser printers. However, color ink jet printers usually require at least two configurations (two queues):
A standard lp configuration for quick and inexpensive black-and-white printouts.
A color queue for color printing.
Because most Linux printer drivers are not written by the maker of the hardware, it is crucial that the printer can be driven through one of the generally known languages. Normal printers understand at least one of these common languages. In the case of a GDI printer, however, the manufacturer has built a device that relies on its own special control sequences. Many inexpensive ink jet models belong to this group. Such a printer only runs out of the box under the versions of the operating systems for which the manufacturer has included a driver. As the device cannot be operated through one of the standard languages, it cannot be used with Linux or can only be used with difficulties.
Nevertheless, a number of these printers are supported by SUSE LINUX. However, their use is often rather problematic and some features might not be available at all, for example, the printer could be limited to low resolution monochrome printing. The following list includes the GDI models that can be directly configured with YaST. Because SUSE does not test GDI printers, there is no guarantee that the list is correct.
Brother HL 720/730/820/1020/1040, MFC 4650/6550MC/9050, and compatible models
HP DeskJet 710/712/720/722/820/1000 and compatible models
Lexmark 1000/1020/1100/2030/2050/2070/3200/5000/5700/7000/7200, Z11/42/43/51/52, and compatible models: Linux drivers from Lexmark are available at http://www.lexmark.com/printers/linuxprinters.html.
Oki Okipage 4w/4w+/6w/8w/8wLite/8z/400w and compatible models
Samsung ML-200/210/1000/1010/1020/1200/1210/1220/4500/5080/6040 and compatible models
To our knowledge, the following GDI printers are not supported by SUSE LINUX. This list is by no means complete.
Brother DCP-1000, MP-21C, WL-660
Canon BJC 5000/5100/8000/8500, LBP 460/600/660/800, MultiPASS L6000
Epson AcuLaser C1000, EPL 5500W/5700L/5800L
HP LaserJet 1000/3100/3150
Lexmark Z12/22/23/31/32/33/82, Winwriter 100/150c/200
Minolta PagePro 6L/1100L/18L, Color PagePro L, Magicolor 6100DeskLaser/2DeskLaserPlus/2DeskLaserDuplex
Nec SuperScript 610plus/660/660plus
Oki Okijet 2010
Samsung ML 85G/5050G, QL 85G
Sharp AJ 2100, AL 1000/800/840/F880/121
To set up a printer, go to in the YaST Control Center then select . This opens the main printer configuration window in which the detected devices are listed in the upper part. The lower part lists any queues already configured. If your printer was not detected, restart the autodetection. If it fails again, select to configure the printer manually. Not every printer can be configured for both printing systems. Certain configurations are only supported by either CUPS or LPRng and lpdfilter. YaST informs you about this whenever necessary.
YaST configures the printer automatically if these requirements are met:
The parallel or USB port can be set up automatically in the correct way and the connected printer can be autodetected.
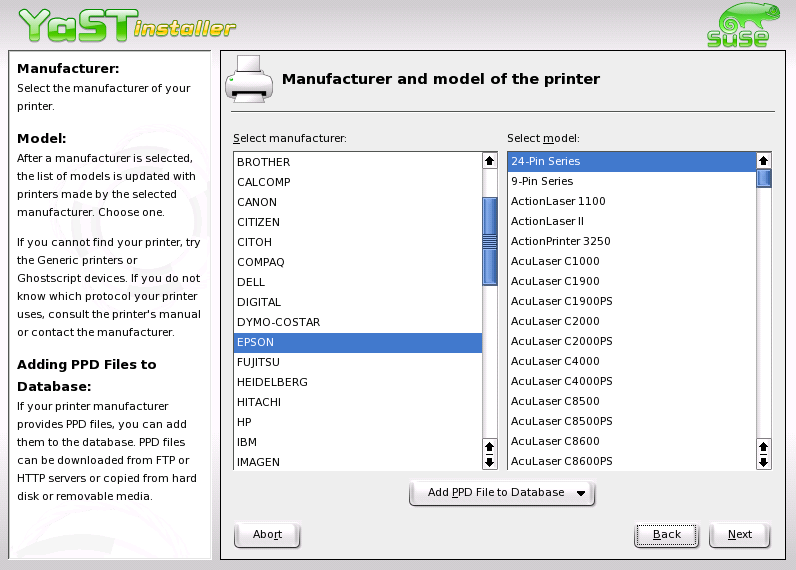
The ID string of the printer, as supplied to YaST during hardware autodetection, is included in the printer database. As this ID may be different from the actual name of the model, you may need to select the model manually.
To make sure everything works properly, each configuration should be checked with the print test function of YaST. The YaST test page also provides important information about the configuration selected.
If one of the requirements for automatic configuration is not met or if you want a custom setup, configure the printer manually. Depending on how successful the autodetection is and how much information about the printer model is found in the database, YaST may be able to determine the right settings automatically or at least make a reasonable preselection.
The following parameters must be configured:
The configuration of the hardware connection depends on whether YaST has been able to find the printer during hardware autodetection.
If YaST is able to detect the printer model automatically, it can be assumed that the printer connection works on the hardware level and no settings need to be changed in this respect.
If YaST is unable to autodetect the printer model, there may be some problem on the hardware level and some manual intervention is required to configure the connection. To learn about the steps involved in this, refer to the Administration Guide.
The queue name is used when issuing print commands. The name should be relatively short and consist of lowercase letters and numbers only.
The Ghostscript driver and the printer language depend on your printer model. YaST lets you select a predefined configuration suitable for the model. Selecting a manufacturer and a model basically means selecting a printer language and a Ghostscript driver suitable for this language with some default settings for the driver. These settings may then be changed in an additional dialog as needed.
For non-PostScript models, all printer-specific data is produced by the Ghostscript driver. The driver configuration — both choosing the right driver and the correct options for it — is the single most important factor determining the output quality. The settings made at this point affect the printout on a queue-by-queue basis.
If your printer was autodetected (using the printer database) or if the model has been selected manually, YaST presents a choice of suitable Ghostscript drivers, usually with a number of predefined configurations for each of them, for instance:
monochrome
color 300 dpi
photo 600 dpi
A predefined configuration includes a suitable Ghostscript driver and, if available, a set of options for the driver related to output quality. Not all selectable combinations of driver settings work with every printer model. This is especially true for higher resolutions.
Always check whether your settings work as expected by printing the test page. If the output is garbled, for example, with several pages almost empty, you should be able to stop the printer by first removing all paper then stopping the print test from YaST. However, in some cases the printer will refuse to resume work if you do so. It may then be better to stop the print test first and wait for the printer to eject all pages by itself.
If the printer model is not listed in the printer database, YaST offers a selection of standard drivers for the standard printer languages.
Use this dialog to access some additional hardware-dependent (driver-specific) and hardware-independent options. If needed, change special queue settings or restrict access to the printer. However, normally there should be no need change anything here. Details about the possible settings are provided in the printing chapter of the Administration Guide.
Applications rely on the existing printer queues in the same way as any command-line tools do. There is usually no need to reconfigure the printer for a particular application and you should be able to print from applications using the available queues.
Print from the command line using the command lpr -Plp filename, where filename is the name of the file to send to the printer. In this example, the default printer queue lp is used, but the -P option allows you to specify another queue. For instance, the command lpr -Pcolor filename tells the printing system to use the color queue.
With this printing system, applications use the lpr command for printing. In the application, select the name of an existing queue (such as color) or enter the respective print command (such as lpr -Pcolor) in the print dialog of the application.
The CUPS printing system provides command-line tools, such as the lpr command, so the approach as described above works with CUPS, too. To enable the above for KDE programs, it is necessary to use the option in the print dialog. There are also several graphical tools, such as xpp and the KDE program kprinter, which provide a graphical interface to choose among queues and to change both CUPS standard options and printer-specific options as made available through the PPD file.
If desired, configure applications to use kprinter as the standard printing interface by specifying kprinter or kprinter --stdin as the printing command in the respective dialogs of these applications. Which of the two commands to use depends on the behavior of the application itself. If this is set up correctly, the application should call the kprinter dialog whenever a print job is issued from it, so you can use kprinter to select the queue and to set other options. This requires that the application's own print setup does not conflict with that of kprinter and that the setup is left unchanged after kprinter has been enabled.
If there is some kind of error in the communication between the computer and the printer, the printer may no longer be able to interpret data correctly. This can cause the output to be garbled and use up large amounts of paper.
To stop the printing, take out all paper or open the paper trays.
As the print job will be removed from the printer queue only after having been sent completely to the printer, it will usually still be there. Even a reboot will not remove it. To delete the print job, use a tool like kprinter. Instructions for managing print jobs from the command line are provided in the Administration Guide.
It is possible that some data is still transmitted to the printer even though the print job has been deleted from the queue. To stop all processes still using the printer device, use the fuser command. For a printer connected to the first parallel port, enter fuser -k /dev/lp0. To achieve the same for a USB printer, enter fuser -k /dev/usb/lp0.
Do a complete reset of the printer by switching it off. Wait a few seconds before putting the paper back into the trays and switching the device back on. The printer should now be ready to accept new jobs.
Details about the Linux printing systems are provided in the printing chapter in the Administration Guide, which should already be installed on your system. To read the manual, start SuSE Help and click Administration Guide. The PDF file is also available in /usr/share/doc/packages/suselinux-reference_en and can be opened with a browser.
If you have problems with your printer, check the Support Database articles Installing a Printer and Printer Configuration with SuSE Linux 9.0 and Later, which you can find by searching for the keyword installation or online at:
http://sdb.suse.de/de/sdb/html/jsmeix_print-einrichten.html
http://sdb.suse.de/de/sdb/html/jsmeix_print-einrichten-82.html
The most important problems are summarized in a central article: http://portal.suse.de/sdb/en/2004/02/bugs91.html
Normally YaST configures the hard disk controller of your system during the installation. If you add controllers, integrate these into the system with this YaST module. You can also modify the existing configuration, but this is generally not necessary.
The dialog presents a list of detected hard disk controllers and enables the assignment of the suitable kernel module with specific parameters. Use to check if the current settings work before they are saved permanently in the system.
![[Warning]](admon/warning.png) | Warning |
|---|---|
This is an expert tool. Do not modify the settings unless you know what you are doing. Your system may no longer boot if you make incorrect settings. In any case, you should make use of the test option. | |
The graphical user interface, or X server, handles the communication between hardware and software. Desktops, like KDE and GNOME, and the wide variety of window managers use the X server for interaction with the user.
The graphical user interface is initially configured during installation. To change the settings afterwards, run this YaST module. In the configuration dialog, choose between and the graphical user interface. The current settings are saved and you can reset to them at any time. The current values are displayed and offered for modification: the screen resolution, the color depth, the refresh rate, and the vendor and type of your monitor, if it was autodetected. If you have just installed a new graphics card, a small dialog appears asking whether to activate 3D acceleration for your graphics card.
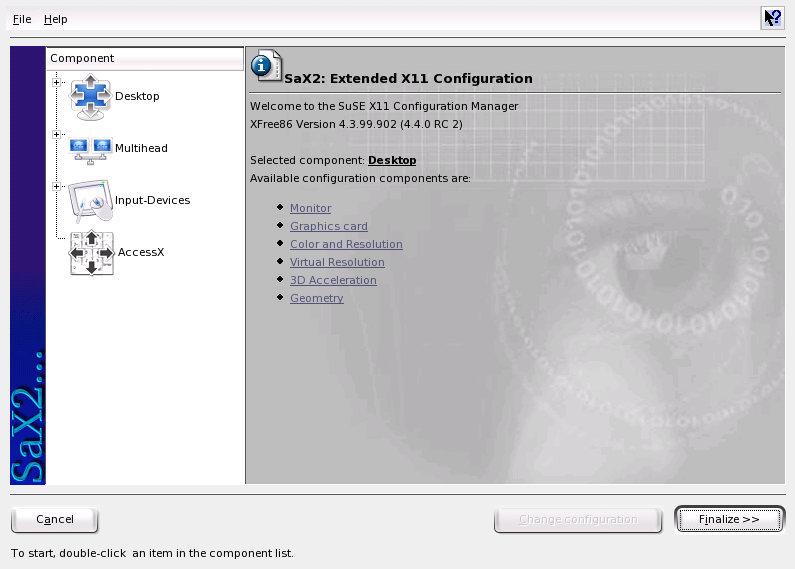
Click . SaX2, the configuration tool for the input and display devices, is started in a separate window. This window is shown in Figure 4.9. “The Main Window of the New SaX2”.
In the left navigation bar, there are four main items: , , , and . Configure your monitor, graphics card, color depth, resolution, and the position and size of the screen under . The keyboard, mouse, touchscreen monitor, and graphics tablet can be configured under . Use to configure multiple screens (see Section 4.4.4.8. “Multihead”). is a useful tool for controlling the mouse pointer with the number pad.
Select your monitor and graphics card. Usually, the monitor and graphics card are autodetected by the system. In this case, no manual settings are required.
If your monitor is not autodetected, you will automatically be taken to the monitor selection dialog. Select your monitor from the extensive list of vendors and devices or manually enter the monitor values specified in the monitor manual. Alternatively, select one of the preconfigured VESA modes.
After you click in the main window following the completion of the settings for your monitor and your graphics card, test your settings. This ensures that your configuration is suitable for your devices. If the image is not steady, terminate the test immediately by pressing Esc and reduce the refresh rate or the resolution and color depth. Regardless of whether you run a test, all modifications are only activated when you restart the X server.
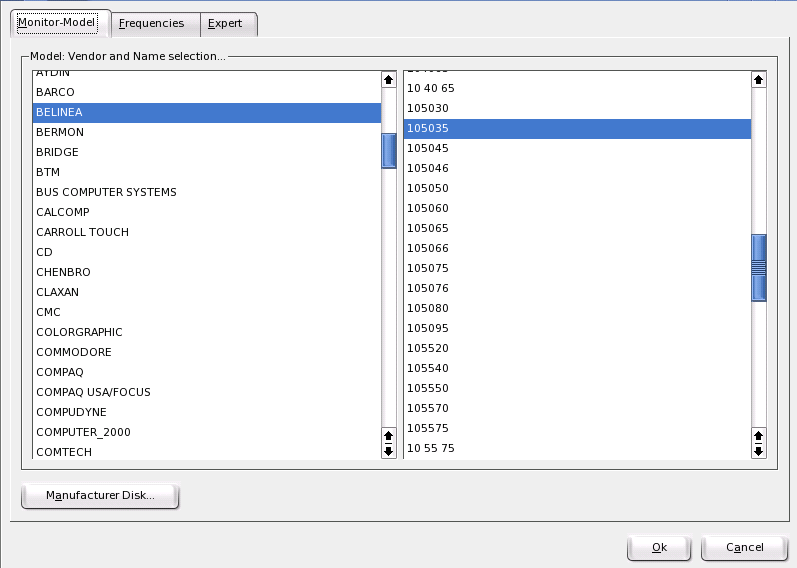
With -> , a window with the tabs , , and appears.
— In the left part of the window, select the vendor. In the right part, select your model. If you have floppy disks with Linux drivers for your monitor, install these by clicking .
— Here, enter the horizontal and vertical frequencies for your screen. The vertical frequency is another designation for the image refresh rate. Normally, the acceptable value ranges are read from the model and entered here. Usually, they do not need to be changed.
— Here, enter some options for your screen. In the upper selection field, define the method to use for the calculation of the screen resolution and screen geometry. Do not change anything unless the monitor is addressed incorrectly and the display is not stable. Furthermore, you can change the size of the displayed image and activate the power saving mode DPMS.
| Warning |
|---|---|
There are safety mechanisms, but you should still be very careful when manually changing the allowed frequencies. False values may destroy your monitor. If in doubt, refer to the manual of the monitor. | |
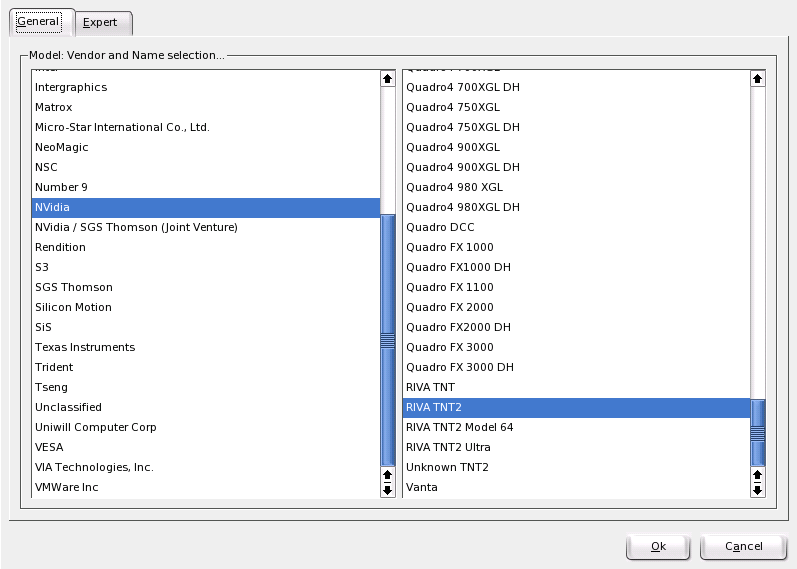
The graphics card dialog has two tabs: and . In , select the vendor of your graphics card on the left side and the model on the right.
offers more advanced configuration possibilities. On the right side, turn your screen to the left or to a vertical position (useful for some turnable TFT screens). The entries for the BusID are only relevant if you operate several screens. Normally, nothing needs to be changed here. You should not modify the card options unless you have experience in this field and know what the options mean. If necessary, check the documentation of your graphics card.
Here, three tabs, , , and , are available.
— Depending on the hardware used, select a color depth of 16, 256, 32768, 65536, or 16.7 million colors (4, 8, 15, 16, or 24 bit). For a reasonable display quality, set at least 256 colors.
— When the hardware is detected, the resolution is queried. Therefore, the module usually only offers resolution and color depth combinations that your hardware can display correctly. This keeps the danger of damaging your hardware with incorrect settings very low in SUSE LINUX. If you change the resolution manually, consult the documentation of your hardware to make sure the value set can be displayed.
— In addition to the resolutions offered in the previous tab, this tab enables you to add your own resolutions, which will subsequently be included for selection in the tab.
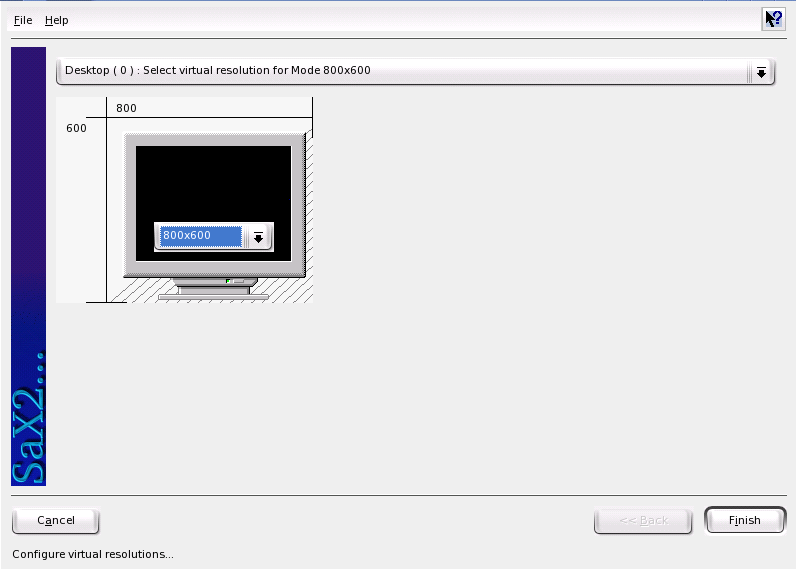
Every desktop has a certain resolution that is displayed over the full screen of the monitor. Additionally, it is possible to set the resolution larger than the visible area of the screen. If you move the mouse beyond the margins of the desktop, the virtual part of the desktop is displayed on screen. This increases the available work space.
The virtual resolution can be set in two different ways:
– Move the mouse pointer over the monitor image and the mouse will turn into crosshairs. Keep the left mouse button pressed and move the mouse to enlarge the raster image, which corresponds with the virtual resolution. This method is best if you are not quite sure how much virtual space you want on your desktop.
— In the pop-up menu in the middle of the raster image, the currently used virtual resolution is displayed. To use one of the default virtual resolutions, select one from the menu.
Optionally, activate the 3D acceleration of your graphics card. A dialog is displayed in which to activate the 3D properties of your graphics card.
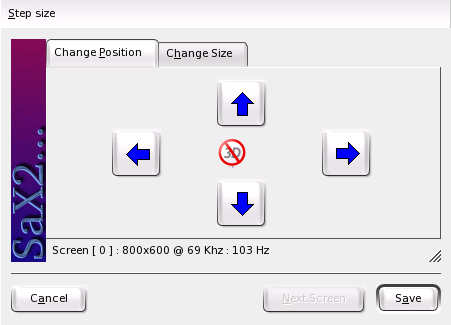
Under these two tabs, precisely adjust the size and the position of the image with the arrows. See Figure 4.14. “Adjusting the Image Geometry”. If you have a multihead environment (more than one screen), use to switch to the other monitors to adjust their size and position. Press to save your settings.
If you have installed more than one graphics card in your computer or a graphics card with multiple outputs, you can connect more than one screen to your system. If you operate two screens, this is referred to as dualhead. More than two is referred to as multihead. SaX2 automatically detects multiple graphics cards in the system and prepares the configuration accordingly. Set the multihead mode and the arrangement of the screens in the multihead dialog. Three modes are offered: (default), , and .
— Each monitor represents an individual unit. The mouse pointer can switch between the screens.
— In this mode, all monitors display the same contents. The mouse is only visible on the main screen.
— All screens combine to form a single large screen. Program windows can be positioned freely on all screens or scaled to a size that fills more than one monitor.
The layout of a multihead environment describes the arrangement of and the relationship between the individual screens. By default, SaX2 configures a standard layout that follows the sequence of the detected graphics cards, arranging all screens in a row from left to right. In the dialog of the multihead tool, determine the way the monitors are arranged by using the mouse to move the screen symbols in the grid. After you have completing the layout dialog, verify the new configuration by clicking .
Linux currently does not offer 3D support for Xinerama multihead environments. In this case, SaX2 deactivates the 3D support.
If the mouse already works, you do not need to do anything. However, if the mouse does not work, control it with the number pad of the keyboard as described in Section 4.4.4.10. “AccessX”.
If the automatic detection fails, use this dialog to configure your mouse manually. Refer to the documentation of your mouse for a description of the model. Select your model from the list of supported mouse types and confirm by pressing 5 on the number pad.
Use the selection field at the top of this dialog to specify the kind of keyboard to use. Then select the language for the keyboard layout (the country-specific position of the keys). Use the test field to check if special characters are displayed correctly.
The status of the check box used for activating and deactivating the entry of accented letters depends on the respective language and does not need to be changed. Click to apply the new settings to your system.
Currently, XFree86 only supports Microtouch and Elo TouchSystems touchscreens. SaX2 can only autodetect the monitor, not the toucher. The toucher is treated as an input device.
To configure the toucher, start SaX2 and select -> . Click and add a touchscreen. Save the configuration by clicking . You do not need to test the configuration.
Touchscreens feature a variety of options and usually must be calibrated first. Unfortunately, there is no general tool for this purpose in Linux. The standard configuration contains suitable default values for the dimensions of the touchscreen. Normally, no additional configuration is required.
Currently, XFree86 only supports a limited number of graphics tablets. SaX2 enables the configuration of graphics tablets connected to the USB port or the serial port. From the configuration perspective, a graphics tablet is just an input device like a mouse.
Start SaX2 and select -> . Click , select the vendor from the following dialog, and add a graphics tablet from the selection list. Mark the check boxes to the right if you have connected a pen or eraser. If your tablet is connected to the serial port, verify the port. /dev/ttyS0 refers to the first serial port. /dev/ttyS1 refers to the second. Additional ports use similar notation. Save the configuration by clicking .
If you do not use a mouse on your computer, start SaX2 and activate AccessX to be able to control the mouse pointer with the keys on the numeric keypad. (See Table 4.1. “AccessX — Operating the Mouse with the Numeric Keypad”).
Table 4.1. AccessX — Operating the Mouse with the Numeric Keypad
| Key | description |
|---|---|
| ÷ | selects the left mouse button |
| × | selects the middle mouse button |
| – | selects the right mouse button |
| 5 | invokes a click event of the previously selected mouse button. The left mouse button is preset if no other button was selected.The selection is reset to its default after the event. |
| + | acts like 5 except is a double-click event |
| 0 | acts like 5 except is a click-and-hold event |
| Del | releases the click-and-hold event previously invoked with 0 |
| 7 | moves the cursor toward the upper left |
| 8 | moves the cursor straight upwards |
| 9 | moves the cursor towards the upper right |
| 4 | moves the cursor towards the left |
| 6 | moves the cursor towards the right |
| 1 | moves the cursor towards the lower left |
| 2 | moves the cursor straight downwards |
| 3 | moves the cursor towards the lower right |
With the slider, set the speed of the mouse pointer movement when a key is pressed.
YaST detects hardware for the configuration of hardware components. The detected technical data is displayed in this screen. This is especially useful, for example, if you want to submit a support request for which you need information about your hardware.
With this module, activate and deactivate the DMA mode for your IDE hard disks and your IDE CD and DVD drives in the installed system. This module does not have any effect on SCSI devices. DMA modes can substantially increase the performance and data transfer speed in your system.
During the installation, the current SUSE LINUX kernel automatically activates DMA for hard disks but not for CD drives, as default DMA activation for all drives often caused problems with CD drives. Use the DMA module if you want to activate DMA for your drives. If the drive supports the DMA mode without any problems, the data transfer rate of your drive can be increased by activating DMA.
| Important |
|---|---|
DMA (Direct Memory Access) means that your data can be transferred directly to the RAM, bypassing the processor control. | |
Use this module to configure your joystick by selecting the manufacturer and the model from the displayed list. With , check if your joystick responds correctly. The test dialog shows three charts for the analog axes of the joystick and marks for the four standard buttons. When you move the joystick or press the buttons, you should be able to see a reaction in the test dialog. As joysticks are usually connected to the sound card, you can also access this module from the sound card configuration.
Configure your mouse with this YaST module. As the procedure for the selection of the mouse was already explained within the scope of the user-defined installation, refer to Section 2.5.3. “Mouse”.
If your scanner is connected and switched on, it should be detected automatically when this YaST module is started. In this case, the dialog for the installation of the scanner appears. If no scanner is detected, the manual configuration dialog appears. If you have already installed one or several scanners, a list of existing scanners that can be modified or deleted is displayed. Press to configure a new device.
Next, an installation is performed with default settings. If the installation is successful, a corresponding message will appear. Now, test your scanner by inserting a document and clicking .
Only supported scanners can be autodetected. Scanners connected to another network host will not be detected. The manual configuration distinguishes three types of scanners: USB scanners, SCSI scanners, and network scanners.
USB scanner: Specify the vendor and model. YaST then attempts to load USB modules. If your scanner is very new, the modules may not be loaded automatically. In this case, continue automatically to a dialog in which to load the USB module manually. Refer to the YaST help text for more information.
SCSI scanner: Specify the device (such as /dev/sg0). SCSI scanners should not be connected or disconnected when the the system is running. Shut the system down first.
Network scanner: Enter the IP address or the host name.
You can use a scanner that is connected to a host in your network and configured as a network scanner. To configure a network scanner, refer to the Support Database article Scanning in Linux (http://sdb.suse.de/en/, keyword scanner). When selecting a network scanner, enter the host name or the IP address of the host to which the scanner is connected.
If your scanner was not detected, the device probably is not supported. However, sometimes even supported scanners are not detected. If that is the case, proceed with the manual scanner selection. If you can identify your scanner in the list of vendors and models, select it. If not, select . Information about scanners that work with Linux is provided at http://cdb.suse.de/index.php?LANG=en, http://sdb.suse.de/en/, and http://www.mostang.com/sane.
| Warning |
|---|---|
Only assign the scanner manually if you are absolutely sure. Incorrect selection could damage your hardware. | |
Your scanner may not have been detected for one of the following reasons:
The scanner is not supported. Check http://sdb.suse.de/en/ for a list of Linux-compatible devices.
Your SCSI controller was not installed correctly.
There are termination problems with your SCSI port.
Your SCSI cable is too long.
Your scanner has a SCSI Light Controller that is not supported by Linux.
Your scanner is defective.
| Warning |
|---|---|
SCSI scanners should not be connected or disconnected when the the system is running. Shut the system down first. | |
For more information about scanning, refer to Chapter 23. Kooka — A Scanning Application.
When the sound configuration tool is started, YaST tries to detect your sound card automatically. Configure one or multiple sound cards. To use multiple sound cards, start by selecting one of the cards to configure. Press to enter the dialog. opens a dialog in which to edit previously configured sound cards. saves the current settings and completes the sound configuration. If YaST is unable to detect your sound card automatically, press in to open a dialog in which to select a sound card and module.
With , you are not required to go through any of the further configuration steps and no sound test is performed. The sound card is configured automatically. With , you have the possibility to adjust the output volume and play a test sound. With , manually customize the sound card options.
Set up your joystick by clicking the respective check box. Select the joystick type in the following dialog and click . The same dialog appears when you click in the YaST Control Center.
Test your sound configuration in this test screen. Use and to adjust the volume. Start at about ten percent to avoid damage to your speakers or hearing. A test sound should be audible when you press . If you cannot hear anything, increase the volume. Press to complete the sound configuration. The volume setting will be saved.
Use to remove a sound card. Existing entries of configured sound cards are deactivated in the file /etc/modules.conf. Click to open a dialog in which to customize the sound module options manually. In , configure the individual settings for the input and output of each sound card. saves the new values and restores the default configuration. Under , configure additional sound cards. If YaST detects another sound card, continue to . If YaST does not detect a sound card, automatically be directed to .
If you use a Creative Soundblaster Live or AWE sound card, automatically copy SF2 sound fonts to your hard disk from the original Soundblaster driver CD-ROM with . The sound fonts will be saved in the directory /usr/share/sfbank/creative/.
Enable or disable the start-up of ALSA when booting the machine with . For playback of MIDI files, activate . This way, the sound modules required for sequencer support are loaded along with the ALSA modules.
The volume and configuration of all sound cards installed will be saved when you click . The mixer settings are saved to the file /etc/asound.conf and the ALSA configuration data is appended at the end of the file /etc/modules.conf.
If multiple sound cards were detected, select your preferred card under . Continue to with . If the sound card was not automatically detected, click and, with , proceed to .
If your sound card was not automatically detected, a list of sound card drivers and models are shown from which to choose. With , see the entire list of supported cards.
Refer to your sound card documentation for the information required. A reference list of sound cards supported by ALSA with their corresponding sound modules is available in /usr/share/doc/packages/alsa/cards.txt and at http://www.alsa-project.org/~goemon/. After making your selection, click to return to .
After starting and initializing this YaST module, the dialog appears. If your card was automatically detected, it is displayed at the top of the list. In this case, highlight the line with the mouse and select . If your card was not detected, select . Press to proceed with the manual selection in which to select your card from the list of vendors and models.
If you have already configured TV or radio cards, modify existing configurations with . In this case, a dialog presents a list of all configured cards. Select a card and start the manual configuration with .
During the automatic hardware detection, YaST attempts to assign the correct tuner to your card. If you are not sure, simply keep the setting and check whether it works. If you are not able to set all channels, this might be due to a failure of the automatic detection of the tuner type. In this case, click and highlight the correct tuner type in the list.
If you are familiar with the technical details, you can use the expert dialog to specify settings for a TV or radio card. Select a kernel module and its parameters in this dialog. Also check all parameters of your TV card driver. To do this, select the respective parameters and enter the new value in the parameter line. Confirm the new values with or restore the default values with .
The dialog enables you to connect your TV or radio card with the installed sound card. You must use a cable to connect the output of the TV or radio card with the external audio input of the sound card. This only works if the sound card is already configured and the external input is active. If you have not yet configured your sound card, select to go to the respective dialog, described in Section 4.4.10. “Sound”.
If your TV or radio card has speaker jacks, you can also connect the speakers directly without configuring the sound card. There are also TV cards without any sound function, which do not require an audio configuration (e.g., for CCD cameras).