| SUSE LINUX – User Guide Chapter 2. Custom Installation / 2.6. Finishing the Installation | ||||
|---|---|---|---|---|
 | 2.5. Installation Suggestion | 2.7. Hardware Configuration |  | |
| SUSE LINUX – User Guide Chapter 2. Custom Installation / 2.6. Finishing the Installation | ||||
|---|---|---|---|---|
| 2.5. Installation Suggestion | 2.7. Hardware Configuration | | |
After completing the basic system setup and the installation of all selected software packages, provide a password for the account of the system administrator (the root user). Then configure your Internet access and network connection, if available. With a working Internet connection, it is possible to update the system with security patches and software updates during installation. If desired, configure a name server for centralized user administration in a local network. Also configure any hardware devices, such as printers and scanners.
root is the name of the superuser, the administrator of the system. Unlike regular users, which may or may not have permission to do certain things on the system, root has unlimited power to do anything: change the system configuration, install programs, and set up new hardware. If users forget their passwords or have other problems with the system, root can help. The root account should only be used for system administration, maintenance, and repair. Logging in as root for daily work is rather risky: a single mistake could lead to many system files being irretrievably lost.
Figure 2.13. “Setting the root Password” shows the relevant dialog. For verification purposes, the password for root must be entered twice. Do not forget the root password. It cannot be retrieved later.
![[Warning]](admon/warning.png) | Warning |
|---|---|
The user root has all the permissions needed to make changes to the system. To carry out such tasks, the root password is required. You cannot carry out any administrative tasks without this password. | |
In this step, configure network devices for a connection to the outside world. If you have these devices, such as network cards, modems, and ISDN or DSL hardware, it is a good idea to configure them now. An Internet connection allows YaST to retrieve any available SUSE LINUX updates.
To configure your network hardware here, refer to the relevant parts of Section 4.5. “Network Devices”. Otherwise choose to and confirm this with . The network hardware can also be configured after system installation has completed.
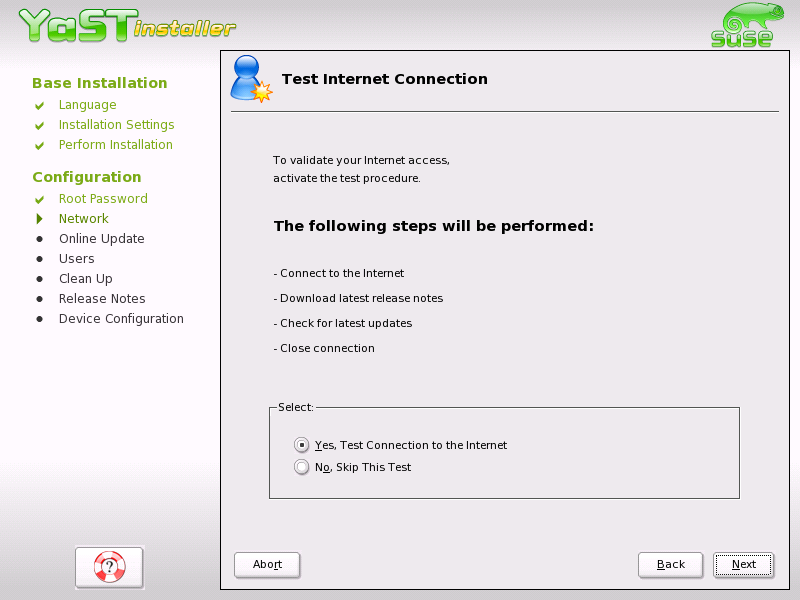
If you configured an Internet connection, you can test it right now. For this purpose, YaST establishes a connection to the SUSE server and checks if any product updates are available for your version of SUSE LINUX. Also, the latest release notes are downloaded. Any available updates can be installed in the next step.
If you do not want to test the connection at this point, select then . This also skips downloading product updates and release notes.
If YaST was able to connect to the SUSE servers, select whether to perform a YaST online update. If there are any patched packages available on the servers, you can download and install them now to fix known bugs or security issues.
![[Important]](admon/important.png) | Important |
|---|---|
The download of updates might take quite some time, depending on the bandwidth of the Internet connection and on the size of the update files. | |
To perform a software update immediately, select and click . This opens YaST's online update dialog with a list of the available patches (if any), which can be selected and loaded. To learn about the process, read Section 4.3.2. “YaST Online Update”. This kind of update can be performed at any time after the installation. If you prefer not to update now, select then click .
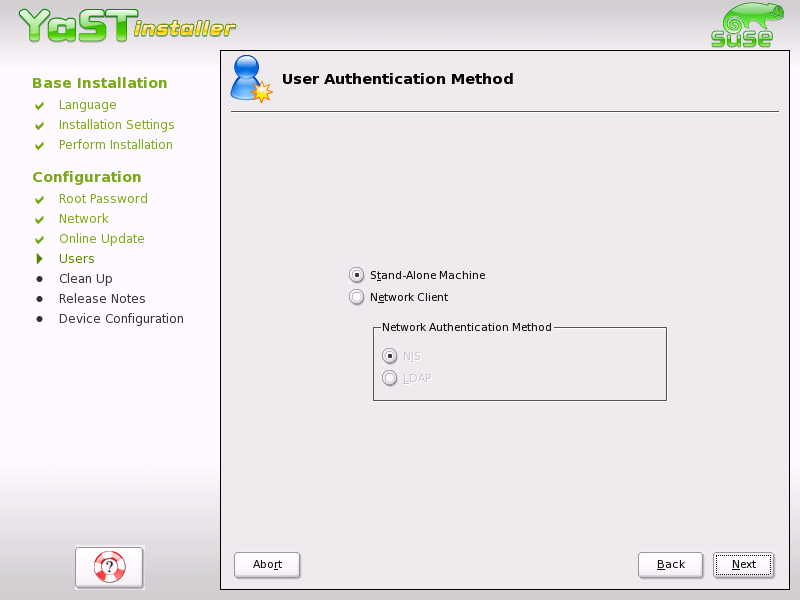
If the network access been configured successfully during the previous steps of the installation, you now have two different possibilities for managing user accounts on your system.
Using this method, users are managed locally — on the installed machine. This is the typical solution for stand-alone workstations.
This method is mostly used in organizations to manage workstations on a department-wide basis. The user administration for the entire department is carried out on a central host or name server, making the creation of local accounts unnecessary. In fact, the method could be chosen because local accounts are undesirable.
If all requirements are met, YaST opens a dialog in which to select the user administration method. It is shown in Figure 2.16. “User Authentication”. If you do not have the necessary network connection, create local user accounts.
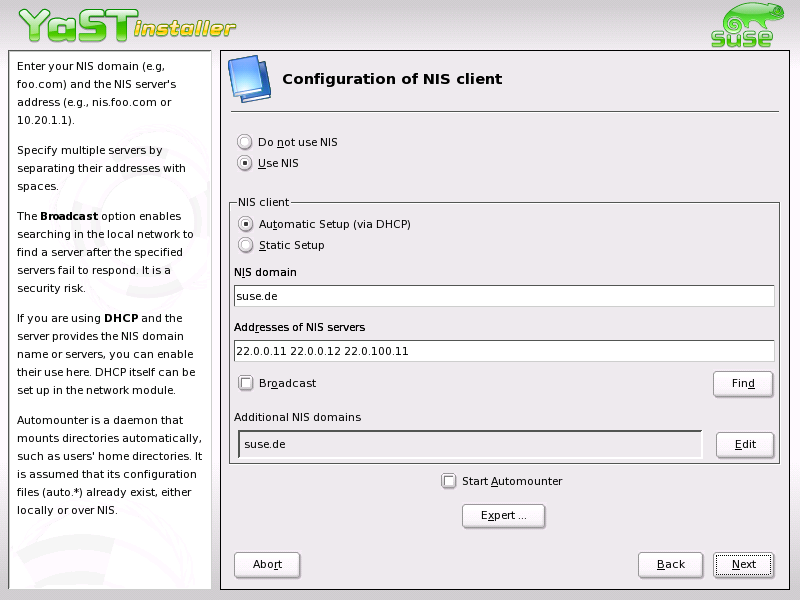
If you have decided to manage user accounts through NIS, configure the host as a NIS client. A NIS-enabled network requires some expert knowledge. The details of NIS are explained in the Administration Guide. The following only explains the basic setup of the client side.
In the following dialog, shown in Figure 2.17. “NIS Client Configuration”, first select whether the host has a fixed IP address or gets one via DHCP. DHCP also provides the NIS domain and the NIS server. For information about DHCP, see the Administration Guide. If a static IP address is used, specify the NIS domain and the NIS server manually.
To search for NIS servers broadcasting in the network, check the relevant option. You can also specify several NIS domains and set a default domain. For each domain, select to specify several server addresses or enable the broadcast function on a per-domain basis.
In the expert settings, use to prevent other network hosts from being able query which server your client is using. If you activate , responses from servers on unprivileged ports are also accepted. For more information, refer to the man page of ypbind.
When user accounts are created locally, any data related to user accounts (name, login, password, and so on) is stored and managed on this host. Linux is an operating system that allows several users to work on the same system at the same time. Each user needs a user account to log in to the system. By having user accounts, the system gains a lot in terms of security. Regular users cannot change or delete files needed for the system to work properly. Similarly, the personal data of a given user cannot be modified, viewed, or tampered with by other users. Each user can set up his own working environment and always find it unchanged when logging back in.
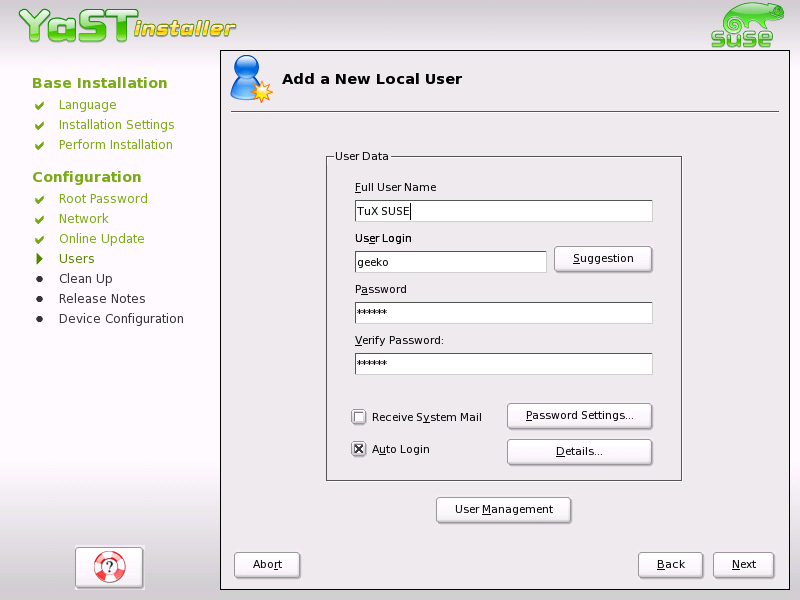
A user account can be created using the dialog shown in Figure 2.18. “Entering the User Name and Password”. After entering the first name and last name, specify the user name (login). If you cannot think of a suitable user name, click for the system to generate one automatically.
Finally, enter a password for the user. Reenter it for confirmation (to ensure that you did not type something else by mistake). The user name tells the system who a user is and the password is used to verify this identity.
| Warning |
|---|---|
Remember both your user name and the password because they are needed each time you log in to the system. | |
To provide effective security, a password should be between five and eight characters long. The maximum length for a password is 128 characters. However, if no special security modules are loaded, only the first eight characters are used to discern the password. Passwords are case-sensitive. Special characters like umlauts are not allowed. Other special characters (7-bit ASCII) and the digits 0 to 9 are allowed.
Two options are available for local users:
Checking this box sends the user messages created by the system services. These are usually only sent to root, the system administrator. This option is useful for the prominently-used user account, because it is highly recommended to log in as root only in special cases.
This option is only available if KDE is used as the default desktop. It automatically logs the current user into the system when it starts. This is mainly useful if the computer is operated by only one user.
| Important |
|---|---|
No authentication is performed during system start-up with automatic login. Do not check this option for systems containing sensitive data or to which other people have access. | |
After completing the user authentication setup, YaST displays the release notes. They contain important up-to-date information not available when the manuals were printed. If you have installed update packages, the most recent version of the release notes is available.