| Working with The GIMP | ||
|---|---|---|
 | Chapter 23. Graphics with The GIMP |  |
| Using The GIMP | Introduction to Image Manipulation | |
| Working with The GIMP | ||
|---|---|---|
| | Chapter 23. Graphics with The GIMP | |
| Using The GIMP | Introduction to Image Manipulation | |
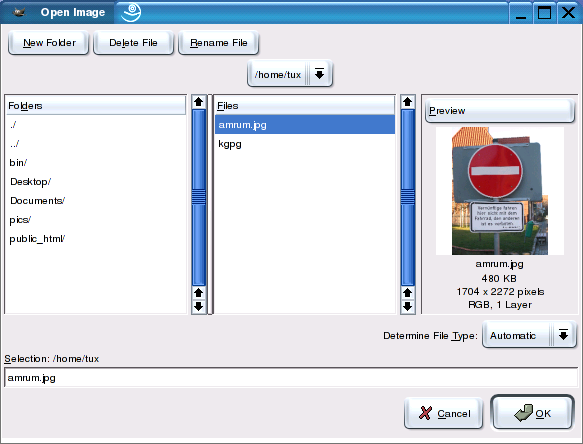
To edit an image that is saved on your hard disk GIMP, click -> or press Ctrl + O to open the GIMP file manager dialog, shown in Figure 23.2: “Load Images”).
On the left-hand side, change to a different directory by double-clicking. On the right-hand side, the files are listed. The file list is sorted alphabetically. Individual sorting by file type or date is not possible. A handy feature is the small integrated preview window. If GIMP recognizes the file format, see a thumbnail picture of the currently selected file. Double-click the file name or click to open the image.
For convenience, GIMP works with each image in a separate image window completely independent from the window containing the tool icons. Move the image window around on your screen and, if needed, change its size and zoom settings independently.
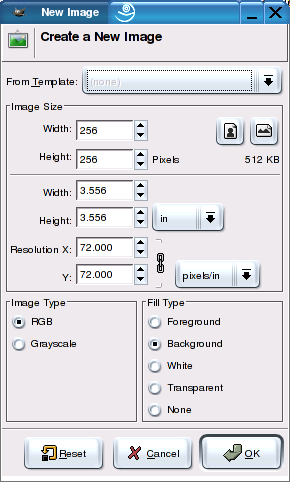
To create a new image, select -> (Ctrl + N). A dialog box opens, enabling specification of several image attributes (see Figure 23.3: “Creating a New Image”). The most important ones are width and height, usually represented in pixels, image type, and fill type. In , select the type of fill to use in the new image: the current foreground or background color, white, or transparent. By default, transparent areas are rendered with a gray checkerboard pattern.
Save with the mouse or Ctrl + S. When using the mouse, right-click inside the image to open the context menu of the image. To save your image, activate -> . If you have already assigned a name to the image, it is saved under that name. If not, GIMP file manager opens and lets you specify the required file name and path. With , specify which image format GIMP should use for saving. Use a correct file extension. In theory, it is no problem to save a GIF file with a .TIF extension. If the file type is set to , GIMP saves in the file type identified by the file extension in the file name.
GIMP provides some simple setting options for fast and efficient work. Explore -> to see the range of options available. Once you are more familiar with GIMP, experiment with the various settings. Refer to the internal help system for advice.
An important setting is the multilevel function, which allows you to undo recent actions. To use it, select -> in the context menu or press Ctrl + Z. Under -> -> , set the number of undo steps.
Many functions or tool settings have their own windows that you can open and close as needed. On a larger screen, leave frequently needed dialog windows open without any problem.
Tear-off menus are another feature of GIMP. Whenever a menu shows a dotted line on top, click this line, detaching the menu from the larger context menu. The menu is then displayed on your desktop in its own window.
Layers are crucial to using GIMP effectively. They allow you to arrange image contents and more easily edit and modify your image. To store layer information when saving a file, save in GIMP's native format, .XCF. As well as preserving layer information, it also saves GIMP features, such as the location of guides.
To understand how layers work, imagine an image created from a stack of transparent sheets. Different parts of the image are drawn on different sheets. The stack can be rearranged, changing which pieces are on top. Individual layers or groups of layers can shift position, moving sections of the image to other locations. New sheets can be added and others set aside. This is very much how the layers work in GIMP.
By drawing parts of your image on separate layers, manipulate, change, or delete those parts without damaging the other parts of the image. Using separate layers for text is the most common usage, but the possibilities are much more extensive.
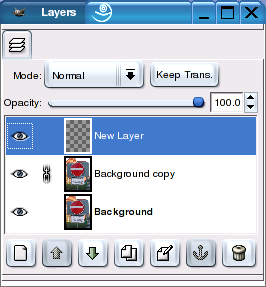
GIMP includes a layer manager. Access it via -> in the context menu then under the tab in the dialog that opens (see Figure 23.4: “Layers, Channels, and Paths Dialog”). Here, create, copy, and delete layers or anchor a layer in the background image. Use the eye icon in the layer manager to make layers invisible without losing their information. The icon with four arrows indicates linked layers. Layers showing this icon are moved as a group.
Under the tab, view the three color channels — red, green, and blue — individually or in any combination. The tab provides information about paths that have been drawn with the Bezier selection tool.
GIMP has three basic image modes — RGB, grayscale, and indexed. RGB is the main color mode usually used in GIMP. Grayscale is for black, white, and gray images. Indexed is used almost exclusively for converting images to the GIF file format. There are a few things to remember when working with image modes:
Only RGB mode has all the filters available. Most, however, are available in grayscale mode. To run filters on an indexed image, convert to RGB first.
Convert to indexed only right before saving to image formats that require it, such as GIF. Never work with an image in indexed mode.
Regardless of any color used on a grayscale image, the color is desaturated and applied in a shade of gray.
Study the internal help system for more information about image modes.
| |  | |
| Using The GIMP |  | Introduction to Image Manipulation |