| Configuration | ||
|---|---|---|
 | Chapter 17. ISDN Telecommunication |  |
| Chapter 17. ISDN Telecommunication | Usage | |
| Configuration | ||
|---|---|---|
| | Chapter 17. ISDN Telecommunication | |
| Chapter 17. ISDN Telecommunication | Usage | |
CapiSuite makes use of the CAPI programming interface for ISDN hardware. Since this interface has only been available for Linux for a short time, suitable drivers are not yet available for all ISDN adapters. However, drivers are already available for ISDN adapters from AVM and can easily be installed and configured with YaST. Refer to the chapter on the ISDN configuration and the help texts of the respective YaST module for more information.
The functionality of the CAPI driver can easily be tested by executing the command capiinfo as the user root. If detailed information about the capabilities of the ISDN adapter is returned, the driver is installed correctly and CapiSuite can be installed and used.
Here you can also see if the CAPI driver you use supports fax operation. This is the case if the “T.30” protocol is listed in the sections “B1 protocols support” to “B3 protocols support” . If this is not the case, you will merely be able to use CapiSuite for receiving voice calls.
The CapiSuite package must be installed with the YaST software installation module to be able to configure CapiSuite. More information on installing software is provided in the respective section of the YaST chapter.
Following the installation, YaST contains two modules for configuring the fax and answering machine functionality. These modules are described below.
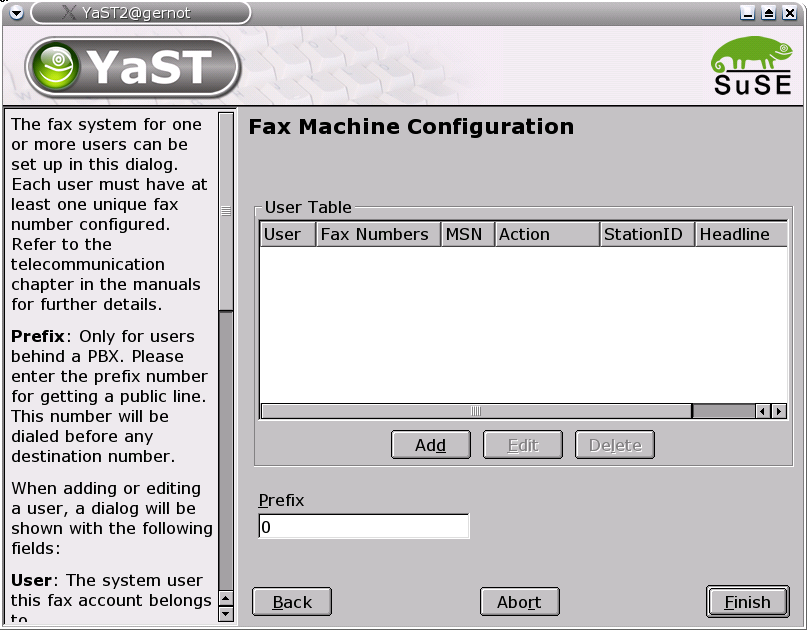
The YaST module from the group contains a form with a user list and buttons for the processing of list entries. The list contains all the users already configured for the fax system. The CapiSuite scripts used here are multiuser-capable and allow each user to send and receive faxes individually. The target number of an incoming call determines which user receives the fax. The list of this module is, of course, empty when it is started for the first time.
The input field under the list can be used to enter any numbers needed for connecting to an external line. If your ISDN adapter is connected to an phone exchange, you can enter the prefix (usually 0) for external calls here.
If various users want to receive faxes with CapiSuite, it must be ensured that the associated phone numbers are all different and that all these numbers are also associated with the line to which the ISDN adapter is connected. This is of importance if you concurrently use an ISDN PBX.
Use only the answering machine module if you intend to receive both fax messages and regular calls under one number, as this module includes the functionality for recognizing and receiving fax messages. See Section “Configuring the Answering Machine”. In order to be able to send fax messages, configure a suitable entry in the fax module, but leave the field for incoming phone numbers (see further below) void.
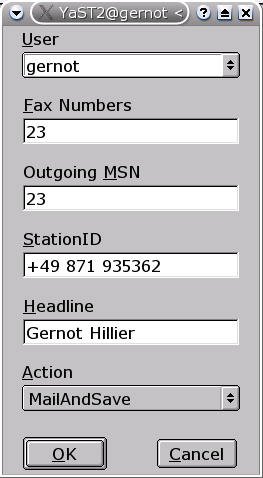
Existing entries can be edited or deleted and new entries can be created by means of the buttons under the list. To create a new entry or edit an existing entry, use the dialog box to enter the following data:
Here you can select the system user for whom you want to activate the fax functionality. Incoming fax messages and status reports will be sent to this user account.
Phone numbers allocated to the user for incoming fax messages are entered in this field. Multiple phone numbers can be separated by commas. All faxes sent to these numbers will be forwarded to the user by e-mail. Leave this field empty if you only want the user to be able to send fax messages.
Enter the phone number used for sending fax messages. If this entry is missing, the first phone number from the fax numbers field will automatically be used.
For identification purposes, the fax protocol uses a special ID that should normally contain the external phone number of the fax device in international notation. An example for a valid station ID is +49 89 123456 for the fax number 123456 in Munich, Germany. The maximum length of this entry is twenty digits. Valid characters are numbers, spaces, and the + symbol as prefix to the international country code.
This field can contain an arbitrary text to use as a header for sent faxes. Whether and how this text is featured on the sent document depends on the respective ISDN driver.
The default setting MailAndSave causes a received fax message to be saved in the system and forwarded to the user by e-mail. The SaveOnly option merely causes the fax to be saved to the hard disk. This option is recommended for expert users only.
Click to accept the changes. Click to drop the changes and close the form.
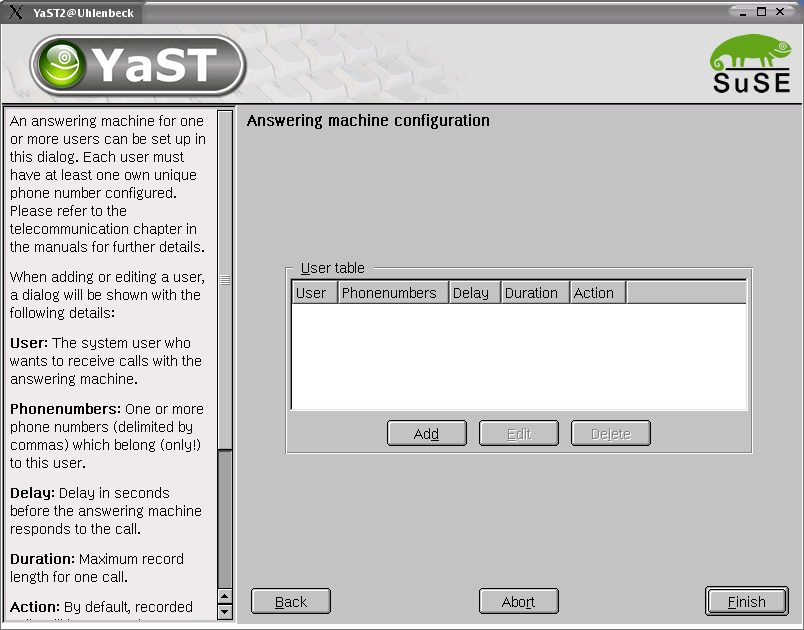
The provided standard scripts also offer a comfortable multiuser answering machine. This can be be configured with the YaST module in the group.
Similar to the fax configuration, there is a list with the already configured users (which is empty when the module is started for the first time). The recorded incoming call is sent to the user associated with the phone number. This shows the importance of assigning unique phone numbers to the users. The individual user welcome message cannot be set at this point. The recording will be made later on with the remote access function of the configured answering machine.
The answering machine has an automatic silence recognition routine that terminates the recording session after five seconds without noises.
Incoming fax calls are also automatically recognized and received in most cases. This automatic routine can, however, fail with older fax machines, which is why a separate fax number is to preferred wherever possible.
Use , , and to administer the entries. The entry form for creating a new entry or for modifying an existing one contains the following fields:
Select the system user for whom the answering machine should be configured. One or more fax numbers are assigned to each registered user. Incoming calls to these numbers are then sent to the user as e-mails.
Set the phone numbers for which messages should be recorded for the user. Faxes can also be sent to the declared phone numbers as the answering machine has an automatic fax recognition feature. Separate multiple numbers with commas.
This value defined in seconds determines after how much time the answering machine should answer an incoming call. A value can be selected from the list or entered.
Determines the maximum recording time for the answering machine — the maximum duration of a recorded incoming call in seconds. This value is usually of secondary importance, as the recording is usually terminated when the caller hangs up. However, to avoid extensive recordings, this value should be set to a reasonable time, such as two minutes (120 seconds).
The answering machine features various processing options for incoming messages. The default setting MailAndSave records a message, saves it in the system, and delivers it to the user as by e-mail. The SaveOnly option can be chosen if the reception of e-mails is not desired. It merely saves the message to the hard disk. This option is only recommended for expert users. The None option completely deactivates the recording of messages. It only plays the welcome message and then hangs up.
Enter a personal identification number (PIN) for remote access in the field. A numerical code of any length can be entered. If it is entered during playback of the welcome message, the user is taken to the remote access menu. The remote access feature is disabled if the field is left empty.
accepts the changes. closes the dialog box without applying any changes.
| |  | |
| Chapter 17. ISDN Telecommunication |  | Usage |