| Chapter 14. Encryption with KGpg | ||
|---|---|---|
 | Part IV. Internet |  |
| Preferences | The Key Server Dialog | |
| Chapter 14. Encryption with KGpg | ||
|---|---|---|
| | Part IV. Internet | |
| Preferences | The Key Server Dialog | |
Table of Contents
Abstract
KGpg is an important component of the encryption infrastructure on your system. With the help of this program, generate and manage all needed keys, use its editor function for the quick creation and encryption of files, or use the applet in your panel to encrypt or decrypt by dragging and dropping. The generation and management of keys is required for the correct handling of encrypted files or e-mail messages by other applications, such as KMail or Konqueror. This chapter covers the basic functions needed for daily work with encrypted files.
This section covers operations needed for handling your digital key ring. Other programs, such as your mail program (KMail or Evolution), access the managed key data to process signed or encrypted contents.
To be able to exchange encrypted messages with other users, first generate your own key pair. One part of it — the “public key” — is distributed to your communication partners, who can use it to encrypt the files or e-mail messages they send. The other part of the key pair — the “secret key” — is used to decrypt the encrypted contents.
The public key is intended for the public and is distributed to all of your communication partners. However, only you should have access to the secret key. Do not grant other users access to this data.
Start KGpg from the main menu or with the command kgpg from the command line. A padlock icon symbolizing KGpg appears in your panel. Click the icon to open the function menu. Select . Refer to Figure 14.1: “The Key Manager”). Under the menu, access all options related to the generation or management of keys. To generate a new key pair for yourself, click (Ctrl + N).
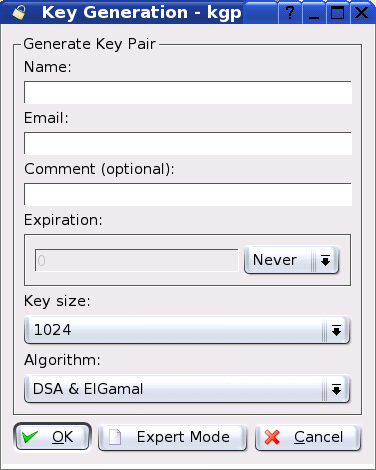
In the following dialog, shown in Figure 14.2: “Generating Keys”, enter your user name, your e-mail address, and an optional comment. The default setting for the (Never — key pair is valid for an indefinite period) can be accepted unless you want your keys to expire after a certain time. The default settings for the and the can be accepted as they are. Now, start the key generation with . After this process is completed, the newly generated key appears in the overview window of the key manager.
After generating your key pair, make the public key available to other users. This enables them to use it to encrypt or sign the messages or files they send you. To make the public key available for others, select -> . The dialog that opens offers three options:
Your public key is sent to a recipient of your choice by e-mail. If you activate this option and confirm with , the dialog for creating a new e-mail message with KMail appears. Enter the recipient and click . The recipient will receive your key and can then send you encrypted contents.
You can place your public key here before you continue to process it.
If you prefer to distribute your key as a file on a data medium instead of sending it by e-mail, click this option, confirm or change the file path and name, and click .
To make your public key available to a wide audience, export it to one of the key servers on the Internet. For more information, refer to Section “The Key Server Dialog”.
Wurden Ihnen Schlüssel als Datei (beispielsweise als Anhang einer E-Mail) geschickt, können Sie diese mit der Funktion in Ihren Schlüsselbund integrieren und zum verschlüsselten Nachrichtenaustausch mit dem Absender nutzen. Die Vorgehensweise ist ähnlich der oben beschriebenen für den Export von öffentlichen Schlüsseln.
Like any other files, keys can also be signed for the purpose of guaranteeing the authenticity and integrity. If you are absolutely sure the imported key truly belongs to the individual specified as the owner, express your trust in the authenticity of the key by means of your signature.
Encrypted communication is only secure to the extent that you can positively associate public keys in circulation with the specified user. By cross-checking and signing these keys, you contribute to the establishment of a web of trust.
Select the key to sign in the key list. Select -> . In the following dialog, designate the secret key to use for the signature. An alert reminds you to check the authenticity of this key before you sign it. If you have performed this check, click and enter the password for the selected secret key in the next step. Other users can now check the signature by means of your public key.
| |  | |
| Preferences |  | The Key Server Dialog |