| Installation Suggestion | ||
|---|---|---|
 | Chapter 2. User-Defined Installation |  |
| Installation Mode | Finishing the Installation | |
| Installation Suggestion | ||
|---|---|---|
| | Chapter 2. User-Defined Installation | |
| Installation Mode | Finishing the Installation | |
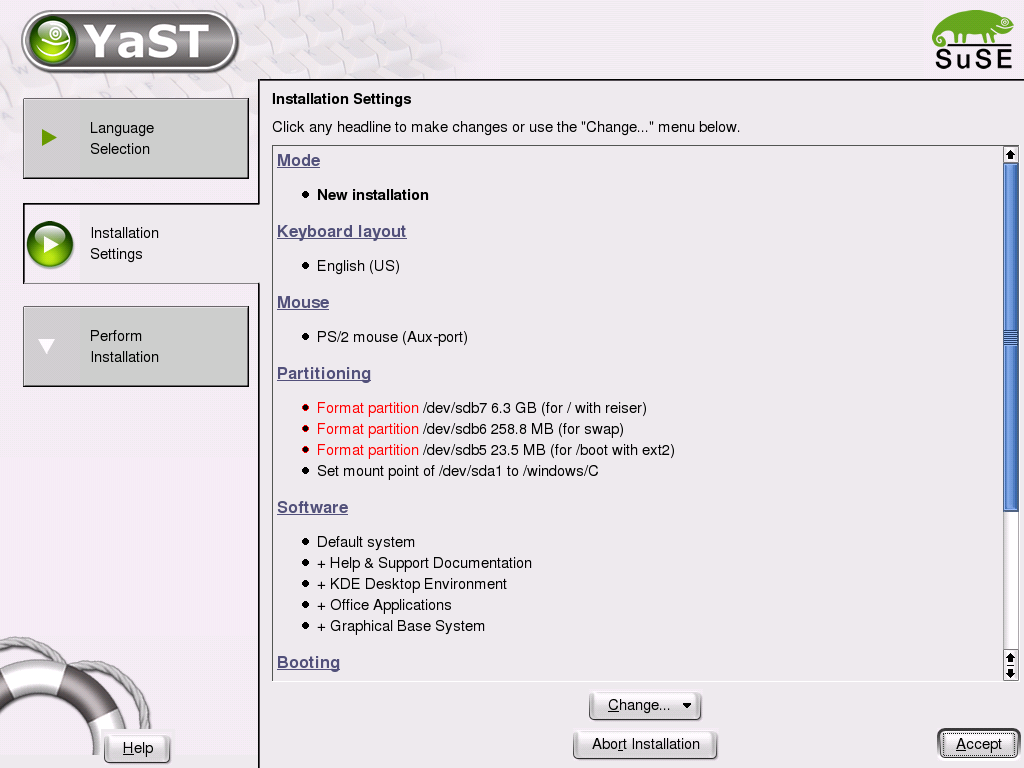
After hardware detection, the suggestion window, shown in Figure 2.4: “Suggestion Window”, displays some information about the hardware recognized and proposes a number of installation and partitioning options. When selecting any of these items and configuring them in the corresponding dialogs, you are always returned to the suggestion window, which is updated accordingly. The individual settings are discussed in the following sections.
This offers the opportunity to change the installation type selected previously. If you already have a Linux system installed on your machine, you can use this to boot into that system. This is useful if the system is damaged for some reason and cannot be booted from the hard disk.
Select the keyboard layout. By default, the layout corresponds to the selected language. After changing the layout, test Y, Z, and special characters to make sure the selection is correct. When finished, select to return to the suggestion window.
If YaST did not detect your mouse automatically, press Tab in the suggestion window several times until is selected. Then use Space to open the dialog in which to set the mouse type. This dialog is shown in Figure 2.5: “Selecting the Mouse Type”.
To select the mouse type, use ↑ and ↓. Consult the mouse documentation for information about the mouse type. After selecting a mouse type, use the key combination Alt + T to test whether the device works correctly without selecting it permanently. If the mouse does not behave as expected, use the keyboard to select another type and test again. Use Tab and Return to make the current selection permanent.
In most cases, YaST proposes a reasonable partitioning scheme that can be accepted without change. If desired, modify this scheme to meet your needs or create a new one.
Every hard disk has a partition table with space for four entries. Each entry in the partition table can be a primary partition or an extended partition. Only one extended partition entry is allowed, however.
Primary partitions consist of a continuous range of cylinders (physical disk areas) assigned to a particular operating system. Using primary partitions, you could not set up more than four partitions per hard disk. More do not fit in the partition table.
This is why extended partitions are used. Extended partitions are also continuous ranges of disk cylinders, but an extended partition may itself be subdivided into logical partitions. Logical partitions do not require entries in the partition table. In other words, an extended partition is a container for logical partitions.
If you need more than four partitions, create an extended partition. This extended partition should span the entire remaining free cylinder range. Then create multiple logical partitions within the extended partition. The maximum number of logical partitions is fifteen on SCSI disks and 63 on (E)IDE disks.
It does not matter which type of partitions are used for Linux. Primary and logical partitions both work fine.
The amount of hard disk space needed depends on the intended use of the system. Available space limits what applications can be installed. The following hints give some guidelines for space requirements:
Minimal system: 180 MB
No graphical interface (X Window System) is installed, which means only console applications can be used. Also, only a very basic selection of software is installed.
Minimal system with graphical interface: 500 MB
This includes X and some applications.
Graphical system with modern applications: between 1 GB and 2 GB
This includes recent versions of graphical desktops, namely KDE and GNOME, and bigger application packages, such as OpenOffice.org and Netscape or Mozilla.
For downloading lots of movies and music with Linux: 2 GB
Both items: 3 GB
Burning CDs and the items listed above: 4 GB
These guidelines can help develop a partitioning scheme for your system:
Under 500 MB:
A swap partition and a root partition (/).
Between 500 MB and 4 GB:
A small boot partition located within the first cylinders of the hard disk (/boot, at least 8 MB or 1 cylinder) to hold the kernel and the boot loader. Also create a swap partition of approximately 256 MB then use the rest for the root partition (/).
For more than 4 GB:
Boot (/boot), swap, root (250 MB), home directories (/home) with about 200 MB for each user, and the rest for programs and data (/usr). You may also reserve an extra partition each for /opt and /var.
Some commercial programs install their data in /opt. If necessary, create a separate partition for /opt or make the root partition large enough. KDE and GNOME are also installed in /opt.
Things should be fine if your partitioning setup is similar to that proposed by YaST. This is usually a small partition for /boot at the beginning of the hard disk (about 10 MB, or 1 cylinder on a large hard disk), a swap partition (between 128 and 256 MB), and the rest for /.
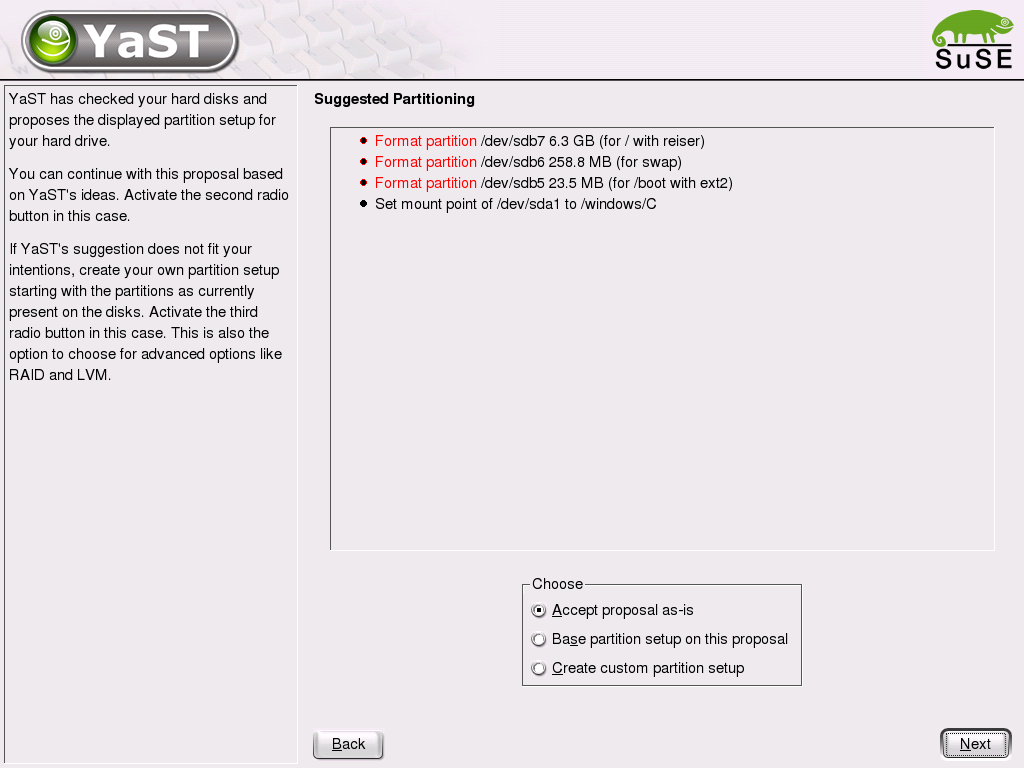
When you select the partitioning item in the suggestion window for the first time, YaST displays a dialog listing the partition settings as currently proposed. Accept these current settings without change or change them before continuing.Alternatively, discard all the settings and start over from scratch.
Nothing in the partitioning setup is changed if you select . If you select , the opens. It allows you to tweak the partition setup in every detail. This dialog is explained in Section “Expert Partitioning with YaST”. The original setup as proposed by YaST is offered there as a starting point.
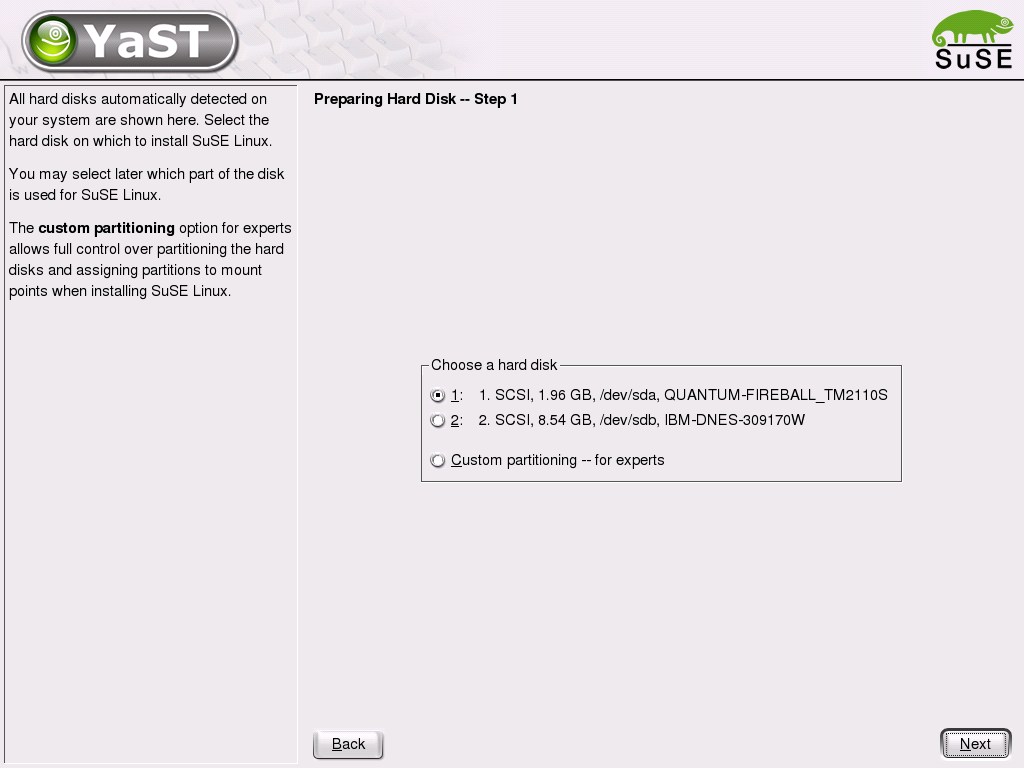
If you select , a dialog, like that in Figure 2.7: “Selecting the Hard Disk”, opens in which to select a hard disk from those on your system. SuSE Linux will be installed on the disk selected in this dialog.
The next step is to determine whether the entire disk should be used () or whether to use any existing partitions, if available, for the installation. If a Windows operating system was found on the disk or if there is some other FAT file system, select whether to delete or resize the partition. Before doing so, read Section “Resizing a Windows Partition”. If desired, go to the dialog to create a custom partition setup at this point (see Section “Expert Partitioning with YaST”).
If you choose , all data on that disk will be lost.
YaST checks during the installation whether the disk space is sufficient for the software selection made. If not, YaST automatically removes parts from the software selection as needed. The suggestion window then includes a notice to inform you about this. As long as there is sufficient disk space available, YaST simply accepts your settings and partitions the hard disk accordingly.
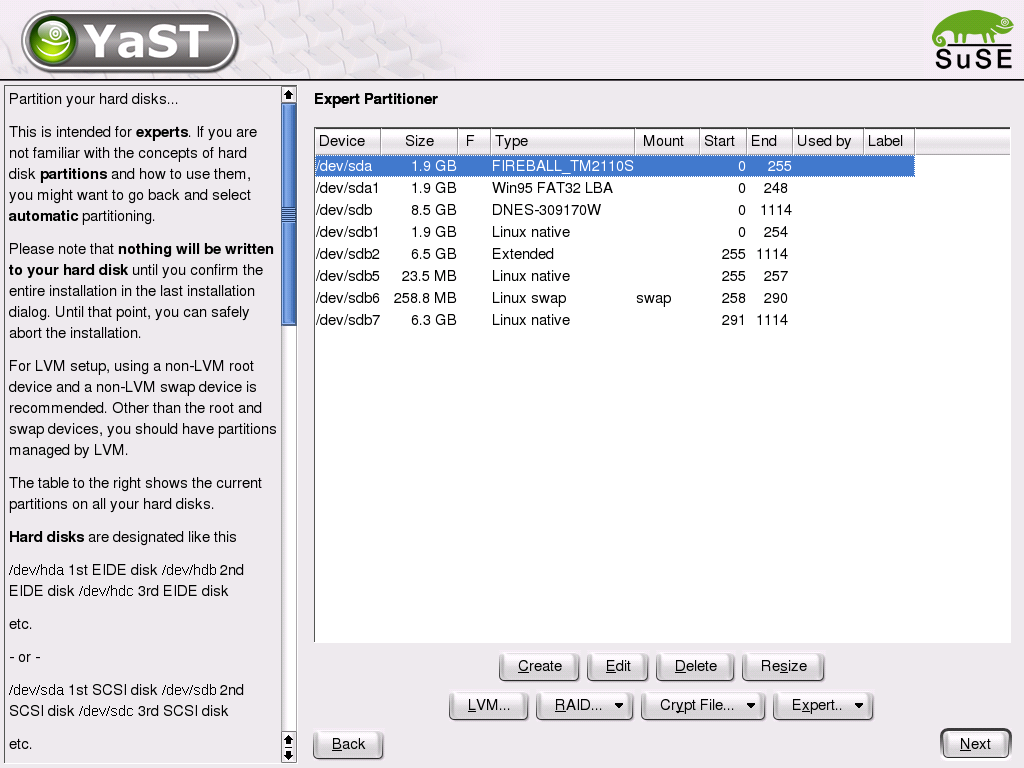
With the expert dialog, shown in Figure 2.8: “The YaST Partitioner in Expert Mode”, the partitioning of your hard disk can be modified manually. Partitions can be added, deleted, or edited.
All existing or suggested partitions on all connected hard disks are displayed in the list of the expert dialog. Entire hard disks are listed as devices without numbers, such as /dev/hda or /dev/sda. Partitions are listed as parts of these devices, such as /dev/hda1 or /dev/sda1. The size, type, file system, and mount point of the hard disks and their partitions are also displayed. The mount point describes where the partition is mounted in the Linux file system tree.
Any free hard disk space is also listed and automatically selected. To allocate additional storage space to Linux, free the needed space starting from the bottom toward the top of the list (starting from the last partition of a hard disk toward the first). For example, if you have three partitions, you cannot use the second exclusively for Linux and retain the third and first for other operating systems.
Select . If several hard disks are connected, a selection dialog appears in which to select a hard disk for the new partition. Then, specify the partition type (primary or extended). Create up to four primary partitions or up to three primary partitions and one extended partition. Within the extended partition, you can create several logical partitions (see Section “Partition Types”).
Select the file system to use to format the partition and a mount point, if necessary. YaST suggests a mount point for each partition created. Details of the parameters are provided in the next section.
Select to apply your changes.
The new partition is then listed in the partition table. If you click , the current values are adopted and you are returned to the suggestion screen.
If you create a new partition or modify an existing partition, various parameters can be set in the partitioning tool. For new partitions, suitable parameters are set by YaST and usually do not require any modification. To perform manual settings, proceed as follows:
Select the partition.
the partition and set the parameters:
File System ID
Even if you do not want to format the partition at this stage, specify one of the following file system IDs to ensure that the partition is registered correctly: , , , or . Refer to the Administrationshandbuch for details on LVM and RAID.
File System
To format the partition immediately within the scope of the installation, specify one of the following file systems for the partition: , , , , or .
Swap is a special format that makes the partition usable as virtual memory. Every system should have at least one swap partition of at least 128 MB (see page Important). ReiserFS is the default for Linux partitions. ReiserFS as well as JFS and Ext3 are journaling file systems. These file systems are able to restore your system very quickly after a system crash, as write processes are logged during the operation. Furthermore, ReiserFS is very fast in handling lots of small files. Ext2 is not a journaling file system. It is rock solid and good for smaller partitions, as it does not require too much disk space for management.
File System Options
Here, specify various parameters for the selected file system. Depending on the file system used, various options are offered. Only make changes if you are absolutely sure what you are doing.
Encrypt File System
If you activate the encryption, all data is written to the hard disk in encrypted form. This increases the security of sensitive data, but reduces the system speed, as the encryption takes some time.
fstab Options
Here you can specify various parameters for the administration file of the file systems (/etc/fstab). Experienced users have the possibility to modify a number of options. Refer to the respective chapter in the Administrationshandbuch before changing anything.
Mount Point
This specifies the directory at which the partition should be mounted in the file system tree. Various YaST suggestions can be expanded at the respective entry field. If you accept these suggestions, the default file system structure is implemented. However, you can also specify any other names.
Select to activate the partition.
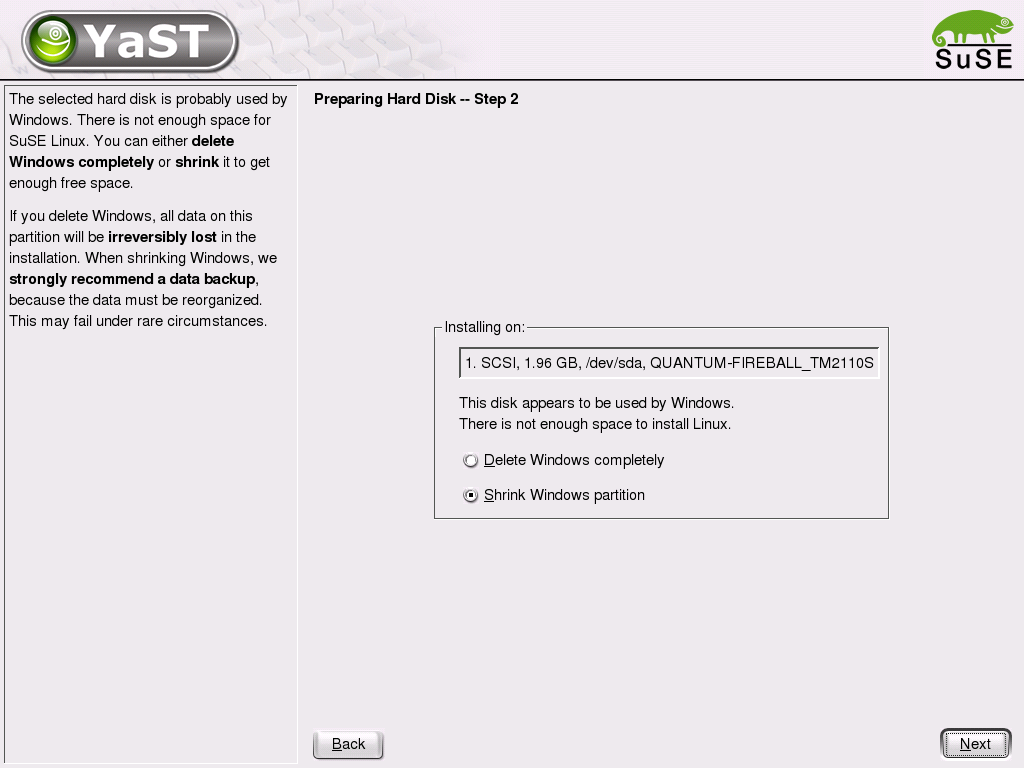
If a hard disk containing a Windows FAT or NTFS partition was selected as installation target, YaST will offer to delete or shrink this partition. In this way, you can install SuSE Linux even if there is currently not enough space on the hard disk. This functionality is especially useful if the selected hard disk merely contains one Windows partition that covers the entire hard disk, which is often the case with preinstalled computers.
If YaST sees that there is not enough space on the selected hard disk, but that space could be made available by deleting or shrinking a Windows partion, it will present a dialog in which you can choose one of these two options.
If you select , the Windows partition will be marked for deletion, and the freed space will be used for the installation of SuSE Linux.
If you delete Windows, all data will be lost beyond recovery as soon as the formatting starts.
To shrink the Windows partition, interrupt the installation and boot Windows in order to prepare the partition from there. Although this step is not strictly required for FAT partitions, it speeds up the resizing process and also makes it safer. These steps are vital for NTFS partitions.
In Windows, first run scandisk to make sure the FAT partition is free of lost file fragments and crosslinks. After that, run defrag to move files to the beginning of the partition. This will accelerate the resizing procedure in Linux.
If you have optimized virtual memory settings for Windows in such a way that a contiguous swap file is used with the same initial (minimum) and maximum size limit, consider another step. With these Windows settings, the resizing might have the effect that the swap file is split into many small parts scattered all over the FAT partition. Also, the entire swap file would need to be moved during the resizing, which makes the process rather slow. It is therefore useful to unset these Windows optimizations for the time being and reenable them after the resizing has been completed.
In Windows, run scandisk and defrag in order to move the files to the beginning of the hard disk. In contrast to the FAT file system, this must be done in NTFS in order to enable resizing.
If you operate your system with a permanent swap file on an NTFS file system, this file may be located at the end of the hard disk and remain there despite defrag. Therefore, it may be impossible to shrink the partition sufficiently. In this case, temporarily deactivate the swap file (the virtual memory in Windows). After the partition has been resized, you can configure as much virtual memory as you need..
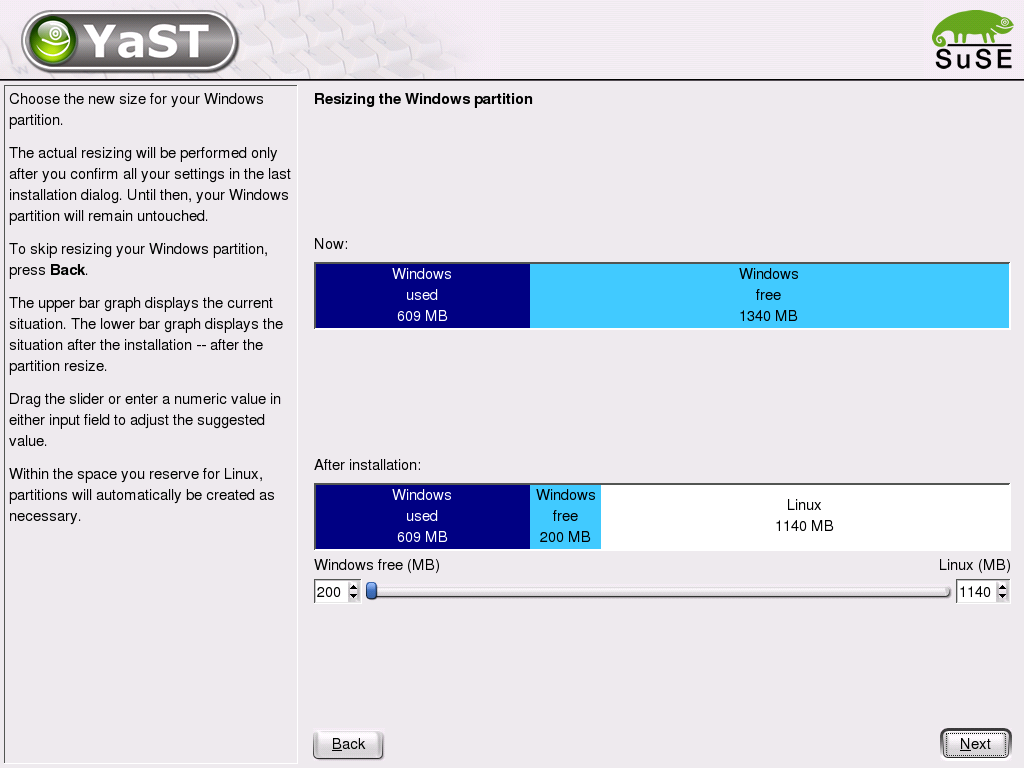
After these preparation, return to the Linux partitioning setup and select . After a quick check of the partition, YaST will open a dialog with a suggestion for resizing the Windows partition.
The first bar graph shows how much disk space is currently occupied by Windows and how much space is still available. The second bar graph shows how the space would be distributed after the resizing, according to YaST's current proposal (Figure 2.10: “Resizing the Windows Partition”). Accept the proposed settings or use the slider to change the partition sizing (within certain limits).
If you leave this dialog by selecting , the settings will be stored and you will be taken back to the previous dialog. The actual resizing will take place later, before the hard disk is formatted.
By default, the Windows versions NT, 2000, and XP use the NTFS file system. Unlike FAT file systems, NTFS file systems can (currently) only be read from Linux. Therefore, you can read your Windows files from Linux, but you cannot edit them. If you want write access to your Windows data and do not need the NTFS file system, you can install Windows anew on a FAT32 file system. In this case, you will have full access to your Windows data from SuSE Linux.
If the partitioning is performed by YaST and other partitions are detected in the system, these partitions are also entered in the file /etc/fstab to enable easy access to this data. This file contains all partitions in the system with their properties (parameters), such as the file system, mount point, and user permissions.
Example 2.1. /etc/fstab: Partition Data
/dev/sda1       /data1  auto    noauto,user 0 0
/dev/sda8       /data2  auto    noauto,user 0 0
The partitions, regardless of whether they are Linux or FAT partitions, are specified with the options noauto and user. This allows any user to mount or unmount these partitions as needed. For security reasons, YaST does not automatically enter the exec option here, which is needed for executing programs from the respective location. However, to run programs from there, you can enter this option manually. This measure is necessary if you encounter system messages such as bad interpreter or Permission denied.
Detailed background information and tips for partitioning are provided in the Administrationshandbuch in Special Installation Procedures, Partitioning for Experts.
SuSE Linux contains a number of software packages for various application purposes. As it would be burdensome to select the needed packages one by one, SuSE Linux offers three system types with various installation scopes. Depending on the available disk space, YaST selects one of these basic systems and displays it in the suggestion screen.
Minimum System (only recommended for special purposes)
This installs the operating system with various services without the graphical user interface. The machine can only be operated by way of the ASCII consoles. This system type is especially suitable for server applications requiring little direct user interaction.
Minimum Graphical System (without KDE)
If you do not want the KDE desktop or if the disk space is insufficient, install this system type. The installed system includes an elementary graphical user interface with terminal windows, but no real desktop with the usual functionality. You can use all programs that have their own graphical user interfaces (such as Netscape). No office programs are installed.
Default System (with KDE and office package)
This is the largest of all offered basic systems. It contains the KDE desktop together with most of the KDE programs and the office programs. This is the most suitable system type for normal stand-alone machines. If possible, YaST selects this system type.
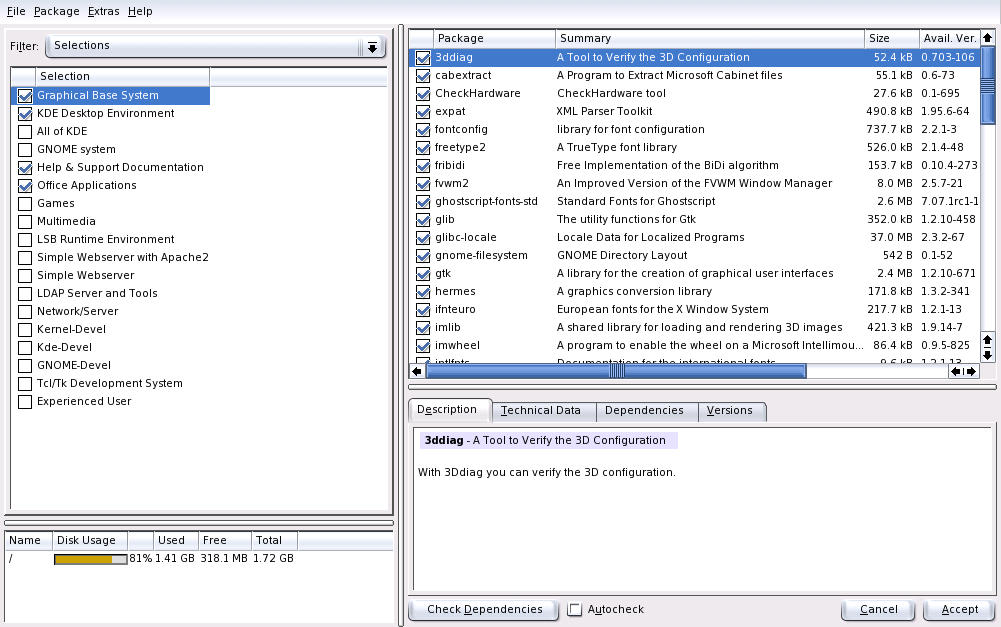
Click in the suggestion screen to open a dialog in which to select one of the basic systems. To start the software installation modules (package manager) and modify the installation scope, click (see Figure 2.11: “Installing and Removing Software with the YaST Package Manager”).
If you install the default system, there is usually no need to add or remove individual packages. This basic system consists of a software selection that meets most requirements without any changes. If you have specific needs, modify this selection with the package manager. It offers various filter criteria for determining a selection from the numerous packages in SuSE Linux.
The filter selection box is located at the top left under the menu bar. At start-up, the filter is active. This filter groups the program packages by their application purpose, such as multimedia or office applications. The various groups of the Selections filter are listed under the filter selection box. The packages included in the selected system type are preselected. Click the respective check boxes to select or deselect entire selections for installation.
The right part of the window displays a table listing the individual packages included in the current selection. The leftmost table column shows the current status of each package. Two status flags are especially relevant for the installation: Install (the box in front of the package name is checked) and Do Not Install (the box is empty). To select or deselect individual software packages, click the status box until the desired status is displayed.
Alternatively, right-click the package line to access a pop-up menu listing various status options. However, the other status settings are not needed for the installation. They are described in detailed in Section “Installing and Removing Software”.
Click the filter selection box to view the range of possible filters. The selection according to can also be used for the installation. This filter sorts the program packages by subjects in a tree structure to the left. The more you expand the branches, the more specific the selection of packages is and the fewer packages that are displayed in the list of associated packages to the right.
Use to search for a specific package. This is explained in detail in Section “Installing and Removing Software”.
Instead of rewriting the same basic functions in each software package, programmers access the functions of other packages. For this reason, many packages require that other packages are installed for the programs to function. In rare cases, programs interfere with each other, causing conflicts. When selecting and deselecting software packages in this dialog, alerts about unresolved package dependencies or conflicts may be displayed. If you install SuSE Linux for the first time or if you do not understand the alerts, read Section “Installing and Removing Software”, which provides detailed information about the operation of the package manager and a brief summary of the software organization in Linux.
The software preselected for installation is based on our long-standing experience and is usually suitable for the needs of most newcomers and advanced home users. In general, there is no need to change anything here. However, if you decide to select or deselect any packages, you should be aware of the consequences. In particular, observe any warnings and avoid deselecting any packages of the base system.
If you are satisfied with your software selection and there are no more unresolved package dependencies or conflicts, click to apply your changes and exit the program. If this module is started in the installed system, the changes are applied immediately. During the installation, however, the changes are recorded internally and applied later when the actual installation starts.
During the installation, YaST proposes a boot configuration for your system. Normally, you should leave these settings unchanged. However, if you need a custom setup, modify the proposal for your system.
One possibility is to configure the boot mechanism to rely on a special boot floppy. Although this has the disadvantage of requiring the boot floppy in the drive for boot, it allows you to leave an existing boot mechanism untouched. This should not normally be necessary, however, because YaST can configure the SuSE Linux boot loader to boot existing operating systems as well. Another possibility with the configuration is to change the location of the boot mechanism on hard disk.
To change the boot configuration proposed by YaST, select to open a dialog in which to change many details of the boot mechanism. For information, read Section “Boot Loader Configuration with YaST”.
The boot method should only be changed by experienced computer users.
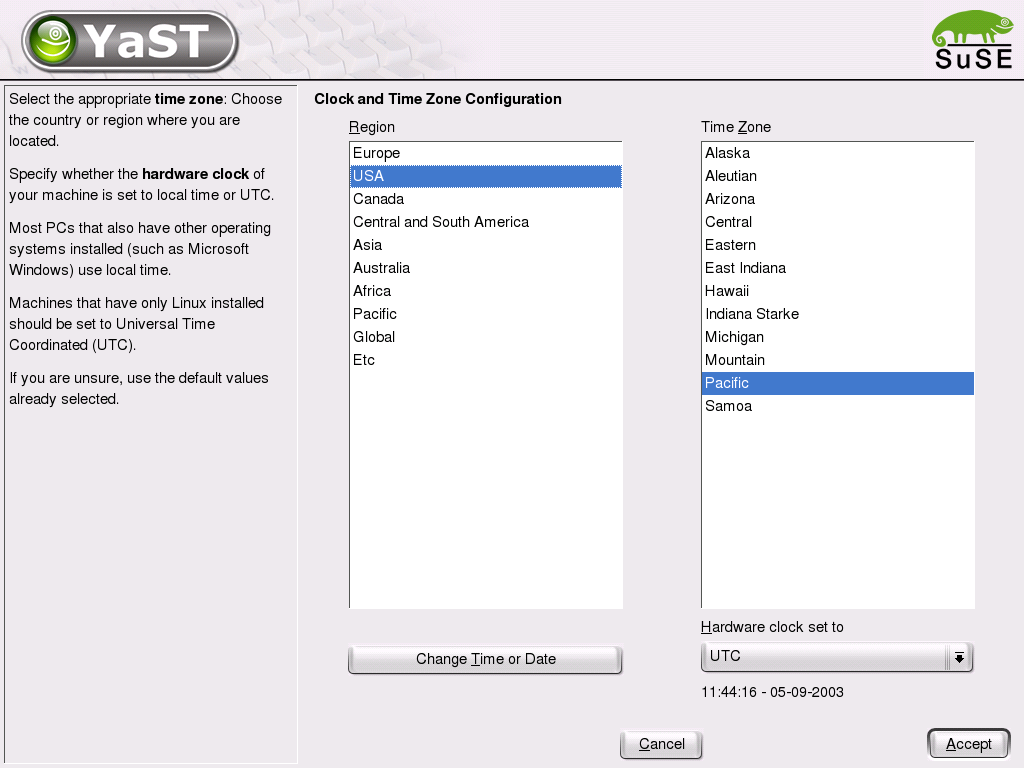
In this dialog, shown in Figure 2.12: “Selecting the Time Zone”, choose between Local Time and UTC under . The selection depends on how the hardware (BIOS) clock is set on your machine. If it is set to GMT, which corresponds to UTC, your system can rely on SuSE Linux to switch from standard time to daylight savings time and vice versa.
The language was already selected at the beginning of the installation (see Section “Language Selection”. If you want to change this setting, you can do this here. Furthermore, advanced users can use the button to set the language for the user root. The drop-down menu offers three options:
The value of the variable LC_CTYPE in the file /etc/sysconfig/language is adopted for the user root. This sets the localization for language-specific function calls.
The user root has the same language settings as the local user.
The language settings for the user root are not affected by the language selection.
Click to complete the configuration or to undo your changes.
| |  | |
| Installation Mode |  | Finishing the Installation |