Chapter 4. The KDE Desktop / 4.4. Important Utilities | ||||
|---|---|---|---|---|
 | 4.3. Konqueror as a File Manager | Chapter 5. Help and Documentation |  | |
Chapter 4. The KDE Desktop / 4.4. Important Utilities | ||||
|---|---|---|---|---|
| 4.3. Konqueror as a File Manager | Chapter 5. Help and Documentation | | |
The following pages introduce a number of small KDE utilities intended to assist in daily work. These applications perform various tasks, such as managing your keys for encrypting and signing files and e-mail messages, managing your clipboard, formatting floppy disks, compressing and decompressing diverse file archive types, and sharing your desktop with other users.
If you have a large collection of images in a directory, you may find it
difficult to manage them. Konqueror can help you
by creating an HTML file with thumbnails. Open the respective directory in
Konqueror and select +. A dialog opens in which to specify the page title, the number
of thumbnails per line, the background and foreground colors, and some other
details. When you are finished, select to start
the action. By default, Konqueror creates a file
named images.html. It can be opened with
Konqueror and presents a well-arranged
thumbnail index of your image collection. To view an image in full size,
simply click the corresponding thumbnail.
To remember all the passwords for protected resources to which you need to log in can be problematic. KWallet remembers them for you. It collects all passwords and stores them in an encrypted file. With a single password, open your wallet to view, search, delete, or create new entries. Normally you do not need to insert an entry manually. KDE recognizes if a resource requires authentication and KWallet starts automatically.
![[Important]](admon/important.png) | Protect Your KWallet Password |
|---|---|
If you forget your KWallet password, it cannot be recovered. Furthermore, anyone who knows your password can obtain all information contained in the wallet. | |
When start KWallet for the first time, a dialog window appears with the welcome screen. Choose between and . is recommended. If you choose it, select in the next screen whether you want to store personal information. Some KDE applications, like Konqueror or KMail, can use the wallet system to store Web form data and cookies. Select for this purpose and leave with .
If you choose , you have an additional security level screen. The default settings are generally acceptable for most users, but others may wish to change them. closes wallets after a period of inactivity. To separate network passwords and local passwords, activate . Close with .
Once configured, KWallet appears in the panel. Right-click the KWallet icon and select if you want to modify the configured. A dialog window opens. Configure different settings, like how KWallet closes a wallet, which wallet is automatically selected, and two options about the wallet manager itself.
To store data in your wallet or view its contents, open
the manager window by right-clicking the KWallet icon in the
panel and selecting .
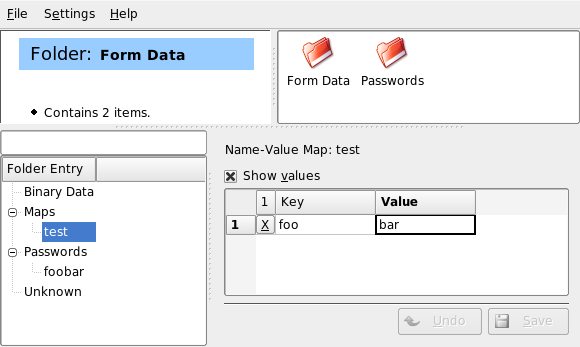
The kdewallet folder is the
default folder for your passwords. Click kdewallet
and a window prompts for your password. After a successful login, you can
see the main window. It is divided into four different parts: the top left
part displays a summary, the top right part displays
subfolders, the lower left part shows a list with folder entries, and
the lower right part shows the contents of a selected entry. The
window is shown in Figure 4.2, “The KWallet Manager Window”.
To insert a new item, proceed as follows:
Procedure 4.1. Inserting New Entries in Your Wallet
You can add a new entry to or only. Use if you have key and value pairs. can contain multiline entries.
Right-click the respective folder entry.
A dialog box appears and prompts for a name of the new entry. Name your entry and approve it with .
Your new entry is sorted under your folder entry. Click the new entry to display it on the right side. Initially it is empty.
Insert a new key and value pair with a right-click and choose . All entries are shown in a table view.
Name your key. Activate to view the value row. Click to write into the cell.
Store your modifications with .
You can always change your password with +.
You probably do not need to pay very much attention to KWallet. It resides silently in the panel and is automatically activated if needed. One nice feature of KWallet is that you can move your wallet files to another computer, for example, to your laptop. To simplify this task, wallets can be dragged from the manager window to a file browser window. For example, save it on a USB stick and carry your passwords with you.
KGet is the download manager for KDE. It manages your transfers in a window. Stop, resume, delete, queue, and add transfers.
Start KGet by pressing Alt-F2 and entering the command kget. When the program starts for the first time, a dialog is displayed. Confirm this dialog to integrate KGet in Konqueror. When you close the dialog, KGet is integrated in the system tray of the panel as an icon with a downward arrow.
Click this arrow to open the dialog displaying your transfers. To add a transfer to the list, select +. A dialog opens. Enter a URL in the input field and confirm with . Then specify the location for saving the downloaded file. After all information has been entered, the entry for the transfer is added to the main window of KGet and started.
Another way to add a transfer is by means of drag and drop. Simply drag a file, for example, from an FTP server, from Konqueror and drop it in the main window.
You can also instruct KGet to perform your transfers at a specific time. Activate +. All transfers inserted from this point are not started immediately but queued. To start the clock, double-click the respective entry. A dialog opens. Select . The dialog is expanded by the settings needed for starting the transfer at a certain time. Enter the day, month, year, time and activate the icon. Then close the window.
After making the desired settings for all your transfers, set KGet back to the online mode by deactivating +. The transfers should start at the specified times.
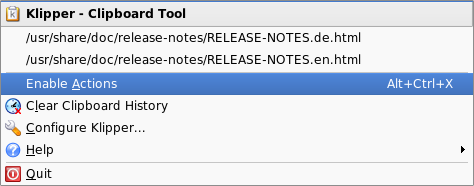
The KDE program Klipper serves as a clipboard for selected text, normally marked by keeping the left mouse button pressed. This text can be transferred to another application by moving the mouse pointer to the target location then pressing the middle mouse button (on a two-button mouse, press both buttons simultaneously). The text is copied to the selected location from the clipboard.
By default, Klipper is started when KDE is loaded and appears as a clipboard icon in the panel. View the contents of the clipboard by clicking this icon. The Klipper context menu and the last seven entries, also referred to as the history, are displayed. See Figure 4.3, “The Clipboard Klipper”. If an extensive text was copied to Klipper, only the first line of the text is displayed. The most recent entry is listed on top and is marked as active with a black check mark. To copy an older text fragment from Klipper to an application, select it by clicking it, move the mouse pointer to the target application, then middle-click.
As well as the contents of the clipboard, the context menu features the following menu items:
If you click this, a black check mark is displayed in front of it. For example, if you mark a URL with the mouse when actions are enabled, a window opens, enabling you to select a browser for displaying this URL. Click to disable this function.
Deletes all entries from the clipboard.
This opens the Klipper configuration dialog. Control the program with keyboard shortcuts or use regular expressions. Check the Klipper handbook for details. Former Windows users may appreciate the option for activating the keyboard shortcuts Ctrl-C and Ctrl-X for cutting and Ctrl-V for pasting under the tab. To use this feature, activate the entry in . Subsequently, use the mouse or the keyboard shortcuts to which you are accustomed.
This item opens a submenu from which to open the Klipper handbook, send a bug report to the developers, and view information about Klipper and KDE.
If you click , a dialog is displayed asking whether Klipper should be started automatically the next time you log in. If you click , start the program from the main menu the next time you want to use it. If you click , the program is not terminated.
To save space on the hard disk, use a packer that compresses files and
directories to a fraction of their original size. The application
Ark can be used to manage such archives. It
supports common formats, such as zip,
tar.gz, tar.bz2,
lha, and rar.
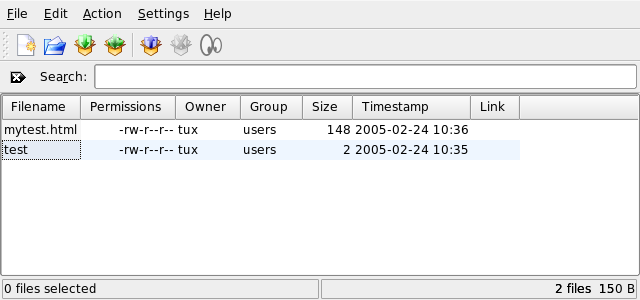
Start Ark from the main menu or from the command line with ark. If you already have some compressed files, move these from an open Konqueror window to the Ark window to view the contents of the archive. To view an integrated preview of the archive in Konqueror, right-click the archive in Konqueror and select . Alternatively, select + in Ark to open the file directly. See Figure 4.4, “Ark: File Archive Preview”.
Once you have opened an archive, perform various actions. offers options such as , , , , , , and .
To create a new archive, select +. Enter the name of the new archive in the dialog that opens and specify the format using . After confirming with or by pressing Enter, Ark opens an empty window. You can drag and drop files and directories from the file manager into this window. As the final step, Ark compresses everything into the previously selected archive format. For more information about Ark, select +.
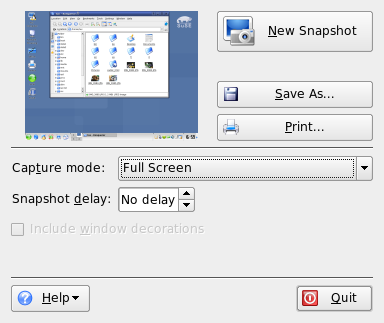
With KSnapshot, create snapshots of your screen or individual application windows. Start the program from the main menu or from the command line with the command ksnapshot. The dialog window of KSnapshot, shown in Figure 4.5, “KSnapshot”, consists of two parts. The upper area contains a preview of the current screen and three buttons for creating and saving the screenshots. In the lower part of the window, set some options to decide how the screenshot should be created.
To take a screenshot, use to determine the period in seconds to wait between when is clicked and the actual creation of the screenshot. If is active, only the window currently under the pointer is “photographed.” By default, the program creates a shot of the entire screen. To change this, select an item from . To save the screenshot to a file, select and set the directory and filename in the dialog that opens. To print the screenshot right away, select .
PDF is probably one of more important formats. KPDF is a KDE program that can view and print them.
Start KPDF by pressing Alt-F2 and entering the command kpdf. Load a PDF file with +. KPDF displays it in its main window. On the left side, there is a sidebar with thumbnails and a contents view. Thumbnails give an overview of the page. The contents view contains bookmarks to navigate in your document. Sometimes it is empty, meaning bookmarks are not supported by this PDF.
To view two pages in the main window, select +. The view depends on what last two options you activate in the menu.
Another nice option is to select the area in which you are interested with the select tool from the toolbar. Draw a rectangle and choose from the pop-up menu whether you need the selected area as text or as a graphic. It is copied to the clipboard. You can even save the area to a file.
Kopete is an online messenger application allowing multiple partners connected to the Internet to chat with each other. Kopete currently supports all common messenger protocols, such as ICQ, MSN, Yahoo, SMS, Jabber, and IRC.
Configure Kopete by entering your personal user data. Click +. shows all currently available protocols. Check the desired connection type to activate it.
With , enter your user data. You must register with a provider offering instant messaging services before using such service. Click to open a configuration assistant that can assist you in completing your user profile.
The next step lists the available messaging services. Select the service with which you have registered and click . Then enter the user data received upon registration with the messaging service. This usually consists of the nickname or e-mail address and a password. Complete the configuration of the messenger account by clicking .
The next item in the configuration dialog is . It influences how Kopete is displayed. provides a selection of various types of smileys.
Use and to adjust the appearance of the chat windows for communication with other participants. Choose from the classic themes of the corresponding providers or create a custom theme by adjusting the font or color to personal preference.
Add contacts to chat with them. If you have already created an account on another PC, this data is imported and automatically added to your contact list. To create a contact entry manually, click +. A new assistant appears to help with creation. However, you must be online to add a contact to your list.
Access this with +. Name the group and confirm this with . A new folder appears in the contact list that can be used to store the desired contacts. Drag and drop contacts into the desired folder. Grouping contacts can give a better overview.
It is necessary to establish a connection to the Internet to be able to chat with other participants. When this is done, clicking ++ then establishes a connection between Kopete and the selected messaging service.
The main application windows features a list of contacts. When you right-click a contact marked as online, a menu opens with various options. Send that person a message or start a chatting session. A chat allows invitation of additional participants for real-time discussion. Connection to all participants is closed when the creator of the chat session closes it.
Transfer files by right-clicking a username. Many options, such as , , , and , can be found in the menu that opens. Clicking opens a dialog for selecting the desired file. Confirming with sends a dialog to the recipient asking whether he wants to accept the file. If he accepts, the file transfer starts.
KDE offers handicap support for daily computer work. There are a number of options in KDE, especially + in the KDE Control Center. Some additional programs also help meet particular needs.
People with low vision have limited possibilities for improve the visibility of their desktop. The font size can be increased, but that is not always a good solution. The tool KMag solves this problem. It is a tool to magnify your desktop. Start it with the command kmag then see a part of the screen in the KMag window.
With the toolbar, choose some important options, such as the zoom factor, the refresh rate, and how KMag should behave. You can magnify around the mouse cursor, show a window for selecting the magnified area, or magnify the entire screen. With F5, halt the process. Press it again to restart it.
KTTS is an implementation of a system for producing speech
from text.
This enables other applications to use this subsystem in a consistent manner.
The capabilities of KTTS include speaking the content of a text file,
KDE notification events, and all or part of the text of a Web page
in Konqueror.
Before configure KTTS, make sure that you have festival and the KDE accessibility package installed.
![[Note]](admon/note.png) | Additional Languages |
|---|---|
Due to incompatible licenses, only the English may be included in our distribution. For more information about festival, see http://festvox.org/. | |
To start KTTS, press Alt-F2 and type kttsmgr. If you have not configured KTTS yet, the talkers screen appears with an empty list. Click to add a talker to the list. This opens a new dialog box. Select a speech synthesis plug-in by name or by language. When the synthesizer method is chosen, the synthesizer box and the language box are updated. For example, check the synthesizer box and choose . If you leave with , the synthesizer automatically configures itself.
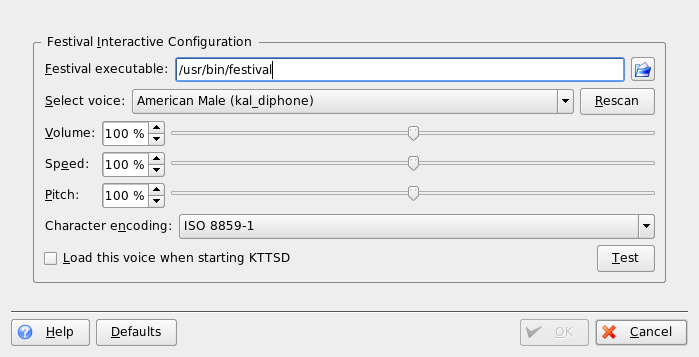
In this example, the talker is added to the list. To configure it, select it and go to . A dialog box like that in Figure 4.8, “Configuring Talkers” appears. In it, select the voice (if more than one is available), set the volume, speed, and pitch, and test it. Approve with .
KTTS has some additional tabs. With , enable or disable the text-to-speech service. Notifications are messages routed from application to the KDE notification system. You can configure it with . To embed KTTS in the system tray, check the respective option.
The tab was already explained above. In , choose between aRts and GStreamer, two sound systems. gives an overview of your current speech jobs. You can pause, resume, restart, remove, or change the order of the jobs.
KMouth is a program designed to speak for those who cannot. You must have installed and configured a speech synthesizer as described in Section 4.4.9.2, “KTTS—The KDE Text-to-Speech Manager”.
When you start KMouth for the first time, a wizard opens. This enables you to specify the command to use to speak the text. If you already configured your text to speech system with KTTS, this is not necessary.
The second page lets you select some phrase books. A phrase book is a collection of frequently-used phrases. This has the advantage that the user does not need to type them in. KMouth supports different languages and different topics (courteousness, greetings, “How are you?,” and personal). You can select all or only one of them.
With the third page, define a dictionary. It is used for word completion. You can define either the KDE documentation of the respective language or the OpenOffice.org dictionary as a text basis. After leaving with , KMouth generates the dictionary and opens the main dialog.
The main dialog, shown in Figure 4.9, “Using KMouth”, displays the topics of the phrase books, a history of spoken sentences, and an edit field. To speak, type the sentence in the text field or choose it from the list. Click .
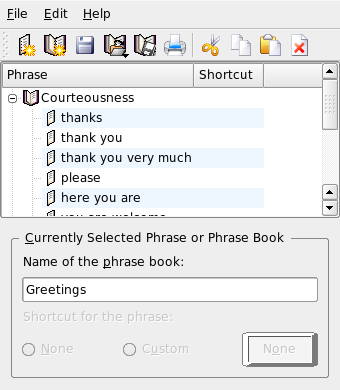
Improve the application by entering your own sentences in your phrase book. Choose + and a window appears like that in Figure 4.10, “Using Phrase Books in KMouth”. You can see the phrase and the assigned shortcut. By right-clicking the phrase book or a phrase itself, open pop-up menu in which to select . Insert your phrase in the text field. You can assign a shortcut with the keycap button. When satisfied with your settings, choose +. Your added phrase book is shown in your toolbar.
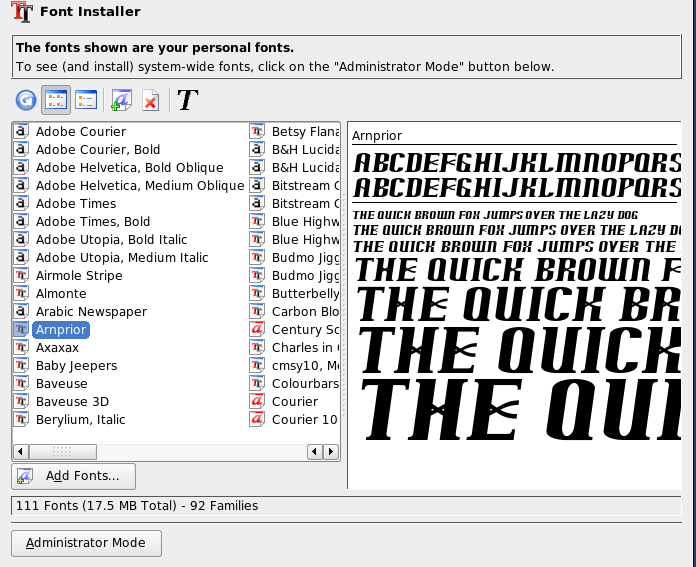
By default, SUSE LINUX provides various fonts commonly available in different file formats (Bitmap, TrueType, etc.). These are known as system fonts. Users can additionally install their own fonts from various collections on CD-ROM. Such user-installed fonts are, however, only visible and available to the corresponding user.
The KDE control center provides a comfortable tool for administering system and user fonts. It is shown in Figure 4.11, “Font Administration from the Control Center”.
To check which fonts are currently available, type the URL fonts:/ into the address field of a Konqueror session. This displays
two windows: Personal and System.
User-installed fonts are installed to the folder
Personal. Only root can install to the
System folder.
To install fonts as a user, follow these steps:
Start the Control Center and access the appropriate module with +.
Choose from the toolbar or from the menu available when right-clicking the list.
In the dialog that opens, select one or more fonts for installation.
The marked fonts are then installed to your personal font folder. Selecting a font shows a preview.
To update system fonts, first select and enter your root password. Then proceed as described for user font installation.