Chapter 3. Special Installation Procedures / 3.8. Soft RAID Configuration | ||||
|---|---|---|---|---|
 | 3.7. LVM Configuration | Chapter 4. Updating the System and Package Management |  | |
Chapter 3. Special Installation Procedures / 3.8. Soft RAID Configuration | ||||
|---|---|---|---|---|
| 3.7. LVM Configuration | Chapter 4. Updating the System and Package Management | | |
The purpose of RAID (redundant array of inexpensive disks) is to combine several hard disk partitions into one large virtual hard disk to optimize performance, data security, or both. Using this method, however, one advantage is sacrificed for another. Most RAID controllers use the SCSI protocol because it can address a larger number of hard disks in a more effective way than the IDE protocol and is more suitable for parallel processing of commands. There are some RAID controllers that support IDE or SATA hard disks. Refer to the Hardware Database at http://cdb.suse.de.
Like a RAID controller, which can often be quite expensive, soft RAID is also able to take on these tasks. SUSE LINUX offers the option of combining several hard disks into one soft RAID system with the help of YaST—a very reasonable alternative to hardware RAID. RAID implies several strategies for combining several hard disks in a RAID system, each of them having different goals, advantages and characteristics. These variations are commonly known as RAID levels.
Common RAID levels are:
This level improves the performance of your data access by spreading out blocks of each file across multiple disk drives. Actually, this is not really a RAID, because it does not provide data backup, but the name RAID 0 for this type of system has become the norm. With RAID 0, two or more hard disks are pooled together. The performance is very good, but the RAID system is destroyed and your data lost if even one hard disk fails.
This level provides adequate security for your data, because the data is copied to another hard disk 1:1. This is known as hard disk mirroring. If a disk is destroyed, a copy of its contents is available on another one. All of them except one could be damaged without endangering your data. The writing performance suffers a little in the copying process compared to when using single disk access (ten to twenty percent slower), but read access is significantly faster in comparison to any one of the normal physical hard disks, because the data is duplicated so can be parallel scanned. Generally it can be said that Level 1 provides nearly twice the read transaction rate of single disks and almost the same write transaction rate as single disks.
These are not typical RAID implementations. Level 2 stripes data at the bit level rather than the block level. Level 3 provides byte-level striping with a dedicated parity disk and cannot service simultaneous multiple requests. Both levels are only rarely used.
Level 4 provides block-level striping just like Level 0 combined with a dedicated parity disk. In the case of a data disk failure, the parity data is used to create a replacement disk. However, the parity disk may create a bottleneck for write access. Nevertheless, Level 4 is sometimes used.
RAID 5 is an optimized compromise between Level 0 and Level 1 in terms of performance and redundancy. The hard disk space equals the number of disks used minus one. The data is distributed over the hard disks as with RAID 0. Parity blocks, created on one of the partitions, are there for security reasons. They are linked to each other with XOR, enabling the contents, via XOR, to be reconstructed by the corresponding parity block in case of system failure. With RAID 5, no more than one hard disk can fail at the same time. If one hard disk fails, it must be replaced as soon as possible to avoid the risk of losing data.
Several other RAID levels have been developed (RAIDn, RAID 10, RAID 0+1, RAID 30, RAID 50, etc.), some of them being proprietary implementations created by hardware vendors. These levels are not very widespread, so are not explained here.
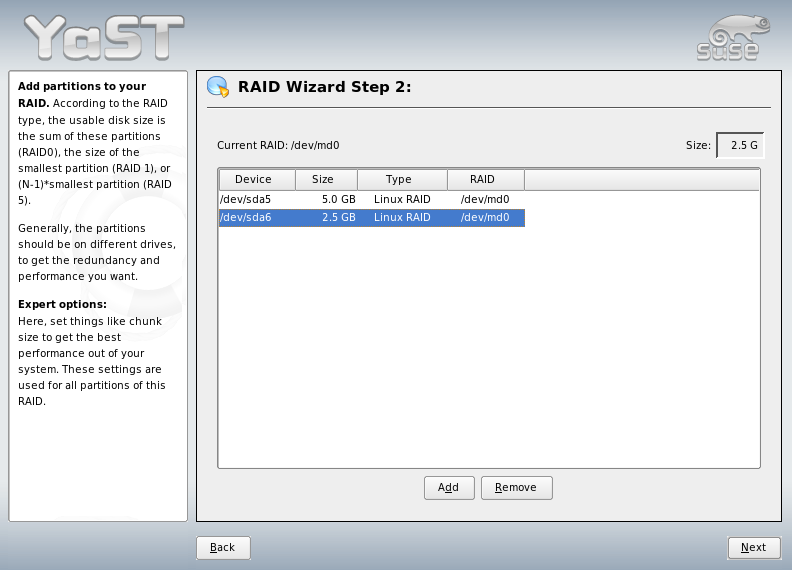
The YaST soft RAID configuration can be reached from the YaST Expert Partitioner, described in Section 2.7.5, “Partitioning”. This professional partitioning tool enables you to edit and delete existing partitions and create new ones that should be used with soft RAID. There, create RAID partitions by first clicking + then selecting as the partition identifier. For RAID 0 and RAID 1, at least two partitions are needed—for RAID 1, usually exactly two and no more. If RAID 5 is used, at least three partitions are required. It is recommended to take only partitions of the same size. The RAID partitions should be stored on different hard disks to decrease the risk of losing data if one is defective (RAID 1 and 5) and to optimize the performance of RAID 0. After creating all the partitons to use with RAID, click + to start the RAID configuration.
In the next dialog, choose between RAID levels 0, 1, and 5 (see Section 3.8.1, “Soft RAID” for details). After
is clicked, the following dialog lists all partitions with
either the “Linux RAID” or “Linux native” type
(see Figure 3.8, “RAID Partitions”). No swap or DOS partitions are
shown. If a partition is already assigned to a RAID volume, the name of the
RAID device (e.g., /dev/md0) is shown in the list.
Unassigned partitions are indicated with “--”.
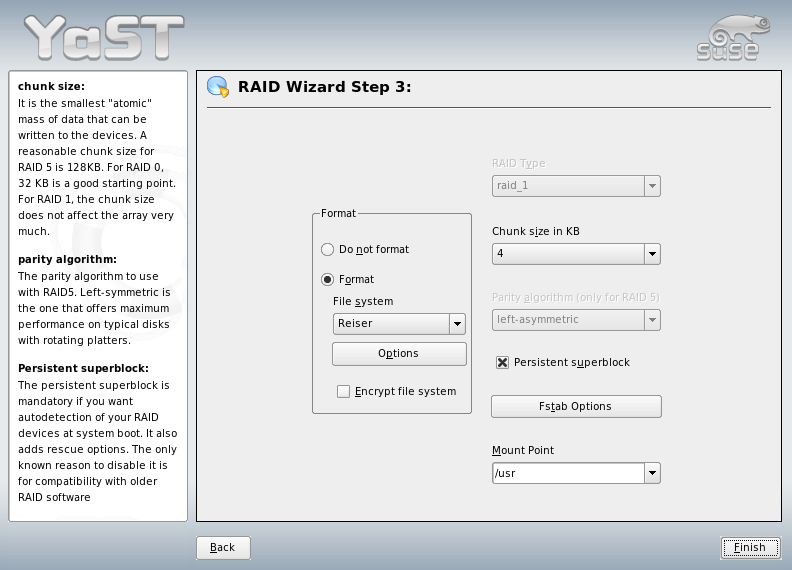
To add a previously unassigned partition to the selected RAID volume, first click the partition then . At this point, the name of the RAID device is entered next to the selected partition. Assign all partitions reserved for RAID. Otherwise, the space on the partition remains unused. After assigning all partitions, click to proceed to the settings dialog where you can fine-tune the performance (see Figure 3.9, “File System Settings”).
As with conventional partitioning, set the file system to use as
well as encryption and the mount point for the RAID volume. Checking
ensures that the RAID partitions
are recognized as such when booting. After completing the configuration with
, see the /dev/md0 device and
others indicated with RAID in the expert partitioner.
Check the file /proc/mdstats to find out whether a RAID
partition has been destroyed. In the event of a system failure, shut down
your Linux system and replace the defective hard disk with a new one
partitioned the same way. Then restart your system and enter the command
mdadm /dev/mdX --add /dev/sdX. Replace
'X' with your particular device identifiers. This integrates the hard disk
automatically into the RAID system and fully reconstructs it.
Configuration instructions and more details for soft RAID can be found in the HOWTOs at:
/usr/share/doc/packages/raidtools/Software-RAID.HOWTO.html
Linux RAID mailing lists are also available, such as http://www.mail-archive.com/linux-raid@vger.rutgers.edu.