Chapter 17. Wireless Communication / 17.2. Bluetooth | ||||
|---|---|---|---|---|
 | Chapter 17. Wireless Communication | 17.3. Infrared Data Transmission |  | |
Chapter 17. Wireless Communication / 17.2. Bluetooth | ||||
|---|---|---|---|---|
| Chapter 17. Wireless Communication | 17.3. Infrared Data Transmission | | |
Bluetooth is a wireless technology for connecting various devices, such as cellular phones, PDAs, peripheral devices, laptops, or system components like the keyboard or mouse. The name is derived from the Danish king Harold Bluetooth, who united various warring factions in Scandinavia. The Bluetooth logo is based on the runes for “H” (resembles a star) and “B”.
A number of important aspects distinguish Bluetooth from IrDA. First, the individual devices do not need to “see” each other directly and, second, several devices can be connected in a network. However, the maximum data rate is 720 Kbps (in the current version 1.2). Theoretically, Bluetooth can even communicate through walls. In practice, however, this depends on the properties of the wall and the device class. There are three device classes with transmission ranges between ten and a hundred meters.
The following sections outline the basic principles of how Bluetooth works. Learn which software requirements need to be met, how Bluetooth interacts with your system, and how Bluetooth profiles work.
To be able to use Bluetooth, you need a Bluetooth adapter (either a
built-in adapter or an external device), drivers, and a Bluetooth protocol
stack. The Linux kernel already contains the basic drivers for using
Bluetooth. The Bluez system is used as protocol stack. To make sure the
applications work with Bluetooth, the base packages bluez-libs and bluez-utils must be installed. These
packages provide a number of needed services and utilities. Additionally,
some adapters (Broadcom, AVM
BlueFritz!) require the bluez-firmware package to be installed. The
bluez-cups
package enables printing over Bluetooth connections.
A Bluetooth system consists of four interlocked layers that provide the desired functionality:
The adapter and a suitable driver for support by the Linux kernel.
Used for controlling the Bluetooth system.
Services that are controlled by the configuration files and provide the functionality.
The applications allow the functionality provided by the daemons to be used and controlled by the user.
When inserting a Bluetooth adapter, the respective driver is loaded by the hotplug system. After the driver is loaded, the system checks the configuration files to see if Bluetooth should be started. If this is the case, it determines the services to start. Based on this information, the respective daemons are started. Bluetooth adapters are probed upon installation. If one or more are found, Bluetooth is enabled. Otherwise the Bluetooth system is deactivated. Any Bluetooth device added later must be enabled manually.
In Bluetooth, services are defined by means of profiles, such as the file transfer profile, the basic printing profile, and the personal area network profile. To enable a device to use the services of another device, both must understand the same profile—a piece of information that is often missing on the device package and in the manual. Unfortunately, some manufacturers do not comply strictly with the definitions of the individual profiles. Despite this, communication between the devices usually works smoothly.
In the following text, local devices are those physically connected to the computer. All other devices that can only be accessed over wireless connections are referred to as remote devices.
This section introduces Bluetooth configuration. Learn which configuration files are involved, which tools are needed, and how to configure Bluetooth with YaST or manually.
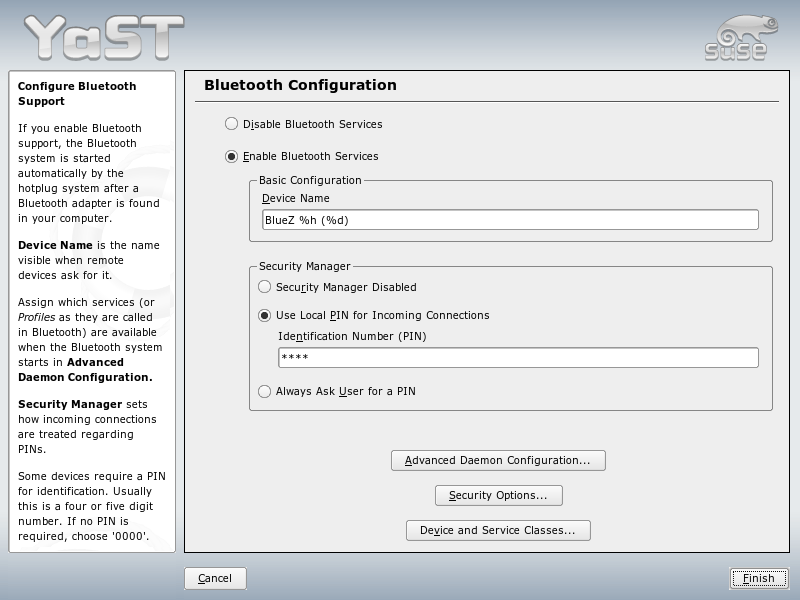
Use the YaST Bluetooth module, shown in Figure 17.2, “YaST Bluetooth Configuration”, to configure Bluetooth support on your system. As soon as hotplug detects a Bluetooth adapter on your system (for example, during booting or when you plug in an adapter), Bluetooth is automatically started with the settings configured in this module.
In the first step of the configuration, determine whether Bluetooth
services should be started on your system. If you have enabled the
Bluetooth services, two things can be configured. First, the
. This is the name other devices display
when your computer has been discovered. There are two placeholders
available—%h stands for the hostname of the system
(useful, for example, if it is assigned dynamically by DHCP) and
%d inserts the interface number (only useful if you
have more than one Bluetooth adapter in your computer). For example, if you
enter Laptop %h in the field and DHCP assigns the name
unit123 to your computer, other remote devices would
know your computer as Laptop unit123.
The parameter is related to the behavior of the local system when a remote device tries to connect. The difference is in the handling of the PIN number. Either allow any device to connect without a PIN or determine how the correct PIN is chosen if one is needed. You can enter a PIN (stored in a configuration file) in the appropriate input field. If a device tries to connect, it first uses this PIN. If it fails, it falls back to using no PIN. For maximum security, it is best to choose the third option, “Always ask user for PIN”. This option allows you to use different PINs for different (remote) devices.
Click to enter the dialog for selecting and configuring the available services (called profiles in Bluetooth). All available services are displayed in a list and can be enabled or disabled by clicking or . Click to open a dialog in which to specify additional arguments for the selected service (daemon). Do not change anything unless you are familiar with the service. After completing the configuration of the daemons, exit this dialog by clicking .
Back in the main dialog, click to enter the security dialog and specify encryption, authentication, and scan settings. Then exit the security dialog to return to the main dialog. After you close the main dialog with , your Bluetooth system is ready for use.
From the main dialog, you can reach the dialog, too. Bluetooth devices are grouped into various device classes. In this dialog, choose the correct one for your computer, such as “Desktop” or “Laptop.” The device class is not very important, unlike the service class, also set here. Sometimes remote Bluetooth devices, like cell phones, only allow certain functions if they can detect the correct service class set on your system. This is often the case for cell phones that expect a class called “Object Transfer” before they allow the transfer of files from or to the computer. You can choose multiple classes. It is not useful to select all classes “just in case.” The default selection should be appropriate in most cases.
To use Bluetooth to set up a network, activate
in the dialog and set the mode of the daemon with
. For a functional Bluetooth network connection,
one pand must operate in the
mode and the peer in the
mode. By default, the
mode is preset. Adapt the behavior of your
local pand. Additionally, configure the
bnepX interface (X stands for the
device number in the system) in the YaST module.
The configuration files for the individual components of the Bluez system
are located in the directory /etc/bluetooth. The only
exception is the file /etc/sysconfig/bluetooth for
starting the components, which is modified by the YaST module.
The configuration files described below can only be modified
by the user root. Currently,
there is no graphical user interface to change all
settings. The most important ones can be set using the YaST Bluetooth
module, described in Section 17.2.2.1, “Configuring Bluetooth with YaST”.
All other settings are only of interest for
experienced users with special cases. Usually, the default
settings should be adequate.
A PIN number provides basic protection against unwanted
connections. Mobile phones usually query the PIN when establishing
the first contact (or when setting up a device contact on the phone).
For two devices to be able to communicate, both must identify themselves
with the same PIN. On the computer, the PIN is located in the file
/etc/bluetooth/pin.
![[Important]](admon/important.png) | Security of Bluetooth Connections |
|---|---|
Despite the PINs, the transmission between two devices may not be fully secure. By default, the authentication and encryption of Bluetooth connections is deactivated. Activating authentication and encryption may result in communication problems with some Bluetooth devices. | |
Various settings, such as the device names and the
security mode, can be changed in the configuration file
/etc/bluetooth/hcid.conf. Usually,
the default settings should be adequate. The file contains
comments describing the options for the various settings.
Two sections in the included file are designated as
options and device. The first
contains general information that hcid uses for starting. The latter
contains settings for the individual local Bluetooth devices.
One of the most important settings of the options
section is security auto;. If set to
auto, hcid tries to use the local PIN for incoming
connections. If it fails, it switches to none and
establishes the connection anyway. For increased security, this default
setting should be set to user to make sure that the user
is requested to enter a PIN every time a connection is established.
Set the name under which the computer is displayed on the other side
in the device section.
The device class, such as Desktop,
Laptop, or Server, is
defined in this section. Authentication and encryption
are also enabled or disabled here.
The operability of Bluetooth depends on the interaction of various services.
At least two background daemons are needed: hcid (host controller
interface), which serves as an interface for the Bluetooth
device and controls it, and sdpd (service discovery
protocol), by means of which a device can find out which
services the host makes available. If they are not activated automatically
when the system is started, both hcid and sdpd can be activated with the
command rcbluetooth start. This command
must be executed as root.
The following paragraphs briefly describe the most important shell tools that can be used for working with Bluetooth. Although various graphical components are now available for controlling Bluetooth, it can be worthwhile to check these programs.
Some of the commands can only be executed as root. This includes the command
l2ping
device_address
hcitool can be used to determine whether local and remote devices are
detected. The command hcitool dev lists
the local devices. The output generates a line in the form
interface_name
device_address for every detected local device.
Search for remote devices with the command
hcitool inq.
Three values are returned for every detected device:
the device address, the clock offset, and the device
class. The device address is important, because other commands
use it for identifying the target device. The clock offset
mainly serves a technical purpose. The class specifies the
device type and the service type as a hexadecimal value.
The command hcitool name
can be used
to determine the device name of a remote device. In the case of a remote
computer, the class and the device name correspond to the information in
its device-address/etc/bluetooth/hcid.conf. Local device addresses
generate an error output.
The command /usr/sbin/hciconfig delivers
further information about the local device. If
hciconfig is executed without any arguments,
the output shows device information, such as the device name
(hciX), the physical device address (a 12-digit
number in the form 00:12:34:56:78),
and information about the amount of transmitted data.
hciconfig hci0 name displays the name
that is returned by your computer when it receives requests from remote
devices. As well as querying the settings of the local device,
hciconfig can be used for modifying these settings. For
example, hciconfig hci0 name TEST sets
the name to TEST.
The program sdptool can be used to check which services are made available
by a specific device. The command sdptool browse
returns all
services of a device. Use the command sdptool device_addresssearch
to
search for a specific service. This command scans all accessible devices
for the requested service. If one of the devices offers the service, the
program prints the full service name returned by the device together with
a brief description. View a list of all possible service codes by
entering sdptool without any parameters.
service_code
In Konqueror, enter the URL bluetooth:/ to list local and
remote Bluetooth devices. Double-click a device for an overview of the
services provided by the device. If you move across one of the specified
services with the mouse, the browser's status bar shows which profile is
used for the service. If you click a service, a dialog opens, asking what to
do: save, use the service (an application must be started to do this), or
cancel the action. Mark a check box if you do not want the dialog to be
displayed again but always want the selected action to be performed. For
some services, support is not yet available. For others, additional packages
may need to be installed.
This section features two typical examples of possible Bluetooth scenarios. The first shows how a network connection between two hosts can be established via Bluetooth. The second features a connection between a computer and a mobile phone.
In the first example, a network connection is
established between the hosts H1
and H2. These two hosts have the
Bluetooth device addresses baddr1 and
baddr2 (determined on both hosts
with the command hcitool dev
as described above). The hosts should be identified with the IP
addresses 192.168.1.3 (H1) and
192.168.1.4 (H2).
The Bluetooth connection is established with the help of pand
(personal area networking). The following commands
must be executed by the user root. The description focuses on the
Bluetooth-specific actions and does not provide a detailed explanation of
the network command ip.
Enter the command pand -s to start pand
on the host H1. Subsequently, a connection can be
established on the host H2 with the command
pand -c
. If you enter
ip baddr1link show on one of the hosts to
list the available network interfaces, the output should contain an entry
like the following:
 bnep0: <BROADCAST,MULTICAST> mtu 1500 qdisc noop qlen 1000
 link/ether 00:12:34:56:89:90 brd ff:ff:ff:ff:ff:ff
Instead of 00:12:34:56:89:90, the output should
contain the local device address baddr1 or
baddr2. Now this interface must be assigned
an IP address and activated. On H1, this
can be done with the following two commands:
ip addr add 192.168.1.3/24 dev bnep0
ip link set bnep0 up
On H2:
ip addr add 192.168.1.4/24 dev bnep0
ip link set bnep0 up
Now H1 can be accessed from H2
under the IP 192.168.1.3. Use the command ssh
192.168.1.4 to access H2
from H1, assuming H2 runs an
sshd, which is activated by default in SUSE LINUX. The command
ssh 192.168.1.4 can also be run as a
normal user.
The second example shows how to transfer a photograph created with a mobile
phone with a built-in digital camera to a computer (without incurring
additional costs for the transmission of a multimedia message). Although
the menu structure may differ on various mobile phones, the procedure is
usually quite similar. Refer to the manual of your phone, if necessary.
This example describes the transfer of a photograph from a Sony Ericsson
mobile phone to a laptop. The service Obex-Push must be available on the
computer and the computer must grant the mobile phone access. In the first
step, the service is made available on the laptop. This is done by means of
the opd daemon from the package bluez-utils. Start the daemon with the
following command:
opd --mode OBEX --channel 10 --daemonize --path /tmp --sdp
Two important parameters are used: --sdp registers the
service with sdpd and --path
/tmp instructs the program where to save the received
data—in this case to /tmp. You can also specify any
other directory to which you have write access.
Now the mobile phone must get to know the computer. To do this, open the
menu on the phone and select
. If necessary, click before selecting . Select
and let your phone search for the laptop. If
a device is detected, its name appears in the display. Select the device
associated with the laptop. If you encounter a PIN query, enter the PIN
specified in /etc/bluetooth/pin. Now your phone
recognizes the laptop and is able to exchange data with the laptop. Exit
the current menu and go to the image menu. Select the image to transfer and
press . In the next menu, press
to select a transmission mode. Select . The laptop should be listed as a target device.
Select the laptop to start the transmission. The image is then saved to the
directory specified with the opd command. Audio tracks
can be transferred to the laptop in the same way.
If you have difficulties establishing a connection, proceed according to the following list. Remember that the error can be on either side of a connection or even on both sides. If possible, reconstruct the problem with another Bluetooth device to verify that the device is not defective.
dev?
If the local device is not listed in this output, hcid is not started or
the device is not recognized as a Bluetooth device. This can have various
causes. The device may be defective or the correct driver may be missing.
Laptops with built-in Bluetooth often have an on and off switch for
wireless devices, like WLAN and Bluetooth. Check the manual of your laptop
to see if your device has such a switch. Restart the Bluetooth system
with the command rcbluetooth restart
and check if any errors are reported in
/var/log/messages.
If it does, install bluez-bluefw and restart the
Bluetooth system with
rcbluetooth restart.
inq return
other devices?Test this command more than once. The connection may have interferences, because the frequency band of Bluetooth is also used by other devices.
Check if the PIN number of the computer (in
/etc/bluetooth/pin) matches
that of the target device.
Try to establish the connection from the remote device. Check if this device sees the computer.
The first example (network connection) may not work for several reasons.
For example, one of the two computers may not support the ssh protocol.
Try ping 192.168.1.3 or
ping 192.168.1.4. If this works,
check if sshd is active. Another problem could
be that one of the two devices already has network settings that conflict
with the address 192.168.1.X in the example. If this
is the case, try different addresses, such as
10.123.1.2 and 10.123.1.3.
In , select the respective device and view the list of . If Obex-Push is not displayed (even after the list is updated), the problem is caused by opd on the laptop. Is opd active? Do you have write access to the specified directory?
If the obexftp package is
installed, the command obexftp -b
can be
used on some devices.
Several Siemens and Sony Ericsson models have been tested and found to be
functional. Refer to the documentation of the package in
device_address -B 10 -p
image/usr/share/doc/packages/obexftp.
An extensive overview of various instructions for the use and configuration of Bluetooth is available at http://www.holtmann.org/linux/bluetooth/. Other useful information and instructions:
Official howto of the Bluetooth protocol stack integrated in the kernel: http://bluez.sourceforge.net/howto/index.html
Connection to PalmOS PDA: http://www.cs.ucl.ac.uk/staff/s.zachariadis/btpalmlinux.html