Chapter 29. LDAP—A Directory Service / 29.5. The YaST LDAP Client | ||||
|---|---|---|---|---|
 | 29.4. Data Handling in the LDAP Directory | 29.6. For More Information |  | |
Chapter 29. LDAP—A Directory Service / 29.5. The YaST LDAP Client | ||||
|---|---|---|---|---|
| 29.4. Data Handling in the LDAP Directory | 29.6. For More Information | | |
YaST includes a module to set up LDAP-based user management. If you did not enable this feature during the installation, start the module by selecting +. YaST automatically enables any PAM and NSS related changes as required by LDAP (described below) and installs the necessary files.
The processes acting in the background of a client machine must be
known to understand the workings of the YaST LDAP client module. If LDAP
is activated for network authentication or the YaST module is called, the
packages pam_ldap and
nss_ldap are installed
and the two
corresponding configuration files are adapted. pam_ldap is the PAM module
responsible for
negotiation between login processes and the LDAP directory as the source of
authentication data. The dedicated module pam_ldap.so
is installed and the PAM configuration is adapted (see
Example 29.11, “pam_unix2.conf Adapted to LDAP”).
Example 29.11. pam_unix2.conf Adapted to LDAP
auth:       use_ldap nullok
account:    use_ldap
password:   use_ldap nullok
session:    none
When manually configuring additional services to use LDAP, include
the PAM LDAP module in the PAM configuration file corresponding to the
service in /etc/pam.d.
Configuration files already adapted to individual services can be found in
/usr/share/doc/packages/pam_ldap/pam.d/.
Copy appropriate files to /etc/pam.d.
glibc name resolution through the
nsswitch mechanism is adapted to the employment of LDAP
with nss_ldap. A new, adapted
file nsswitch.conf is created in
/etc/ with the installation of this package.
More about the workings of nsswitch.conf can be found
in Section 22.5.1, “Configuration Files”.
The following lines must be present in nsswitch.conf
for user administration and authentication with LDAP. See
Example 29.12, “Adaptations in nsswitch.conf”.
Example 29.12. Adaptations in nsswitch.conf
passwd: compat
group: compat

passwd_compat: ldap
group_compat: ldap
These lines order the resolver library of glibc
first to evaluate the corresponding files in /etc and
additionally access the LDAP server as sources for authentication and user
data. Test this mechanism, for example, by reading the content of the user
database with the command getent
passwd. The returned set should contain a
survey of the local users of your system as well as all users stored on the
LDAP server.
To prevent regular users managed through LDAP from logging in to the server
with ssh or login,
the files /etc/passwd and
/etc/group each need to include an additional
line. This is the line
+::::::/sbin/nologin in
/etc/passwd and
+::: in /etc/group.
After nss_ldap,
pam_ldap, /etc/passwd, and
/etc/group have been modified by YaST in the
required way, the actual configuration work can begin on the first YaST
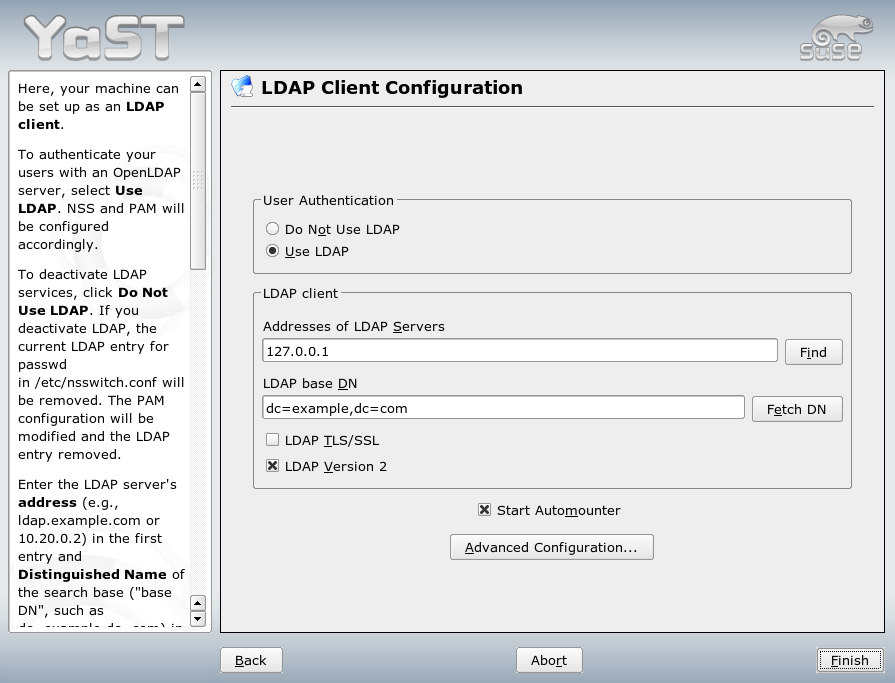
dialog. See Figure 29.2, “YaST: Configuration of the LDAP Client”.
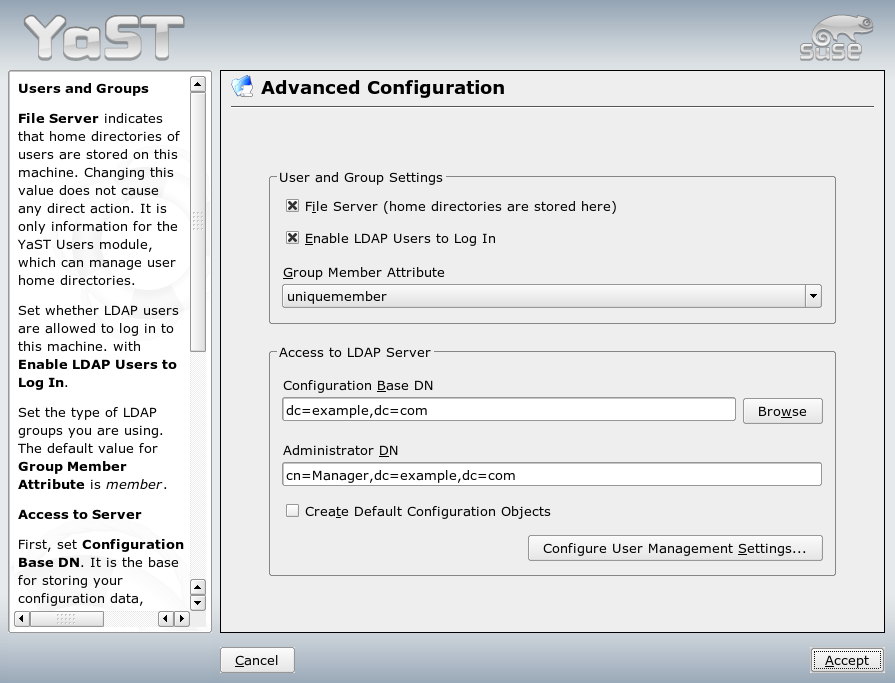
Activate the use of LDAP for user authentication in the first dialog. Enter the search base on the server below which all data is stored on the LDAP server in . Enter the address at which the LDAP server can be reached in . To mount directories on remote hosts automatically, select . To modify data on the server as administrator, click . See Figure 29.3, “YaST: Advanced Configuration”.
The next dialog has two parts: In the upper area, set general options for users and groups, as reflected by the YaST user module. In the lower area, provide the data required to obtain access to the LDAP server. The user and group settings comprise the following items:
If the current system is a file server, with /home
containing individual users' directories, enabling this
ensures that the YaST module deals with the user directories in the
proper way.
Enable this option to give the users administered through LDAP permission to log in on the system.
With this, specify the type of LDAP group to use, (default setting) or .
Enter the required access data for modifying configurations on the LDAP server here. These are below which all configuration objects are stored and .
Click to edit entries on the LDAP server. In the dialog that appears, enter your LDAP password for authentication with the server. Access to the configuration modules on the server is then granted according to the ACLs and ACIs stored on the server.
![[Important]](admon/important.png) | Using the YaST Client |
|---|---|
Use the YaST LDAP client to adapt the YaST modules for user and group administration and to extend them as needed. It is furthermore possible to define templates with default values for the individual attributes to simplify the actual registration of the data. The presets created here are stored themselves as LDAP objects in the LDAP directory. The registration of user data is still done with the regular YaST module input forms. The registered information is stored as objects in the LDAP directory. | |
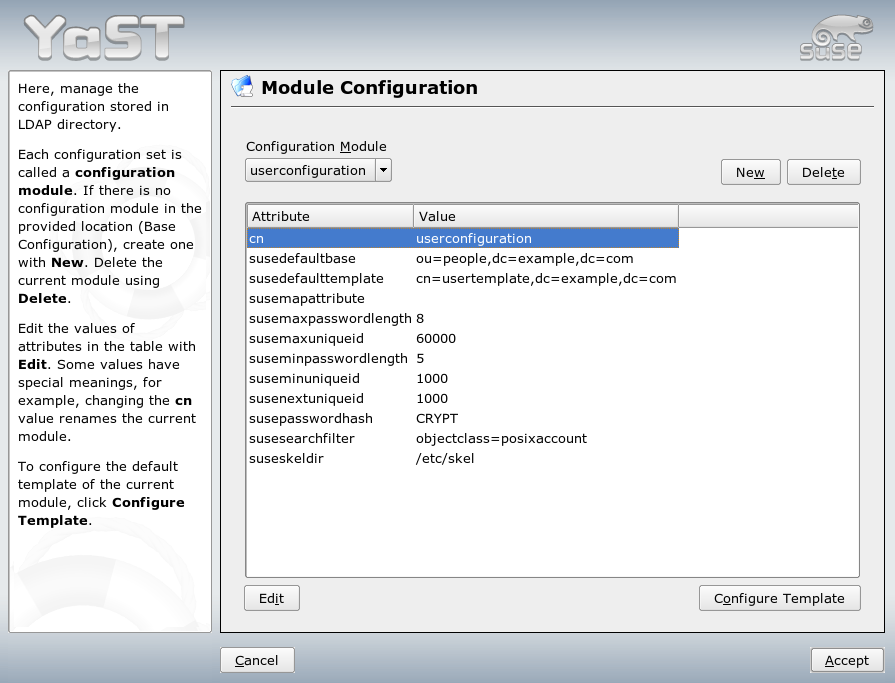
The dialog for module configuration (Figure 29.4, “YaST: Module Configuration”) allows selection and modification of existing configuration modules, creation of new modules, and design and modification of templates for such modules. To modify a value in a configuration module or rename a module, select the module type above the content view of the current module. The content view then features a table listing all attributes allowed in this module with their assigned values. Apart from all set attributes, the list also contains all other attributes allowed by the current schema but currently not used.
To copy a module, it is only necessary to change
cn. To modify individual attribute values,
select
them from the content list then click . A dialog
opens in which to change all settings belonging to the attribute.
Accept the changes with .
If a new module should be added to the existing modules, click
, located above the content overview. Enter the name
and the object class of the new module in the dialog that appears (either
suseuserconfiguration or
susegroupconfiguration). When the dialog is closed with
, the new module is added to the selection list of the
existing modules and can then be selected or deselected. Clicking
deletes the currently selected module.
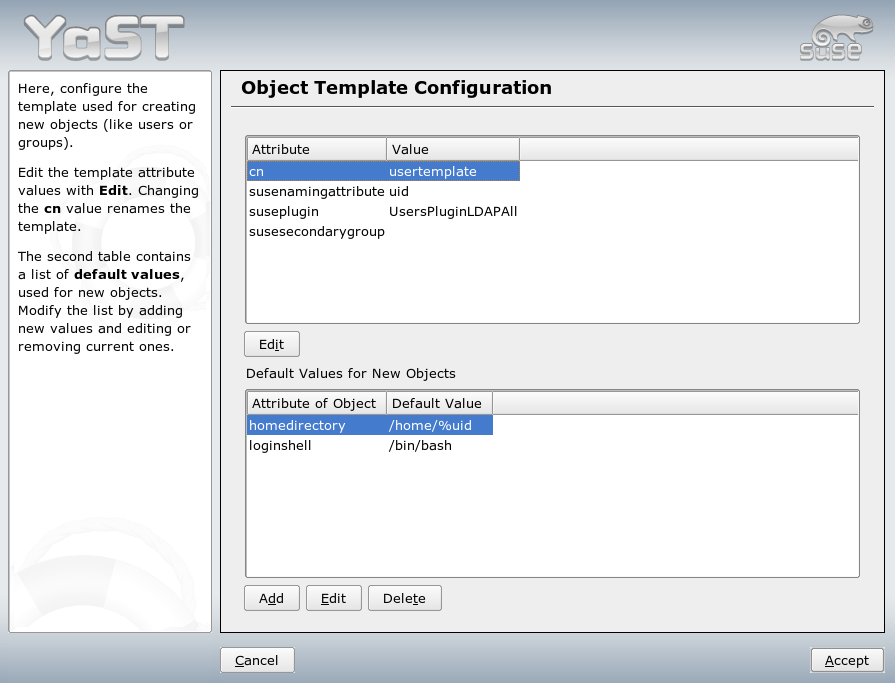
The YaST modules for group and user administration embed templates with sensible standard values, if these were previously defined with the YaST LDAP clients. To edit a template as desired, click . The drop-down menu contains already existing, modifiable templates or an empty entry. Select one and configure the properties of this template in the form (see Figure 29.5, “YaST: Configuration of an Object Template”). This form is subdivided into two overview windows in table form. The upper window lists all general template attributes. Determine the values according to your needs or leave some of them empty. Empty attributes are deleted on the LDAP server.
The second view ()
lists all attributes of the corresponding LDAP object (in this case, group
or user configuration) for which a standard value is defined. Additional
attributes and their standard values can be added, existing
attribute and value
pairs can be edited, and entire attributes can be deleted. Copy a template
by changing the cn entry. Connect the template to its
module, as already described, by setting the
susedefaulttemplate attribute value of the module to the
DN of the adapted template.
![[Tip]](admon/tip.png) | Tip |
|---|---|
The default values for an attribute can be created from other
attributes by using a variable style instead of an absolute value. For
example, when creating a new user, | |
Once all modules and templates are configured correctly and ready to run, new groups and users can be registered in the usual way with YaST.
The actual registration of user and group data differs only slightly from the procedure when not using LDAP. The following brief instructions relate to the administration of users. The procedure for administering groups is analogous.
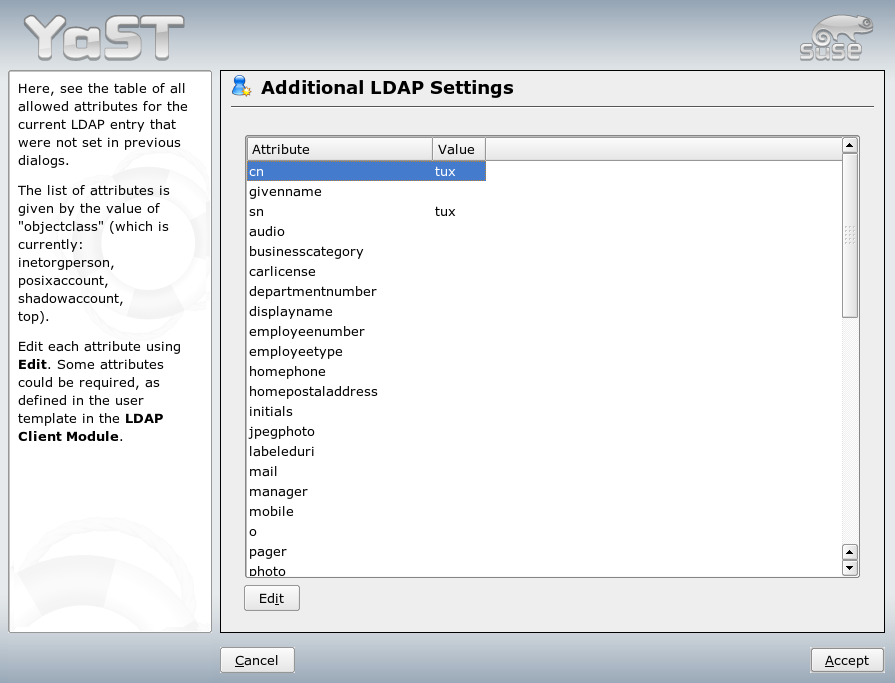
Access the YaST user administration with +. An input form is displayed for the registration of the most important user data, like name, login, and password. accesses a form for the configuration of group membership, login shell, and the home directory. The default values were defined with the procedure described in Section 29.5.2, “Configuration of the LDAP Client”. When LDAP is used, this form leads to another form for the registration of LDAP-specific attributes. It is shown in Figure 29.6, “YaST: Additional LDAP Settings”. Select all attributes for which to change the value then click . Closing the form that opens with returns to the initial input form for user administration.
The initial input form of user administration offers . This gives the possibility to apply LDAP search filters to the set of available users or go to the module for the configuration of LDAP users and groups by selecting .