Part II. System / Chapter 11. The X Window System | ||||
|---|---|---|---|---|
 | 10.4. Language and Country-Specific Settings | 11.2. Optimizing the X Configuration |  | |
Part II. System / Chapter 11. The X Window System | ||||
|---|---|---|---|---|
| 10.4. Language and Country-Specific Settings | 11.2. Optimizing the X Configuration | | |
Table of Contents
Abstract
The X Window System (X11) is the de facto standard for graphical user interfaces in UNIX. X is network-based, enabling applications started on one host to be displayed on another host connected over any kind of network (LAN or Internet). This chapter describes the setup and optimization of the X Window System environment, provides background information about the use of fonts in SUSE LINUX, and explains the configuration of OpenGL and 3D.
The graphical user interface, or X server, handles the communication between hardware and software. Desktops, like KDE and GNOME, and the wide variety of window managers, use the X server for interaction with the user.
The graphical user interface is initially configured during installation. To change the settings afterwards, run SaX2. The current settings are saved and you can reset to them at any time. The current values are displayed and offered for modification: the screen resolution, the color depth, the refresh rate, and the vendor and type of your monitor, if autodetected.
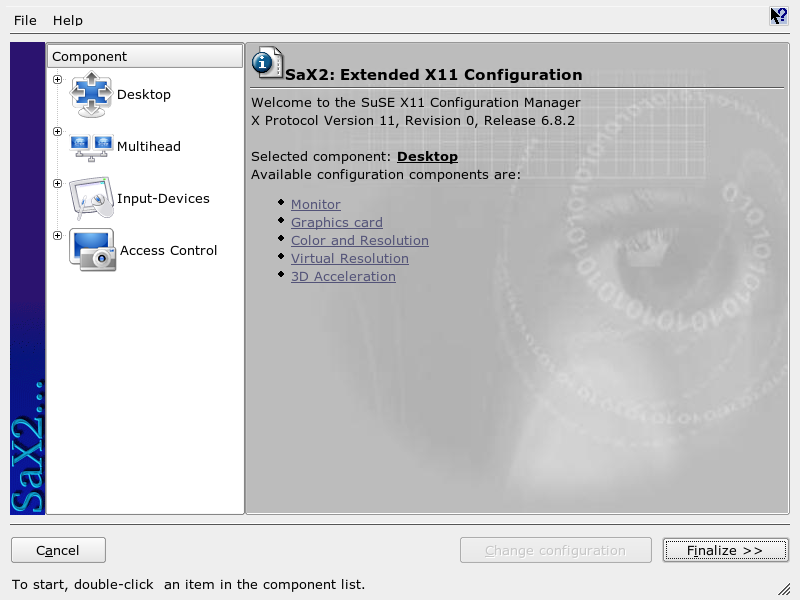
If you have just installed a new graphics card, a small dialog appears asking whether to activate 3D acceleration for your graphics card. Click . SaX2, the configuration tool for the input and display devices, starts in a separate window. This window is shown in Figure 11.1, “The Main Window of SaX2”.
In the left navigation bar, there are four main items: , , , and . Configure your monitor, graphics card, color depth, resolution, and the position and size of the screen under . The keyboard, mouse, touchscreen monitor, and graphics tablet can be configured under . Use to configure multiple screens (see Section 11.1.7, “Multihead”). is a useful tool for controlling the mouse pointer with the keys on the number pad.
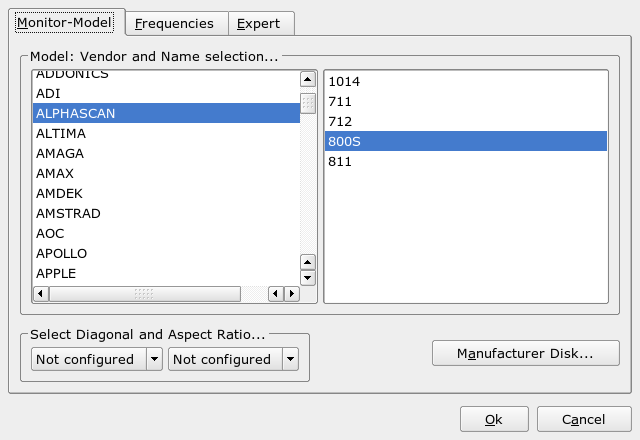
Select your monitor and graphics card. Usually, the monitor and graphics card are autodetected by the system. If your monitor is not autodetected, automatically proceed to the monitor selection dialog. Select your monitor from the list of vendors and devices or manually enter the monitor values specified in the monitor manual. Alternatively, select one of the preconfigured VESA modes.
Click in the main window following the completion of the settings for your monitor and your graphics card then test your settings. This ensures that your configuration is suitable for your devices. If the image is not steady, terminate the test immediately by pressing Esc and reduce the refresh rate or the resolution and color depth. Regardless of whether you run a test, all modifications are only activated when you restart the X server.
With +, a window with the tabs , , and appears.
In the left part of the window, select the vendor. In the right part, select your model. If you have floppy disks with Linux drivers for your monitor, install these by clicking .
Here, enter the horizontal and vertical frequencies for your screen. The vertical frequency is another designation for the image refresh rate. Normally, the acceptable value ranges are read from the model and entered here. Usually, they do not need to be changed.
Here, enter some options for your screen. In the upper selection field, define the method to use for the calculation of the screen resolution and screen geometry. Do not change anything unless the monitor is addressed incorrectly and the display is not stable. Additionally, you can change the size of the displayed image and activate the power saving mode DPMS.
![[Warning]](admon/warning.png) | Configuring the Monitor Frequencies |
|---|---|
There are safety mechanisms, but you should still be very careful when manually changing the allowed frequencies. Incorrect values may destroy your monitor. If in doubt, refer to the manual of the monitor. | |
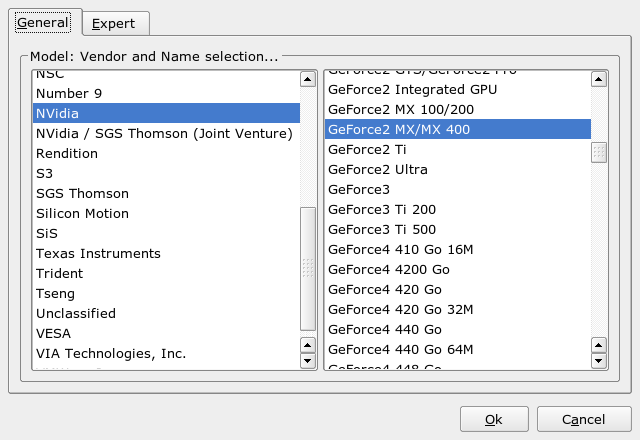
The graphics card dialog has two tabs: and . In , select the vendor of your graphics card on the left side and the model on the right.
offers more advanced configuration possibilities. On the right side, turn your screen to the left or to a vertical position (useful for some turnable TFT screens). The entries for the BusID are only relevant if you operate several screens. Normally, nothing needs to be changed here. You should not modify the card options unless you have experience in this field and know what the options mean. If necessary, check the documentation of your graphics card.
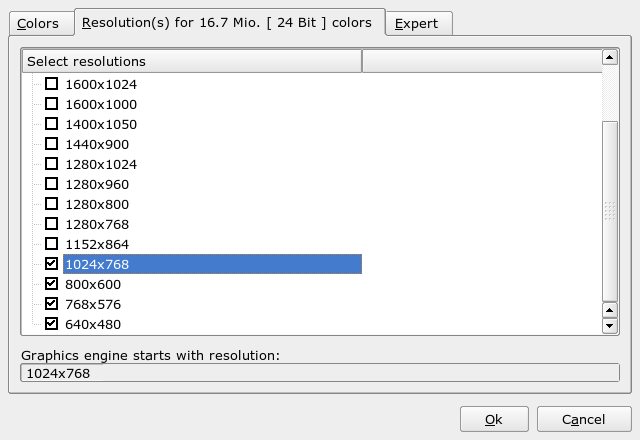
Here, three tabs, , , and , are available.
Depending on the hardware used, select a color depth of 16, 256, 32768, 65536, or 16.7 million colors (4, 8, 15, 16, or 24 bit). For a reasonable display quality, set at least 256 colors.
The module offers all resolution and color depth combinations that your hardware can display correctly. This keeps the danger of damaging your hardware with incorrect settings very low in SUSE LINUX. If you change the resolution manually, consult the documentation of your hardware to make sure the value set can be displayed.
In addition to the resolutions offered in the previous tab, this tab enables you to add your own resolutions, which will subsequently be included for selection in the tab.
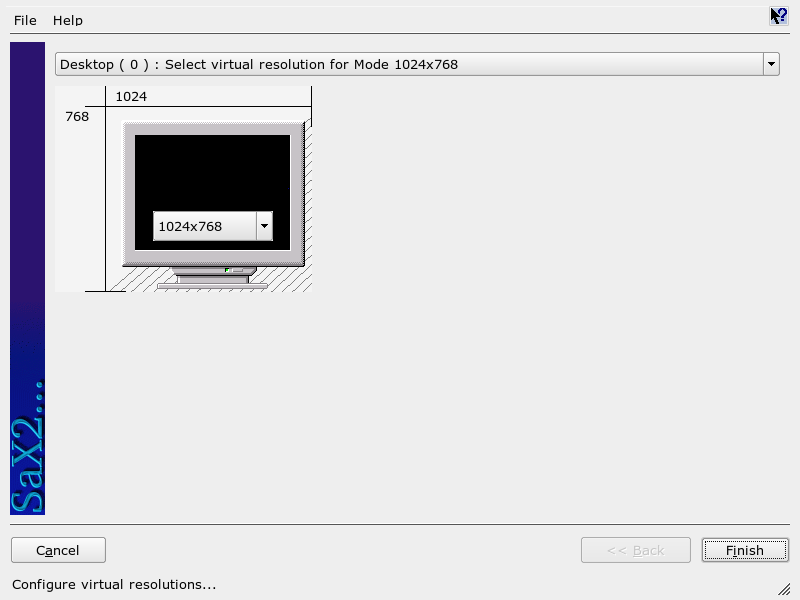
Every desktop has a certain resolution that is displayed over the full screen of the monitor. Additionally, it is possible to set the resolution larger than the visible area of the screen. If you move the mouse beyond the margins of the desktop, the virtual part of the desktop is displayed on screen. This increases the available work space.
The virtual resolution can be set in two different ways. To set it using , move the mouse pointer over the monitor image so it turns into crosshairs. Keep the left mouse button pressed and move the mouse to enlarge the raster image, which corresponds with the virtual resolution. This method is best if you are not quite sure how much virtual space you want on your desktop.
For , the pop-up menu in the middle of the raster image displays the currently used virtual resolution. To use one of the default virtual resolutions, select one from the menu.
If you did not activate 3D acceleration during the initial installation or when you installed a new graphics card, you can do this here.
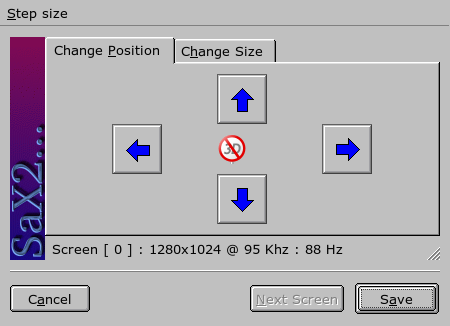
Under these two tabs, precisely adjust the size and the position of the image with the arrows. See Figure 11.6, “Adjusting the Image Geometry”. If you have a multihead environment (more than one screen), use to switch to the other monitors to adjust their sizes and positions. Press to save your settings.
If you have installed more than one graphics card in your computer or a graphics card with multiple outputs, you can connect more than one screen to your system. If you operate two screens, this is referred to as dualhead. More than two is referred to as multihead. SaX2 automatically detects multiple graphics cards in the system and prepares the configuration accordingly. Set the multihead mode and the arrangement of the screens in the multihead dialog. Three modes are offered: (default), , and .
Each monitor represents an individual unit. The mouse pointer can switch between the screens.
In this mode, all monitors display the same contents. The mouse is only visible on the main screen.
All screens combine to form a single large screen. Program windows can be positioned freely on all screens or scaled to a size that fills more than one monitor.
The layout of a multihead environment describes the arrangement of and the relationship between the individual screens. By default, SaX2 configures a standard layout that follows the sequence of the detected graphics cards, arranging all screens in a row from left to right. In the dialog of the multihead tool, determine the way the monitors are arranged by using the mouse to move the screen symbols in the grid. After completing the layout dialog, verify the new configuration by clicking .
Linux currently does not offer 3D support for Xinerama multihead environments. In this case, SaX2 deactivates the 3D support.
If the automatic detection fails, use this dialog to configure your mouse manually. Refer to the documentation of your mouse for a description of the model. Select your model from the list of supported mouse types and confirm by pressing 5 on the number pad.
Use the selection field at the top of this dialog to specify the kind of keyboard to use. Then select the language for the keyboard layout (the country-specific position of the keys). Use the test field to check if special characters are displayed correctly.
The status of the check box used for activating and deactivating the entry of accented letters depends on the respective language and does not need to be changed. Click to apply the new settings to your system.
Currently, X.Org only supports Microtouch and Elo TouchSystems touchscreens. SaX2 can only autodetect the monitor, not the toucher. The toucher is treated as an input device.
To configure the toucher, start SaX2 and select +. Click and add a touchscreen. Save the configuration by clicking . You do not need to test the configuration.
Touchscreens feature a variety of options and usually must be calibrated first. Unfortunately, there is no general tool for this purpose in Linux. The standard configuration contains suitable default values for the dimensions of the touchscreen. Normally, no additional configuration is required.
Currently, X.Org only supports a limited number of graphics tablets. SaX2 enables the configuration of graphics tablets connected to the USB port or the serial port. From the configuration perspective, a graphics tablet is just an input device like a mouse.
Start SaX2 and select
+.
Click , select
the vendor from the following dialog, and add a graphics tablet from the
selection list. Mark the check boxes to the right if you have connected a
pen or eraser. If your tablet is connected to the serial port, verify the
port. /dev/ttyS0 refers to the first serial port.
/dev/ttyS1 refers to the second. Additional ports
use similar notation. Save the configuration by clicking
.
If you do not use a mouse on your computer, start SaX2 and activate AccessX to be able to control the mouse pointer with the keys on the numeric keypad. See Table 11.1, “AccessX—Operating the Mouse with the Numeric Keypad” for a description of the functions of the different keys. Use the slider to set the speed of the mouse pointer movement when a key is pressed.
Table 11.1. AccessX—Operating the Mouse with the Numeric Keypad
Key | description |
|---|---|
÷ | selects the left mouse button |
× | selects the middle mouse button |
– | selects the right mouse button |
5 | invokes a click event of the previously selected mouse button. The left mouse button is preset if no other button was selected. The selection is reset to its default after the event. |
+ | acts like 5 except is a double-click event |
0 | acts like 5 except is a click-and-hold event |
Del | releases the click-and-hold event previously invoked with 0 |
7 | moves the cursor toward the upper left |
8 | moves the cursor straight upwards |
9 | moves the cursor towards the upper right |
4 | moves the cursor towards the left |
6 | moves the cursor towards the right |
1 | moves the cursor towards the lower left |
2 | moves the cursor straight downwards |
3 | moves the cursor towards the lower right |
In YaST, select the menu entry then click . In the started module, configure your joystick by selecting the manufacturer and the model from the displayed list. With , check if your joystick responds correctly. The test dialog shows three charts for the analog axes of the joystick and marks for the four standard buttons. When you move the joystick or press the buttons, you should be able to see a reaction in the test dialog. Because joysticks are usually connected to the sound card, you can also access this module from the sound card configuration.