| SUSE LINUX – Administration Guide Part III. Services / Chapter 27. Security in Linux | ||||
|---|---|---|---|---|
 | 26.3. Proxy Server: Squid | 27.2. SSH: Secure Network Operations |  | |
| SUSE LINUX – Administration Guide Part III. Services / Chapter 27. Security in Linux | ||||
|---|---|---|---|---|
| 26.3. Proxy Server: Squid | 27.2. SSH: Secure Network Operations | | |
Table of Contents
Abstract
Masquerading and the firewall ensure a controlled data flow and data exchange. SSH (Secure Shell) enables you to log in to remote hosts over an encrypted connection. The encryption of files or entire partitions protects your data in the event that third parties gain access to your system. Apart from these purely technical instructions, the last section focuses on security aspects in Linux networks.
Whenever Linux is used in a networked environment, you can use the kernel functions that allow the manipulation of network packets to maintain a separation between internal and external network areas. The Linux netfilter framework provides the means to establish an effective firewall that keeps different networks apart. With the help of iptables — a generic table structure for the definition of rule sets — precisely control the packets allowed to pass a network interface. Such a packet filter can be set up quite easily with the help of SuSEfirewall2 and the corresponding YaST module.
The components netfilter and iptables are responsible for the filtering and manipulation of network packets as well as for network address translation (NAT). The filtering criteria and any actions associated with them are stored in chains, which must be matched one after another by individual network packets as they arrive. The chains to match are stored in tables. The iptables command allows you to alter these tables and rule sets.
The Linux kernel maintains three tables, each for a particular category of functions of the packet filter:
This table holds the bulk of the filter rules, because it implements the packet filtering mechanism in the stricter sense, which determines whether packets are let through (ACCEPT) or discarded (DROP), for instance.
This table defines any changes to the source and target addresses of packets. Using these functions also allows you to implement masquerading, which is a special case of NAT used to link a private network with the Internet.
The rules held in this table make it possible to manipulate values stored in IP headers (such as the type of service).
The above-mentioned tables contain several predefined chains to match packets:
This chain is applied to incoming packets.
This chain is applied to packets destined for the system's internal processes.
This chain is applied to packets that are only routed through the system.
This chain is applied to packets originating from the system itself.
This chain is applied to all outgoing packets.
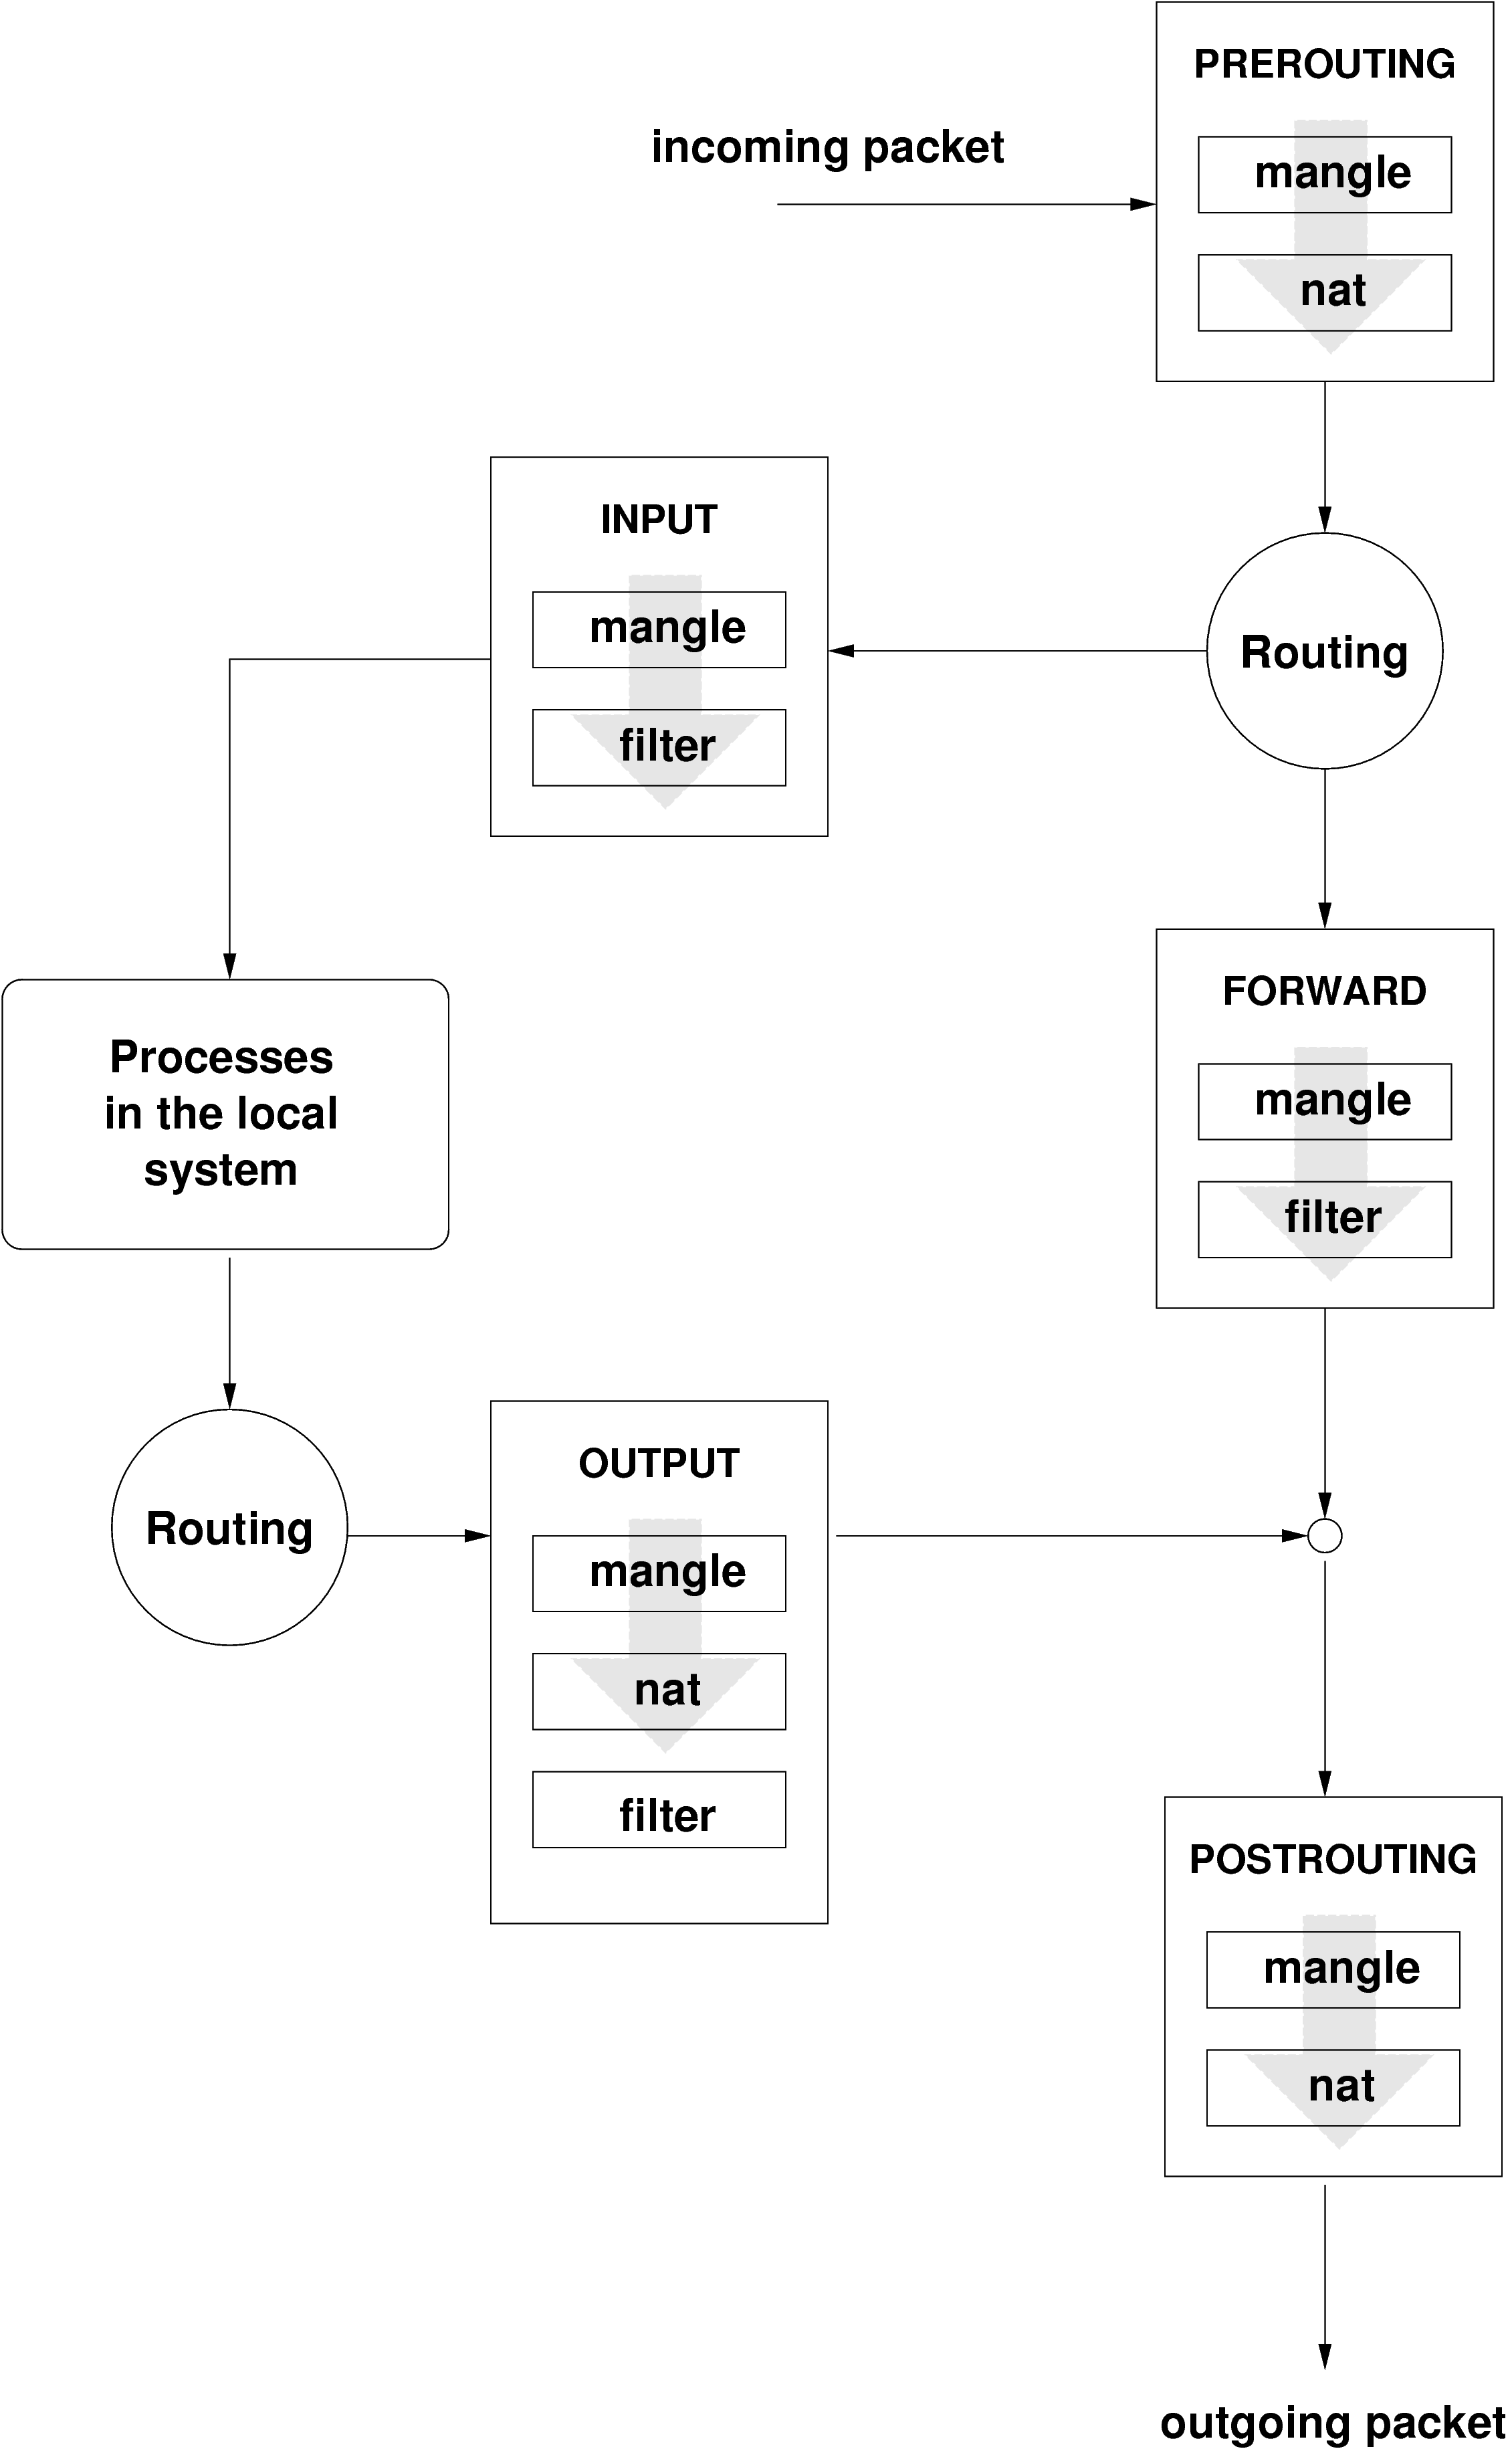
Figure 27.1. “iptables: A Packet's Possible Paths” illustrates the paths along which a network packet may travel on a given system. For the sake of simplicity, the figure lists tables as parts of chains, but in reality these chains are held within the tables themselves.
In the simplest of all possible cases, an incoming packet destined for the system itself arrives at the eth0 interface. The packet is first referred to the PREROUTING chain of the mangle table then to the PREROUTING chain of the nat table. The following step, concerning the routing of the packet, determines that the actual target of the packet is a process of the system itself. After passing the INPUT chains of the mangle and the filter table, the packet finally reaches its target, provided that the rules of the filter table are actually matched.
Masquerading is the Linux-specific form of NAT (network address translation). It can be used to connect a small LAN (where hosts use IP addresses from the private range — see 22.1.2.2. “Netmasks and Routing”) with the Internet (where official IP addresses are used). For the LAN hosts to be able to connect to the Internet, their private addresses are translated to an official one. This is done on the router, which acts as the gateway between the LAN and the Internet. The underlying principle is a simple one: The router has more than one network interface, typically a network card and a separate interface connecting with the Internet. While the latter links the router with the outside world, one or several others link it with the LAN hosts. With these hosts in the local network connected to the network card (such as eth0) of the router, they can send any packets not destined for the local network to their default gateway or router.
![[Important]](admon/important.png) | Using the Correct Network Mask |
|---|---|
When configuring your network, make sure both the broadcast address and the netmask are the same for all local hosts. Failing to do so results in a broken network because packets cannot be routed properly. | |
As mentioned, whenever one of the LAN hosts sends a packet destined for an Internet address, it goes to the default router. However, the router must be configured before it can forward such packets. For security reasons, SUSE LINUX does not enable this in a default installation. To enable it, set the variable IP_FORWARD in the file /etc/sysconfig/sysctl to IP_FORWARD=yes.
The target host of the connection can see your router, but knows nothing about the host in your internal network where the packets originated. This is why the technique is called masquerading. Because of the address translation, the router is the first destination of any reply packets. The router must identify these incoming packets and translate their target addresses, so packets can be forwarded to the correct host in the local network.
With the routing of inbound traffic depending on the masquerading table, there is no way to open a connection to an internal host from the outside. For such a connection, there would be no entry in the table. In addition, any connection already established has a status entry assigned to it in the table, so the entry cannot be used by another connection.
As a consequence of all this, you might experience some problems with a number of application protocols, such as ICQ, cucme, IRC (DCC, CTCP), and FTP (in PORT mode). Netscape, the standard FTP program, and many others use the PASV mode. This passive mode is much less problematic as far as packet filtering and masquerading is concerned.
Firewall is probably the term most widely used to describe a mechanism that provides and manages a link between networks while also controlling the data flow between them. Strictly speaking, the mechanism described in this section is called a packet filter. A packet filter regulates the data flow according to certain criteria, such as protocols, ports, and IP addresses. This allows you to block packets that, according to their addresses, are not supposed to reach your network.
To allow public access to your web server, for example, explicitly open the corresponding port. However, a packet filter does not scan the contents of packets with legitimate addresses, such as those directed to your web server. For example, if incoming packets were intended to compromise a CGI program on your web server, the packet filter would still let them through.
A more effective but more complex mechanism is the combination of several types of systems, such as a packet filter interacting with an application gateway or proxy. In this case, the packet filter rejects any packets destined for disabled ports. Only packets directed to the application gateway are accepted. This gateway or proxy pretends to be the actual client of the server. In a sense, such a proxy could be considered a masquerading host on the protocol level used by the application. One example for such a proxy is Squid, an HTTP proxy server. To use Squid, the browser must be configured to communicate via the proxy. Any HTTP pages requested are served from the proxy cache and pages not found in the cache are fetched from the Internet by the proxy. As another example, the SUSE proxy-suite (proxy-suite) provides a proxy for the FTP protocol.
The following section focuses on the packet filter that comes with SUSE LINUX. For further information about packet filtering and firewalling, read the Firewall HOWTO included in the howto package. If this package is installed, read the HOWTO with less /usr/share/doc/howto/en/Firewall-HOWTO.gz.
SuSEfirewall2 is a script that reads the variables set in /etc/sysconfig/SuSEfirewall2 to generate a set of iptables rules. It defines three security zones, although only the first and the second one are considered in the following sample configuration:
Given that there is no way to control what is happening on the external network, the host needs to be protected from it. In most cases, the external network is the Internet, but it could be another insecure network, such as a WLAN.
This refers to the private network, in most cases the LAN. If the hosts on this network use IP addresses from the private range (see 22.1.2.2. “Netmasks and Routing”), enable network address translation (NAT), so hosts on the internal network can access the external one.
While hosts located in this zone can be reached both from the external and the internal network, they cannot access the internal network themselves. This setup can be used to put an additional line of defense in front of the internal network, because the DMZ systems are isolated from the internal network.
Any kind of network traffic not explicitly allowed by the filtering rule set is suppressed by iptables. Therefore, each of the interfaces with incoming traffic must be placed into one of the three zones. For each of the zones, define the services or protocols allowed. The rule set is only applied to packets originating from external hosts. Locally generated packets are not captured by the firewall.
The configuration can be performed with YaST (see 27.1.4.1. “Configuration with YaST”). It can also be made manually in the file /etc/sysconfig/SuSEfirewall2, which is well commented. Additionally, a number of example scenarios are available in /usr/share/doc/SuSEfirewall2/EXAMPLES.
| Automatic Firewall Configuration |
|---|---|
YaST automatically starts a firewall on all configured interfaces. If a server is configured and activated on the system, YaST modifies the automatically generated firewall configuration with the options or in the server configuration modules. Some server module dialogs feature a button for activating additional services and ports. The YaST firewall configuration module can only be used to activate, deactivate, or independently reconfigure the firewall. | |
The YaST dialogs for the graphical configuration can be accessed from the YaST Control Center. Select +. The configuration is divided into five sections:
If SuSEfirewall2 is already active on the system because the automatic firewall configuration and initialization was not deactivated during the installation, this dialog appears. You can manually edit the firewall settings that were automatically generated by YaST with or select to stop and skip the firewall entirely when the system is booted. If there is no active firewall on the system, this dialog does not appear and the configuration begins with the Basic Settings.
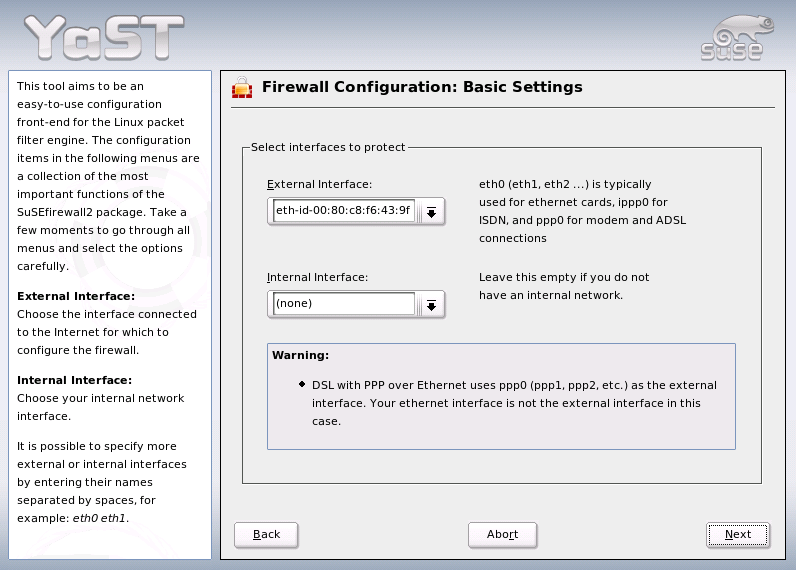
Specify the interfaces to protect. To protect an individual host that is not connected to an internal network, enter the interface facing the Internet. Several interfaces can be specified in a comma-separated list. If the system is connected to an internal network, the interface facing the internal network must also be specified to protect the system against the internal network. This puts your system in a DMZ. This type of configuration is usually only needed in company networks. Click to exit this dialog.
You only need this option to use your system to offer services accessible from the Internet (web server, mail server, etc.). Activate the respective check boxes or use to enable services by way of their port numbers (listed in /etc/services). If your host is not used as a server, press to exit this dialog without making any changes.
Here, select the main features of your firewall:
Protects hosts in the internal network from the Internet — all Internet services appear to be used by your firewall, while the internal hosts remain invisible.
If enabled, internal hosts can only use the services explicitly made available to them. Given that services cannot be made available from these dialogs, disable this option if you want internal hosts to access the firewall.
Enable this to deny access to the TCP and UDP services of the firewall from the outside completely. This does not affect the services explicitly made available in the preceding step.
This assists in checking the routing to your firewall.
This tells the firewall to deal with successfully decrypted IPsec packets as if they were packets coming from the internal network.
When completed the feature configuration, exit this dialog with .
Determine the scope of logging for your firewall. Before activating the , consider that these log files produce a large amount of output. The configuration of the logging function is the final step of the firewall configuration. Exit the dialog with and confirm the following message to activate the firewall.
The following paragraphs provide step-by-step instructions for a successful configuration. Each configuration item is marked as to whether it is relevant to firewalling or masquerading. Aspects related to the DMZ (demilitarized zone) as mentioned in the configuration file are not covered here. They are applicable only to a more complex network infrastructure found in larger organizations (corporate networks), which require extensive configuration and in-depth knowledge about the subject.
First, use the YaST runlevel editor to enable SuSEfirewall2 in your runlevel (3 or 5 most likely). It sets the symlinks for the SuSEfirewall2_* scripts in the /etc/init.d/rc?.d/ directories.
The device linked to the Internet. For a modem or DSL connection, enter ppp0. For an ISDN link, use ippp0. Specify auto to use the interface that corresponds to the default route.
The device linked to the internal, private network (such as eth0). Leave this blank if there is no internal network and the firewall protects only the host on which it runs.
If you need the masquerading function, set this to yes. Your internal hosts will not be visible to the outside, because their private network addresses (e.g., 192.168.x.x) are ignored by Internet routers.
For a firewall without masquerading, only set this to yes if you want to allow access to the internal network. Your internal hosts need to use officially registered IPs in this case. Normally, however, you should not allow access to your internal network from the outside.
Set this to yes if you need the masquerading function. It is more secure to have a proxy server between the hosts of the internal network and the Internet.
Specify the hosts or networks to masquerade, leaving a space between the individual entries. For example:
FW_MASQ_NETS="192.168.0.0/24 192.168.10.1"
Set this to yes to protect your firewall host from attacks originating in your internal network. Services are only be available to the internal network if explicitly enabled. Also see FW_SERVICES_INT_TCP and FW_SERVICES_INT_UDP.
Normally, set this to yes to enable automatic generation of explicit rules for running services.
Enter the TCP ports that should be made available. Leave this blank for a normal workstation at home that should not offer any services.
Leave this blank unless you run a name server and want to make it available to the outside. In that case, enter the UDP ports to use.
With this variable, define the services available for the internal network. The notation is the same as for FW_SERVICES_EXT_TCP, but the settings are applied to the internal network. The variable only needs to be set if FW_PROTECT_FROM_INTERNAL is set to yes.
See above.
Insert yes if you have configured your dial-up procedure to work automatically via diald or ISDN (dial-on-demand).
After configuring the firewall, test your setup. The firewall rule sets are created by entering SuSEfirewall2 start as root. Then use telnet, for example, from an external host to see whether the connection is actually denied. After that, review /var/log/messages, where you should see something like this:
Mar 15 13:21:38 linux kernel: SFW2-INext-DROP-DEFLT IN=eth0
OUT= MAC=00:80:c8:94:c3:e7:00:a0:c9:4d:27:56:08:00 SRC=192.168.10.0
DST=192.168.10.1 LEN=60 TOS=0x10 PREC=0x00 TTL=64 ID=15330 DF PROTO=TCP
SPT=48091 DPT=23 WINDOW=5840 RES=0x00 SYN URGP=0
OPT (020405B40402080A061AFEBC0000000001030300)
The most up-to-date information and other documentation about the SuSEfirewall2 package is found in /usr/share/doc/packages/SuSEfirewall2. The home page of the netfilter and iptables project, http://www.netfilter.org, provides a large collection of documents in many languages.