| SUSE LINUX – Administration Guide Chapter 2. System Configuration with YaST / 2.3. Software | ||||
|---|---|---|---|---|
 | 2.2. The YaST Control Center | 2.4. Hardware |  | |
| SUSE LINUX – Administration Guide Chapter 2. System Configuration with YaST / 2.3. Software | ||||
|---|---|---|---|---|
| 2.2. The YaST Control Center | 2.4. Hardware | | |
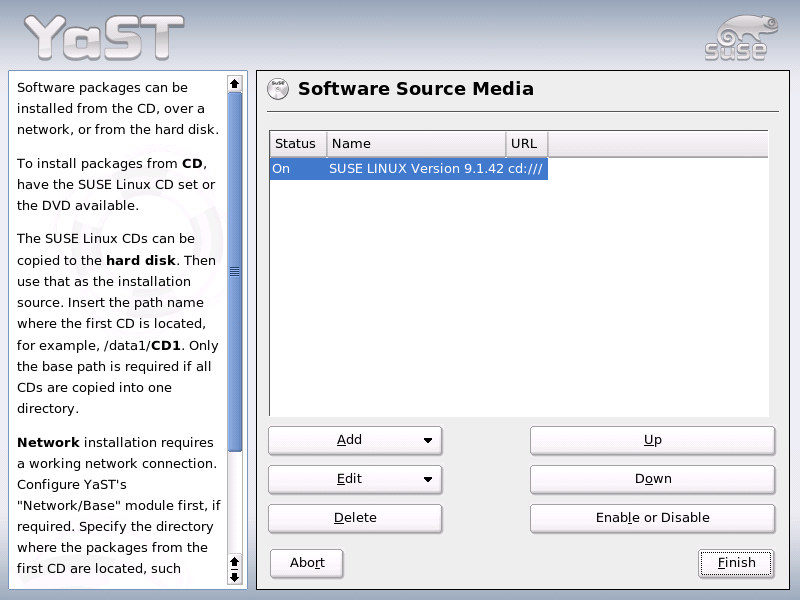
YaST can administer a number of different installation sources. It enables their selection for installation or update purposes. When this module starts, it displays a list of all previously registered sources. Following a normal installation from CD, only the installation CD is listed. Click to include additional sources in this list. As well as removable media like CDs and DVDs, you can add network sources, like NFS and FTP servers. Even directories on the local hard disk can be selected as the installation medium. See the detailed YaST help text.
All registered sources have an activation status in the first column of the list. Click to activate or deactivate individual installation sources. During the installation of software packages or updates, YaST selects a suitable entry from the list of activated installation sources. When you exit the module with , the current settings are saved and applied to the configuration modules and .
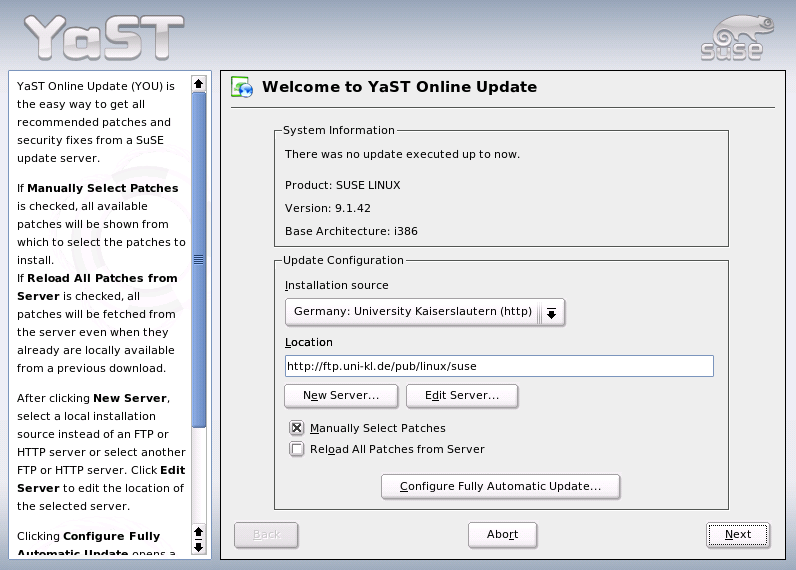
The YaST Online Update (YOU) enables the installation of important updates and improvements. These patches are available for download on the SUSE FTP server and various mirror servers.
Under , select one of the various servers. When you select a server, its URL is copied to the input field, where it can be edited. You can also specify local URLs in the format file:/my/path or /my/path. Expand the existing list with additional servers using . Click to modify the settings of the currently selected server.
When the module starts, is active, enabling selection of the patches to fetch. To apply all available update packages, deactivate this option. However, depending on the bandwidth of the connection and the amount of data to transmit, this can result in long download times.
If you activate , all available patches, installable packages, and descriptions are downloaded from the server. If this is not activated (default), only retrieve patches not yet installed on your system.
Additionally, the system can be updated automatically. Click to configure a process that automatically looks for updates and applies them on a regular basis. This procedure is fully automated. Of course, the system must be able to connect to the update server at the scheduled time.
To perform the update, click . For a manual update, this loads a list of all available patches and starts the package manager, described in 2.3.3. “Installing and Removing Software”. In the package manager, the filter for YOU patches is activated, enabling selection of updates to install. At start-up, the available security patches and recommended patches are preselected, provided the respective packages are installed on the system. This proposal should be accepted.
After making your selection, click in the package manager. All selected updates are then downloaded from the server and installed on your machine. Depending on the connection speed and hardware performance, this may take some time. Any errors are displayed in a window. If necessary, skip a problematic package. Prior to the installation, some patches open a window displaying details.
While the updates are downloaded and installed, you can track all actions in the log window. Following the successful installation of all patches, exit YOU with . If you do not need the update files after the installation, select for them to be deleted after the update. Finally, SuSEconfig is executed to adjust the system configuration as needed.
This module enables installation, uninstallation, and update of software on your machine. In Linux, software is available in the form of packages. Normally, a package contains everything needed for a program: the program itself, the configuration files, and documentation. A package containing the source files for the program is normally available as well. The sources are not needed for running the program, but you may want to install the sources to compile a custom version of the program.
Some packages depend on other packages. This means that the software of the package only works properly if another package is also installed. Furthermore, the installation of some packages is only possible if certain other packages are installed, perhaps because the installation routine needs specific tools. Accordingly, such packages must be installed in the correct sequence. There are some packages with identical or similar functionalities. If these packages use the same system resource, they should not be installed concurrently (package conflict). Dependencies and conflicts can occur between two or more packages and are sometimes very complex. The fact that a specific package version may be required for smooth interaction can make things even more complicated.
All these factors must be taken into consideration when installing, uninstalling, and updating software. YaST provides an extremely efficient tool for this purpose: the software installation module, usually referred to as the package manager. When the package manager starts, it examines the system and displays installed packages. If you select additional packages for installation, the package manager automatically checks the dependencies and selects any other needed packages (resolution of dependencies). If you select conflicting packages, the package manager indicates this and submits suggestions for solving the problem (resolution of conflicts). If a package needed by other installed packages is marked for deletion, the package manager issues an alert with detailed information and alternative solutions.
Apart from these purely technical aspects, the package manager provides a well-structured overview of the range of packages in SUSE LINUX. The packages are arranged by subjects and the display of these groups is restricted by means of suitable filters.
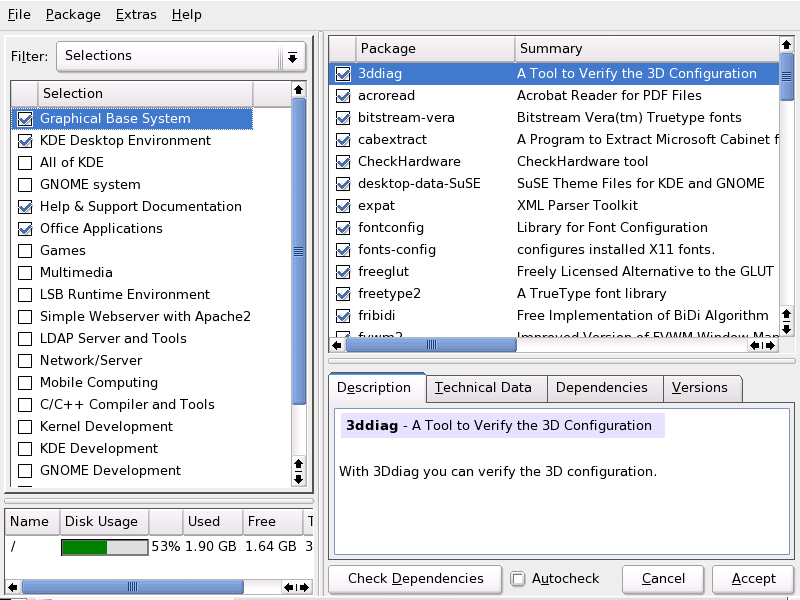
To change the software selection on your system with the package manager, select in the YaST Control Center. The dialog window of the package manager is shown in Figure 2.4. “YaST Package Manager”. The window comprises various frames. Modify the frame sizes by clicking and moving the lines separating the areas. The contents of the frames and their uses are described below.
The package manager offers various filter methods for arranging the packages in categories and limiting the number of packages displayed. The filter window is located to the left under the menu bar. It controls and displays various filter methods. The filter selection box at the top determines what is displayed in the lower part of the filter window. Click the filter selection box to select a filter from the list of available filters.
At start-up, the filter is active. This filter groups the program packages according to their application purpose, such as multimedia or office applications. The various groups of the filter are listed under the filter selection box. The packages already installed on the system are preselected. Click the status box at the beginning of a line to toggle the status flags of a selection. Select a status directly by right-clicking the selection and using the context menu. The individual package window to the right displays the list of packages included in the current selection, enabling selection and deselection of individual packages.
The filter provides a more technical overview of the range of packages and is suitable for users who are familiar with the package structure of SUSE LINUX. This filter sorts the program packages by subjects, such as applications, development, and hardware, in a tree structure to the left. The more you expand the branches, the more specific the selection is and the fewer packages are displayed in the individual package window to the right.
Additionally, this filter provides the possibility to display all packages in alphabetic order without any categorization. To do this, select in the top level. As SUSE LINUX contains a large number of packages, it may take some time to display this long list.
The function is the easiest way to find a specific package. By specifying various search criteria, you can restrict the filter so much that often only one package is displayed in the individual package window. Enter a search string and use the check boxes to determine where to search for this string (in the name, in the description, or in the package dependencies). Advanced users can define special search patterns using wild cards and regular expressions and search the package dependencies in the and fields. For example, software developers who download source packages from the Internet can use this function to determine which package contains a specific library.
![[Tip]](admon/tip.png) | Quick Search |
|---|---|
In addition to the filter, all lists of the package manager feature a quick search. Simply enter a letter to move the cursor to the first package in the list whose name begins with this letter. The cursor must be in the list (by clicking the list). | |
After selecting the packages for installation, update, or deletion, use the filter selection to view the installation summary. It shows what will happen with packages when you click . Use the check boxes to the left to filter the packages to view in the individual package window. For example, to check which packages are already installed, start the package manager and deactivate all check boxes except .
The package status in the individual package window can be changed as usual. However, the respective package may no longer meet the search criteria. To remove such packages from the list, update the list with .
As mentioned above, a list of individual packages is displayed to the right in the individual package window. The content of this list is determined by the currently selected filter. If, for example, the filter is selected, the individual package window displays all packages of the current selection.
In the package manager, each package has a status that determines what to do with the package, such as “Install” or “Delete”. This status is shown by means of a symbol in a status box at the beginning of the line. Toggle the status by clicking or selecting the desired status from the menu that opens when the item is right-clicked. Depending on the current situation, some of the possible status flags may not be available for selection. For example, a package that has not yet been installed cannot be set to “Delete.” View the available status flags with +.
The package manager offers the following package status flags:
This package is not installed and will not be installed.
This package is not yet installed but will be installed.
This package is already installed and will not be changed.
This package is already installed and will be replaced by the version on the installation medium.
This package is already installed and will be deleted.
This package is not installed and will never be installed. It will be treated as if it does not exist on any of the installation media. If a package would automatically be selected to resolve dependencies, this can be prevented by setting the package to “Taboo.” However, this may result in inconsistencies that must be resolved manually (dependency check). Thus, “Taboo” is mainly intended for expert users.
This package is installed and should not be modified. Third-party packages (packages without SUSE signature) are automatically assigned this status to prevent them from being overwritten by later versions existing on the installation media. This may cause package conflicts that must be resolved manually (for experts).
This package has been automatically selected for installation because it is required by another package (resolution of package dependencies). To deselect such a package, you may need to use the status “Taboo”.
This package is already installed. However, as another package requires a newer version of this package, the installed version will automatically be updated.
This package is already installed, but existing package conflicts require that this package be deleted. For example, this may be the case if the current package has been replaced by a different package.
This package has been automatically selected for installation because it is part of a predefined selection, such as “Multimedia” or “Development.”
This package is already installed, but a newer version exists on the installation media. This package is part of a predefined selection, such as “Multimedia” or “Development,” selected for update and will automatically be updated.
This package is already installed, but a predefined selection (such as “Multimedia” or “Development”) requires this package be deleted. This does not happen very often.
Additionally, you can decide whether to install the sources for a package. This information complements the current package status and cannot be toggled with the mouse or selected directly from the context menu. Instead, a check box at the end of the package line enables selection of the source packages. This option can also be accessed under .
Also install the source code.
The sources will not be installed.
The font color used for various packages in the individual package window provides additional information. Installed packages for which a newer version is available on the installation media are displayed in blue. Installed packages whose version numbers are higher than those on the installation media are displayed in red. However, as the version numbering of packages is not always linear, the information may not be perfect, but should be sufficient to indicate problematic packages. If necessary, check the version numbers in the information window.
The tabs in the bottom right frame provide various information about the selected package. The description of the selected package is automatically active. Click the other tabs to view technical data (package size, group, etc.), the list of other packages on which it depends, or the version information.
During the selection of the software, the resource window at the bottom left displays the prospective usage of all mounted file systems. The colored bar graph grows with every selection. As long as it remains green, there is sufficient space. The bar color slowly changes to red as you approach the limit of disk space. If you select too many packages for installation, an alert is displayed.
The menu bar at the top left of the window provides access to most of the functions described above and contains the following four menus:
Select + to save a list of all installed packages in a text file. This is recommended if you want to replicate a specific installation scope at a later date or on another system. A file generated in this way can be imported with and generates the same package selection as was saved. In both cases, define the location of the file or accept the suggestion.
To exit the package manager without saving changes to the package selection, click . To save your changes, select . In this case, all changes are applied and the program is terminated.
The items in the menu always refer to the package currently selected in the individual package window. Although all status flags are displayed, you can only select those possible for the current package. Use the check boxes to determine whether to install the sources of the package. opens a submenu listing all package status flags. However, these do not merely affect the current package, but all packages in this list.
The menu offers options for handling package dependencies and conflicts. If you manually selected packages for installation, click to view the list of packages that the package manager automatically selected to resolve dependencies. If there are still unresolved package conflicts, an alert is displayed and solutions suggested.
If you set package conflicts to , this information is saved permanently in the system. Otherwise, you would need to set the same packages to each time you start the package manager. To unignore dependencies, click .
+ provides a brief explanation of the package manager functionality. A detailed description of the various package flags is available under . If you prefer to operate programs without using the mouse, click to view a list of shortcuts.
and are located under the information window. If you click , the package manager checks if the current package selection results in any unresolved package dependencies or conflicts. In the event of unresolved dependencies, the required additional packages are selected automatically. For package conflicts, the package manager opens a dialog that shows the conflict and offers various options for solving the problem.
If you activate , any change of a package status triggers an automatic check. This is a useful feature, because the consistency of the package selection is monitored permanently. However, this process consumes resources and can slow down the package manager. For this reason, the autocheck is not activated by default. In either case, a consistency check is performed when you confirm your selection with .
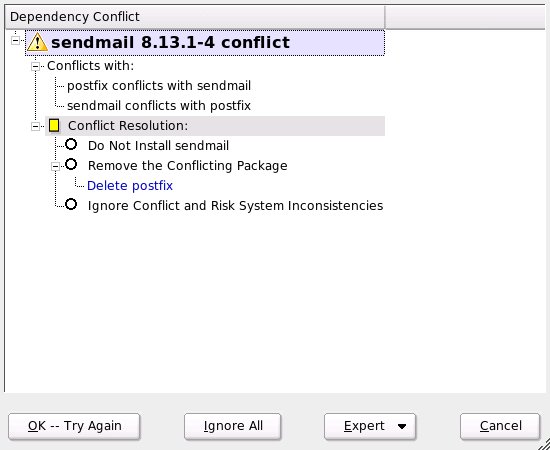
In the following example, sendmail and postfix may not be installed concurrently. Figure 2.5. “Conflict Management of the Package Manager” shows the conflict message prompting you to make a decision. postfix is already installed. Accordingly, you can refrain from installing sendmail, remove postfix, or take the risk and ignore the conflict.
![[Warning]](admon/warning.png) | Handling Package Conflicts |
|---|---|
It is advised to follow the suggestions of YaST when handling package conflicts, because otherwise the stability and functionality of your system could be endangered by the existing conflict. | |
This module enables an update of the version installed on your system. During operation, you can only update application software, not the SUSE LINUX base system. To update the base system, boot the computer from an installation medium, such as CD. When selecting the installation mode in YaST, select instead of .
The procedure for updating the system is similar to a new installation. Initially, YaST examines the system, determines a suitable update strategy, and presents the results in a suggestion dialog. Click the individual items with the mouse to change any details. Some items, such as and , are covered in the section explaining the installation procedure (see 1.3. “Language Selection”). This section only covers update-specific settings.
If several versions of SUSE LINUX are installed on your system, this item enables the selection of a partition for the update from the list.
Set the update method for your system. Two options are available.
To update the entire system to the latest software versions, select one of the predefined selections. These selections are the same as those offered during the installation. They make sure packages that did not exist previously are also installed.
This option merely updates packages that already exist on the system. No new features will be installed.
Additionally, you can use to remove packages that do not exist in the new version. By default, this option is preselected to prevent outdated packages from unnecessarily occupying hard disk space.
Click to start the package manager and select or deselect individual packages for update. Any package conflicts should be resolved with the consistency check. The use of the package manager is covered in detail in 2.3.3. “Installing and Removing Software”.
During the update, the configuration files of some packages may be replaced by those of the new version. As you may have modified some of the files in your current system, the package manager normally makes backup copies of the replaced files. With this dialog, determine the scope of these backups.
![[Important]](admon/important.png) | Scope of the Backup |
|---|---|
This backup does not include the software. It only contains configuration files. | |
The system update is a very complex procedure. For each program package, YaST must first check which version is installed on the computer then determine what needs to be done to replace the old version with the new version correctly. YaST also tries to adopt any personal settings of the installed packages. Some configurations may cause problems because the old configuration is unable to handle the new program version as expected or because unexpected inconsistencies arise between various configurations.
The older the existing version is and the more the configuration of the packages to update diverges from the standard, the more problematic the update will be. Sometimes, the old configuration cannot be adopted correctly. In this case, an entirely new configuration must be made. Before starting the update, the existing configuration should be saved.