| Network Services | ||
|---|---|---|
 | Chapter 3. YaST — Configuration |  |
| Network Devices | Security and Users | |
| Network Services | ||
|---|---|---|
| | Chapter 3. YaST — Configuration | |
| Network Devices | Security and Users | |
This group mostly contains tools for professionals and for the system administrator. If you have SuSE Linux Personal Edition, some of the tools covered in this section are not available, as they are only installed in the Professional Edition.
The tools , , , , and are not addressed here, as these are genuine expert tools that are usually only used in company networks. More information about these modules is provided in the Administrationshandbuch.
The host name and the domain name can be changed here. If the provider has been configured correctly for DSL, modem, or ISDN access, the list of name servers contains entries made automatically, as they were extracted from the provider data. If you are located in a local network you might receive your host name via DHCP, in which case you should not modify the name.
You need these two tools only if you are located in a network. In this case, you have the possibility to operate a file server that can be accessed by members of your network. On this file server, you can make programs, files, or storage space available for users. Use the module to set up your computer as an NFS server and to determine the directories to export for use by the network users. The NFS server should be set up by an expert. To configure an NFS server, refer to the brief instructions in the Administrationshandbuch under Linux in the Network: NFS.
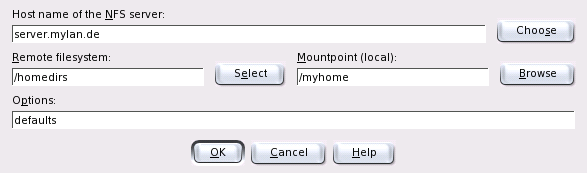
Subsequently, any user (with the needed permissions) can mount these directories in his own file tree. The easiest way to do this is by means of the module in which the user merely needs to enter the host name of the computer acting as NFS server and the mount point on his computer. To do this, select in the first dialog and enter the needed data. See Figure 3.22: “Configuration of NFS Clients”).
Set up a Samba server to share resources such as files or printers with Windows hosts. In the first dialog, define the role of the Samba server. You can deactivate it, use it as file and print server, or use it as backup or primary domain controller. A file and print server makes directories and printers available. A domain controller enables its clients to log in to a Windows domain. The primary domain controller manages users and passwords. A backup domain controller uses another domain controller for authenticating the users. More information about Samba is available in the Administrationshandbuch.
After determining the use, enter the Windows domain or workgroup. Use to display all existing domains and workgroups. Under , enter a text to display to all clients. Use to enter an advanced configuration dialog in which to set the user authentication mode. If you activate , all users and their passwords are saved in the file smbpasswd. If you opt for LDAP, the user information is stored on an LDAP server. Specify the LDAP server by entering the server name, Base DN, and Administration DN. Detailed information about LDAP is available in the Administrationshandbuch. Test the LDAP connection with the respective button. Enter the LDAP administration password when required to do so.
Complete all settings and click . In the following dialog, define the resources. If you activate , the home directories of the users appear as Windows shares on the clients. If you activate , you can use to share individual printers.
Configure a Samba client to access resources (files or printers) on the Samba server. In the dialog, enter the domain or workgroup. Use to display all available groups and domains and select one of them with a mouse click. If you activate , user authentication is conducted via the Samba server. After specifying all settings, click to complete the configuration.
NTP (Network Time Protocol) is a protocol for synchronizing the clocks of network hosts. In the respective YaST module, select a type with . Several options are then displayed. Server and Radio clock are the most frequently-used options. Radio clock requires special hardware.
If you select Server, enter the address of an NTP server when prompted. Normally, your system administrator does this for you. However, you can also enter one of the public NTP servers listed at http://www.eecis.udel.edu/~mills/ntp/servers.html. Confirm with .
To start the NTP daemon when the system is booted, select When booting system. Save your settings with .
Consult the Administrationshandbuch for more information.
This tool is only needed if you are located in a local network or are connected to the Internet by way of a network card, as is the case with DSL. As indicated in Section “DSL”, for DSL the gateway data is only needed to configure the network card correctly. However, the entries are dummies that do not have any function. The value is important only if you are located in a local network and use your own computer as gateway (the gateway to the Internet).
This configuration module allows you to adapt your mail settings if you send your e-mail with sendmail, postfix, or the SMTP server of your provider. You can fetch mail via SMTP or the fetchmail program, for which you can also enter the details of the POP3 server or IMAP server of your provider.
You can also use a mail program of your choice, such as KMail (see Section Chapter 15, KMail — The KDE Mail Application) or Evolution, to set your POP and SMTP access data as usual (to receive mail with POP3 and send mail with SMTP). In this case, you do not need this module.
If you want to specify your mail settings with YaST, specify the desired type of connection to the Internet in the first dialog of the e-mail configuration module. Choose one of the following options:
Select this option if you have a dedicated line to the Internet. Your machine will be online permanently, so no dial-up is required. If your system is part of a local network with a central e-mail server, select this option to ensure permanent access to your e-mail messages.
This item is relevant for all users who have a computer at home, are not located in a network, and establish dial-up connections with the Internet occasionally via modem, DSL, or ISDN.
If you do not have access to the Internet and are not located in a network, you cannot send or receive e-mail.
Furthermore, you can activate virus scanning for your incoming and outgoing e-mail with AMaViS by activating the respective check box. The package is installed automatically as soon as you activate the mail filtering feature. In the following dialogs, specify the outgoing mail server (usually the SMTP server of your provider) and the parameters for incoming mail. If you use a dial-up connection, you can specify diverse POP or IMAP servers for mail reception by various users. By means of this dialog, you can also assign aliases, use masquerading, or set up virtual domains. Click to exit the mail configuration.
This tool allows you to determine which network services (such as telnet, finger, talk, and ftp) should start when SuSE Linux boots. These services enable external hosts to connect to your computer. You can also configure various parameters for each service. By default, the master service that manages the individual services (inetd or xinetd) is not started.
When this module starts, choose which of the two services to configure. The selected daemon can be started with a standard selection of network services. If desired, , , or services to compose your own selection of services.
This is an expert tool. Only make modifications if you are familiar with network services.
| |  | |
| Network Devices |  | Security and Users |