| Hard Disk Recording with Audacity | ||
|---|---|---|
 | Chapter 18. Sound in Linux |  |
| The JACK Audio Connection Kit | Direct Recording and Playback of WAV Files | |
| Hard Disk Recording with Audacity | ||
|---|---|---|
| | Chapter 18. Sound in Linux | |
| The JACK Audio Connection Kit | Direct Recording and Playback of WAV Files | |
With audacity (audacity), record and edit audio files. This is called hard disk recording. When you start the program for the first time, selection a language. At other times, change the language setting under -> -> . The language change it then effective the next time you start the program.
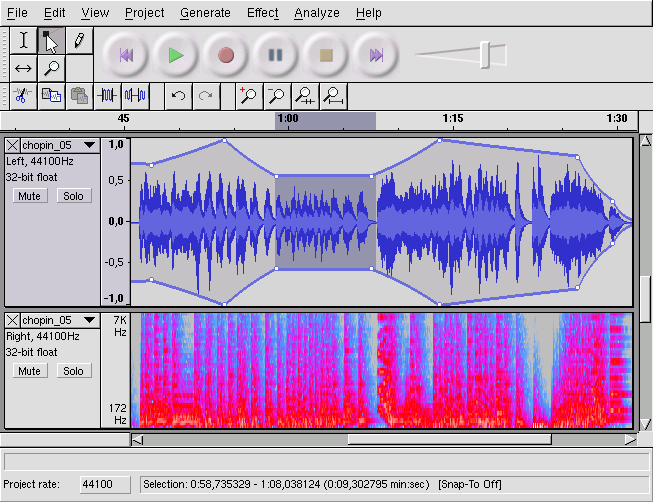
Click the red recording button to generate an empty stereo track and start the recording. To change the standard parameters, specify the settings under -> . The items and are important for the recording. Even if tracks already exist, pressing the recording button creates new tracks. Initially, this may be confusing, as these tracks cannot be seen in the standard-size program window.
To import audio files, select -> . The program supports the WAV format as well as the compressed MP3 and Ogg Vorbis formats. See Section “Compressing Audio Data” for more information about these formats.
The menu can be opened to the left of each track and offers various views. One of them is , which is not suitable for checking the signal tuning, as in this view the data is always adjusted to the maximum amplitude of the track.
Depending on the application, various view formats for segment selections are offered under . With , the segment boundaries can automatically be adapted to the selected view format. For example, if you select as view format and activate , the segment boundaries will always be selected in multiples of frames.
The many editing tools are all equipped with tool tips and should therefore be quite easy to use. , which can be accessed with -> , is a useful feature for viewing recent editing steps and undoing them by clicking the respective item in the list. Use with caution, because it deletes editing steps from the list. Subsequently, these steps can no longer be undone.
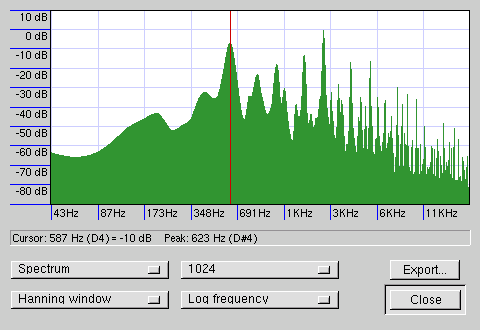
The built-in spectrum analyzer assists in quickly tracking down any noises. View the spectrum of the selected segment with -> . Select a logarithmic frequency scale in octaves with . If you move the mouse pointer within the spectrum, the frequencies of the peaks are automatically displayed together with the respective notes.
Unwanted frequencies are best removed with -> . In connection with the filtering process, it may be necessary to readjust the signal amplitude with . Additionally, can be used to check the amplitude. By default, the is set to 0.0 dB. This value represents the highest possible amplitude in the selected audio format. shows the value needed to amplify the selected segment to this peak amplitude. A negative value indicates overamplification.
To save the entire project, select -> or . This generates an XML file with the extension .aup, which describes the project. The actual audio data is saved in a directory named after the project with _data appended.
The entire project or the currently selected segment can also be exported as a stereo WAV file. To export the project in MP3 format, refer to the information in Section “Compressing Audio Data”.
| |  | |
| The JACK Audio Connection Kit |  | Direct Recording and Playback of WAV Files |